Blog Post

Ian Baker • May 14, 2020

Case Study: How to soundproof a wall against noisy neighbours

ReductoClip™ Direct To Wall System Case Study for the effective soundproofing of walls against noisy neighbours

ReductoClip Wall soundproofing solution

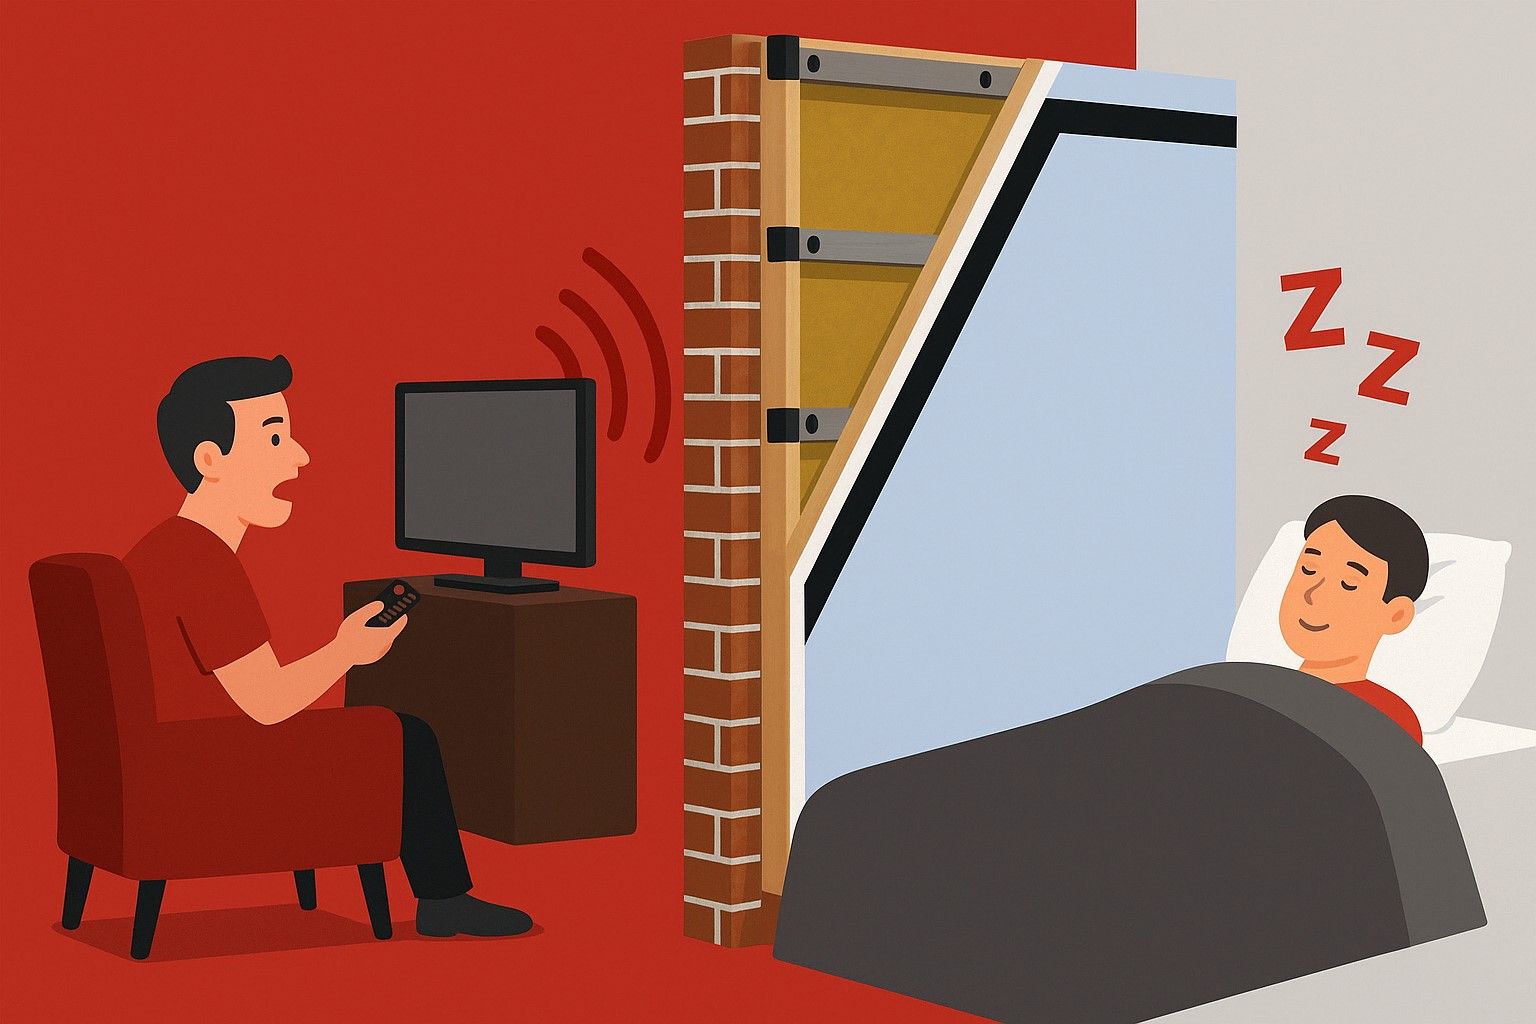
The Soundproofing Store speaks to many customers a day who are looking at how to soundproof an existing wall with the aim of reducing the noise from noisy neighbours.  This wall soundproofing case study focuses on just that. 

The Noisy Neighbour Issue

Discussing a noisy neighbour issue

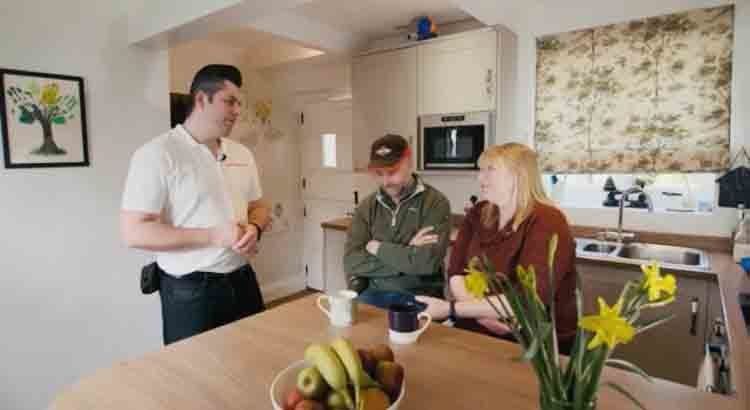
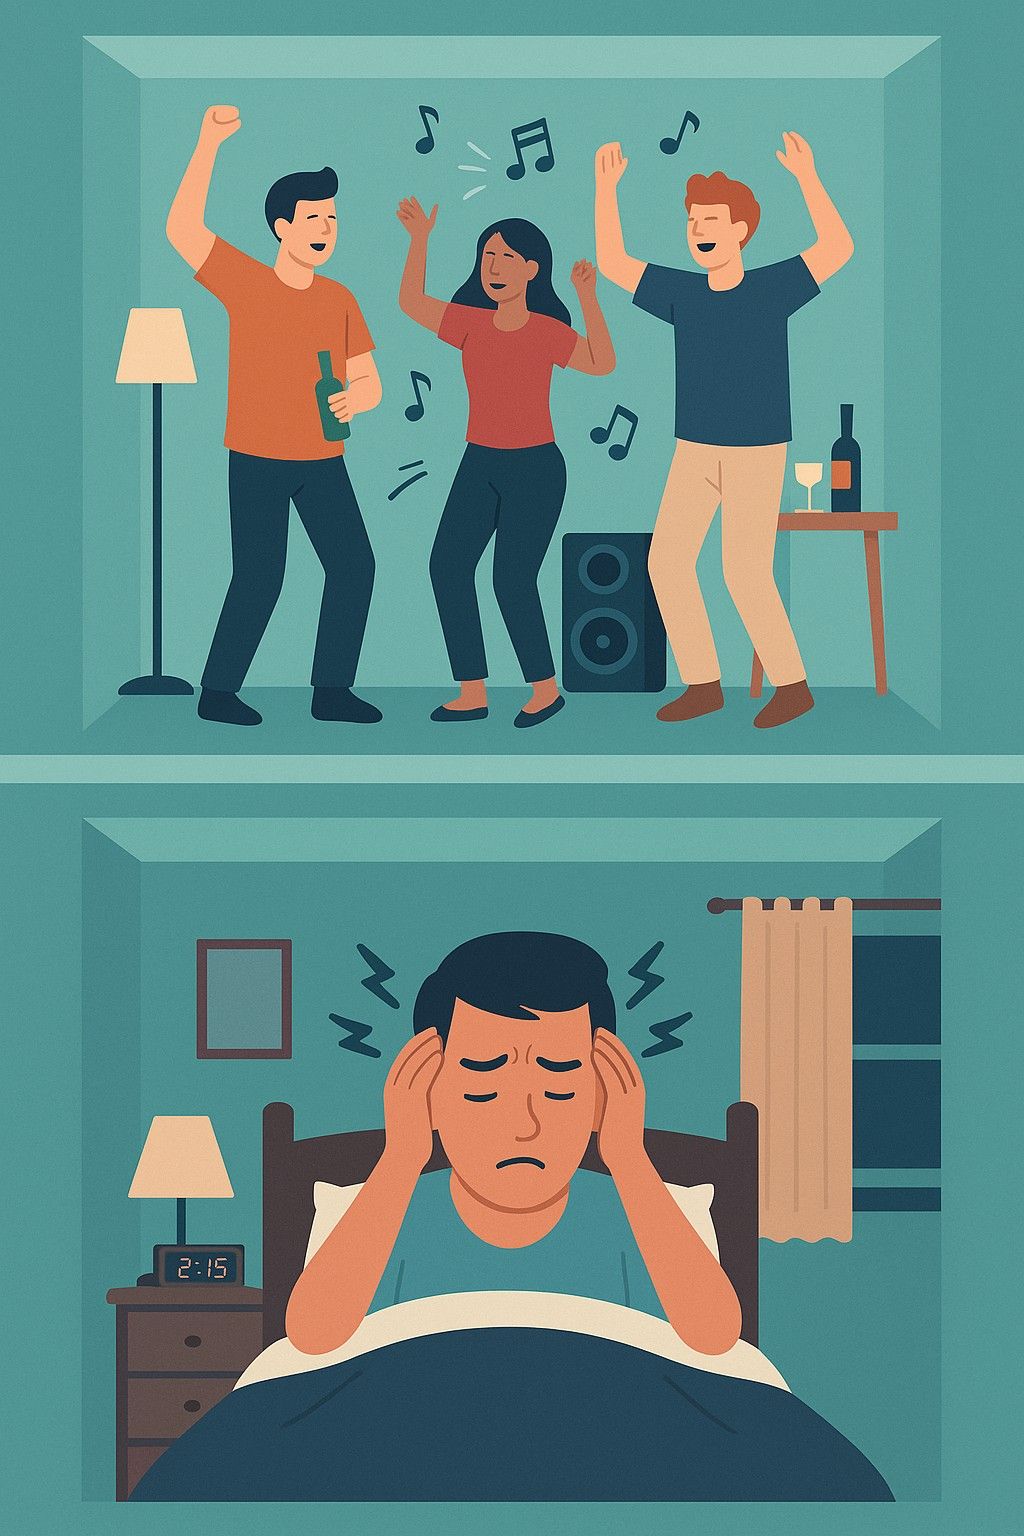
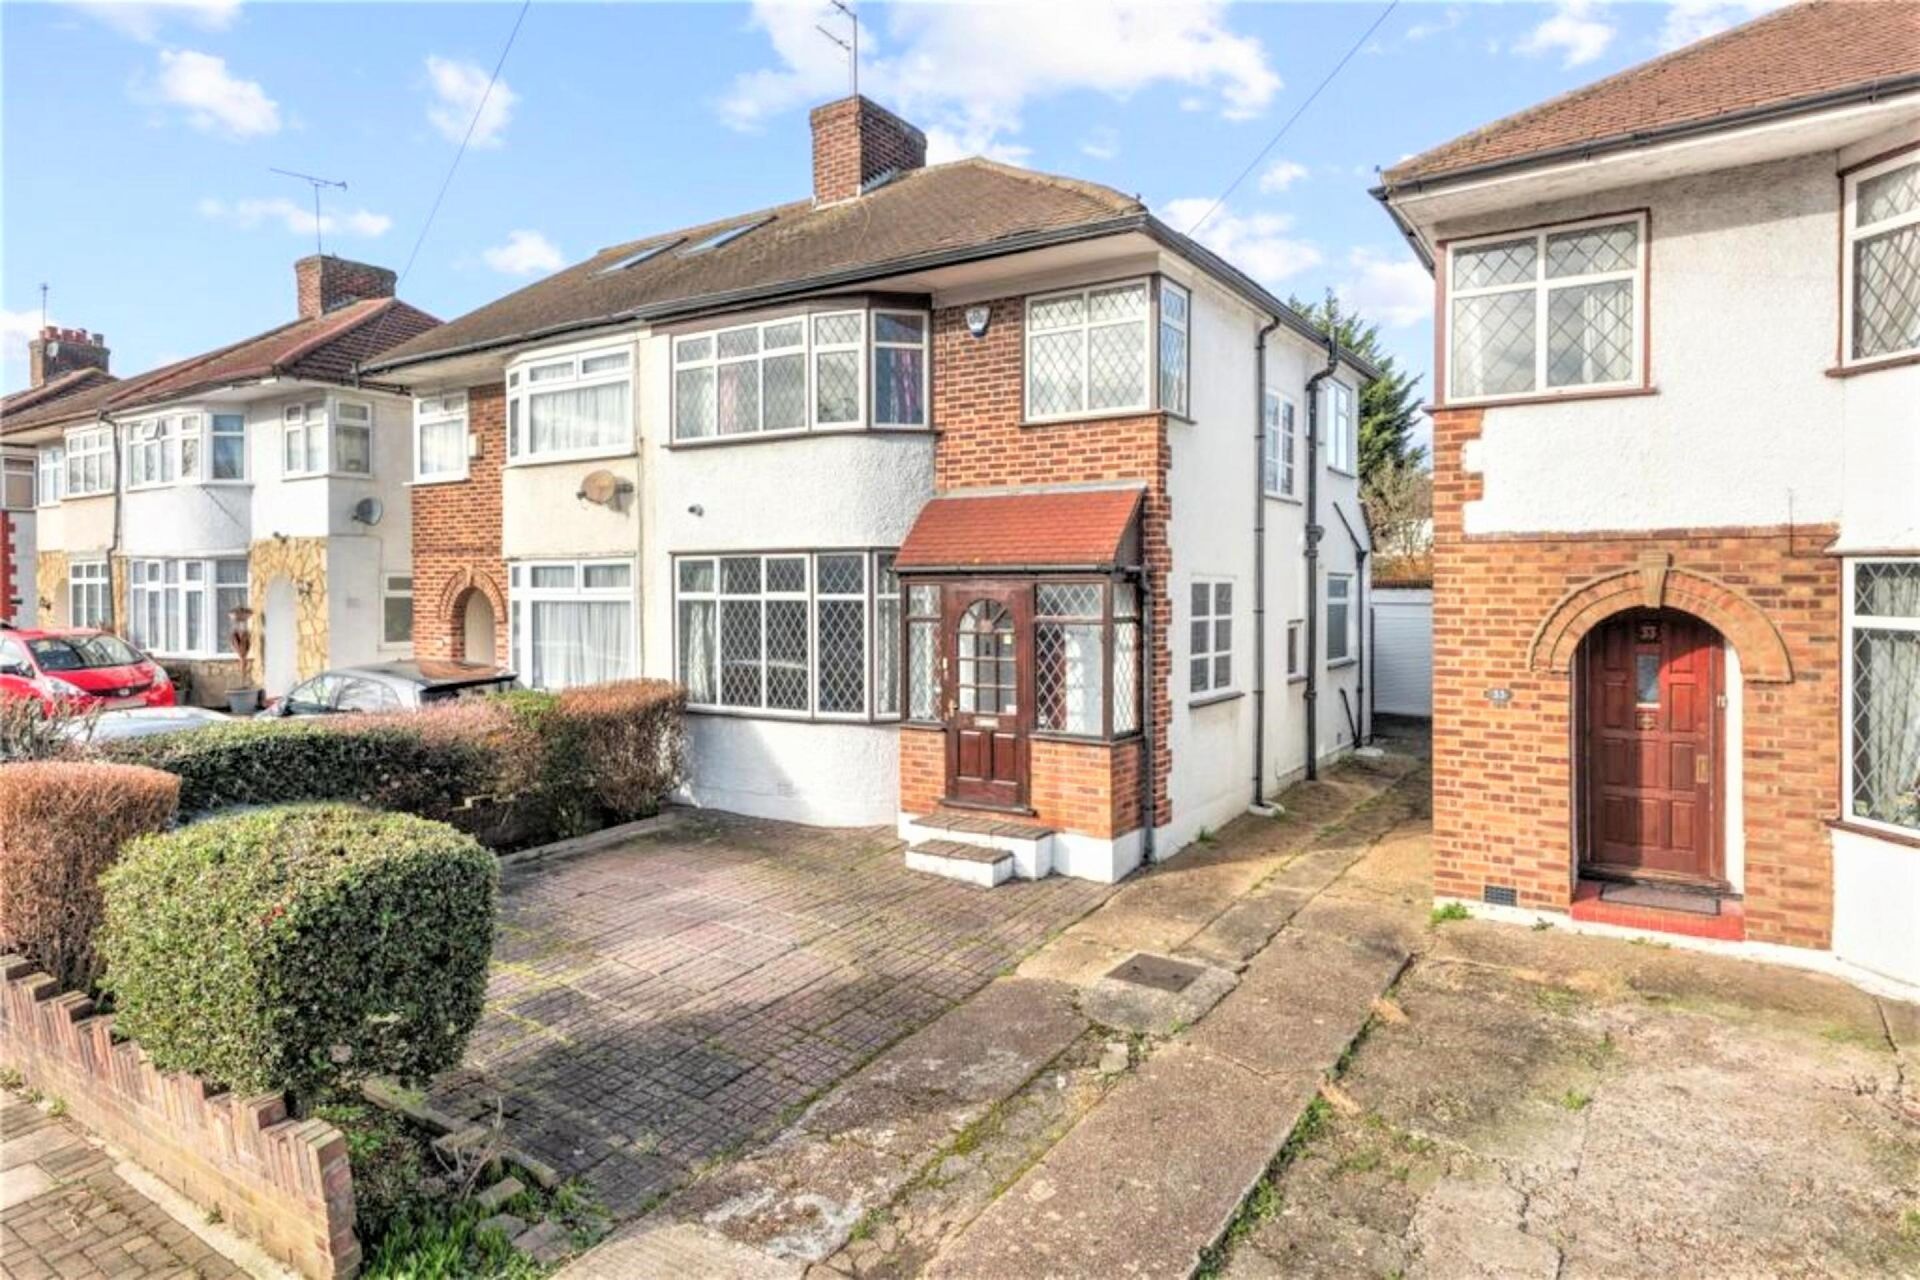
Mr and Mrs Billanie live in a 3-bedroom 1950’s semi-detached house and although they have a great relationship with their neighbours (we know not everyone is this fortunate) they were hearing a lot of airborne noise from next door. Anything and everything from the TV, talking and sometimes raised voices and shouting and occasionally dogs barking. Both Mr and Mrs Billanie and their neighbours also had young children in their homes and there was often the noise from the children, which is obviously expected within any family home. 


As well as airborne noise, there was no carpet in their neighbour’s lounge, which meant they often heard the impact noise of footsteps on the floor. Mr and Mrs Ballanie wanted to soundproof the party wall of their lounge, which is where most of the noise from their neighbours was being experienced. Their lounge is directly opposite that of their noisy neighbours lounge. 

Before soundproofing an existing wall, the following questions needed to be answered:


  • The type of wall, is it a stud wall or a solid wall? - in this case it was a solid brick wall
  • What is the type of noise being heard? Airborne (e.g. TV noise, conversation) or Impact noise (footsteps, doors banging) or is it a combination of both? - a combination of both
  • How loud is the noise on their side of the wall? - sometimes loud levels, being able to distinctly hear clear words and conversations
  • Is there a chimney on the wall? - yes, with a log burner 
  • If so, if you do an ear test to the chimney when hearing the noise, can you hear it coming through the chimney breast? - yes, muffled airborne noise could be heard


Does soundproofing a wall work both ways?

Mr and Mrs Billanie also asked if they soundproof their wall, would their neighbours also hear less noise from them? They were conscious that if they could hear their noisy neighbours, then they could also hear them. Not only did they want to soundproof their party wall to reduce unwanted noise from next door, but they were pleased to learn that the wall soundproofing would also give them more privacy within their own home, by reducing the noise next door were hearing from them too. 

How does soundproofing a wall work?

There are two parts to address when soundproofing a wall against noisy neighbours:
 
  1. Airborne sound which is the sound wave (when a sound is created it travels through the air as a sound wave). This is blocked by mass, basically weight, so the heavier and denser a material is, the more sound it blocks.
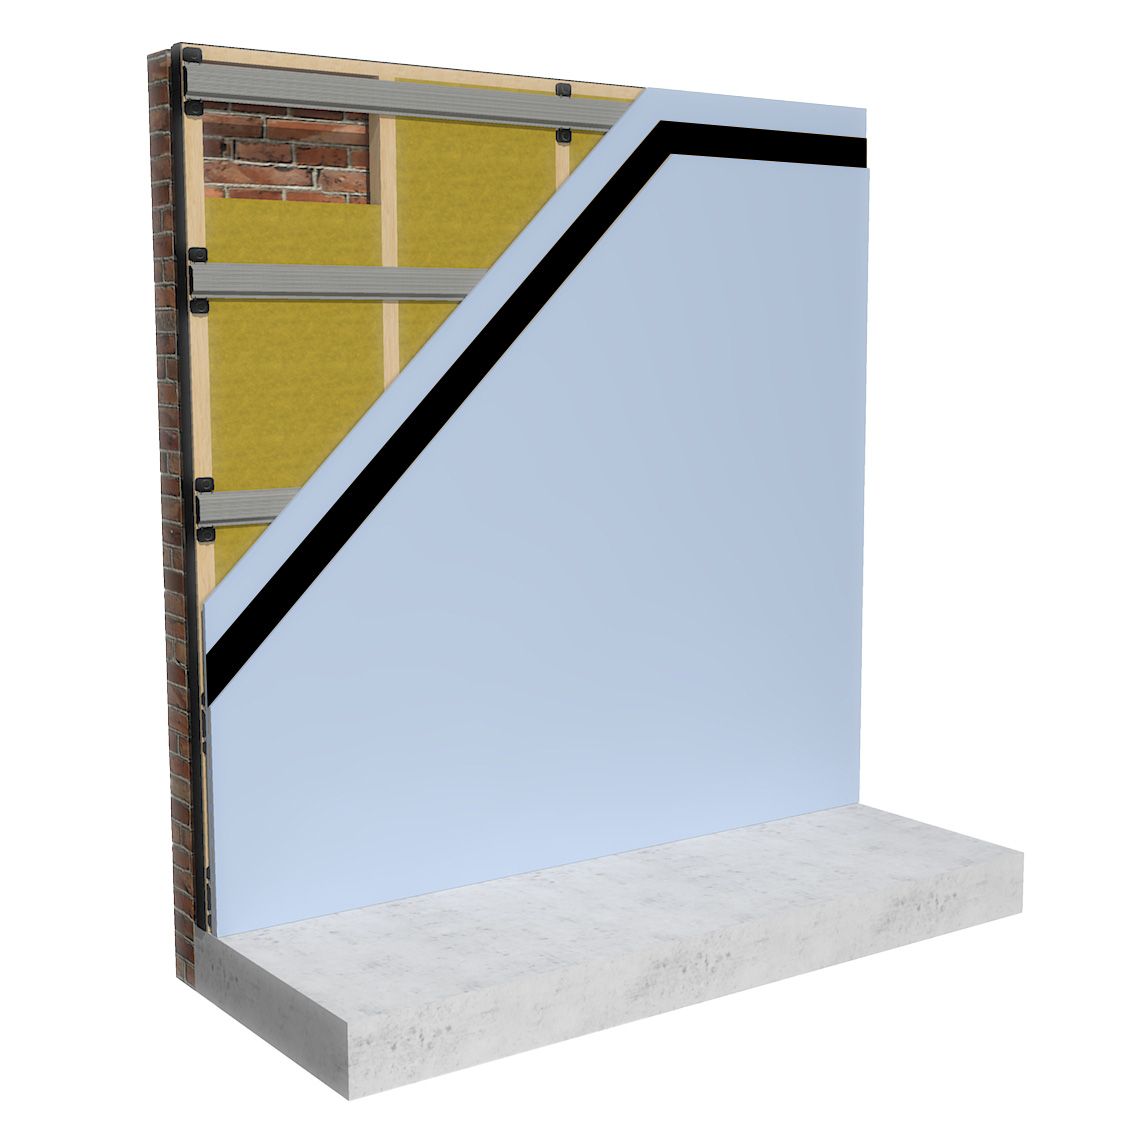
  2. Sound is an energy and a vibration, and both parts need to be treated to achieve the best result. This is the tricky part, because as soon as sound hits a wall the vibration travels through any solid, dense material. This energy and vibration needs to be absorbed. We will come onto the system used within this case study and why it was used, however it's worth mentioning early on, that this was achieved by installing dense material onto the ReductoClip™ Direct to Wall System. The ReductoClips make the wall flexible, meaning when the soundwave hits it, the wall can ride out that energy vibration. Like the suspension in a car.
The combination of the mass and the resilience and ability to absorb vibration is how to achieve the highest performing wall soundproofing solution against noisy neighbours.

What is the best wall soundproofing solution?

The technical team at The Soundproofing Store always prefer to speak to customers to gather more information about their noise problem before talking through the best wall soundproofing solution for their individual needs.

After speaking to Mrs and Mrs Billanie, there were three wall soundproofing systems which we spoke to them about in more detail:


The below shows an overview of each system:
Level of noise the solution works for Sound reduction in dB Thickness / space loss from original wall How the system is attached to the wall
ReductoClip™ Independent Wall System Loud levels, can be used in recording studios 65dB 120mm Requires an independent stud frame
ReductoClip™ Direct To Wall System Medium to loud levels of noise 55dB 60mm Applied directly to the wall
SoundBoard 4™ System Medium levels of noise 52dB 30mm Applied directly to the wall
Mr and Mrs Billanie didn’t want to lose the 120mm from their alcoves that the ReductoClip Independent Stud Wall System requires. Although, it is worth noting that this ReductoClip Independent System still delivers the lowest amount of space loss at 120mm than any other independent wall soundproofing system on the market. Their decision not to want to lose this space is understandable, as many domestic customers are conscious about only wanting to lose the minimal amount of space within their home. 

Because of the level of noise Mr and Mrs Billanie were experiencing from their noisy neighbours, the advice from The Soundproofing Store was to therefore go with the ReductoClip Direct To Wall System. Which provided a greater performing system against loud levels of noise than that of the SoundBoard4™,  whilst having no need to build a stud frame, meaning the space loss from their alcoves would only be 60mm.

Benefits of the ReductoClip™ Direct to Wall System

The ReductoClip™ Direct to Wall System is an innovative soundproofing solution, designed to completely isolate walls. Reducing the transference of sound vibration energy, whilst also blocking airborne noise.
  • Delivering the highest level of soundproofing with minimal loss of space within the home (13mm - 17mm thinner than all other clip systems)
  • Creates a room within a room, de-coupled from the existing structure - offering a high level of soundproofing
  • Outstanding performance against noisy neighbours - bringing peace and quiet to the home
  • The perfect solution for soundproofing against medium to loud levels of noise such as clear conversation, TV noise and music - as was being experienced by Mr and Mrs Billanie
  • Suitable for use on a solid or stud wall
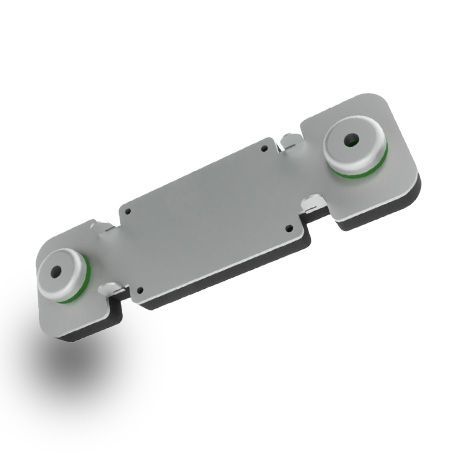
  • Dual rubber design, meaning the ReductoClip is able to absorb different sound frequencies - achieving a higher wall soundproofing performance than other clips that feature just one layer of rubber
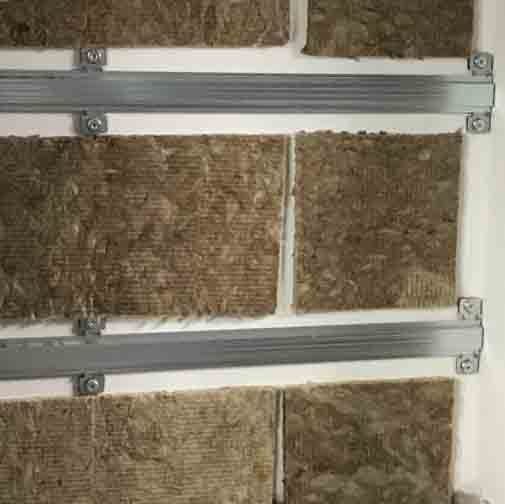
  • Wider furring bars for easier plasterboard fixing - wider bars mean a larger surface area on which to attach the acoustic plasterboard, meaning an easier installation process
  • Indents within the furring bars have a central and middle groove, which makes finding the midpoint on the furring bars far easier to work with when butting together the acoustic plasterboard
  • Outperforms resilient bars by up to 7dB -  a much higher performing system
  • Exceeds Part E Building Regulations (not relevant to this particular case study)
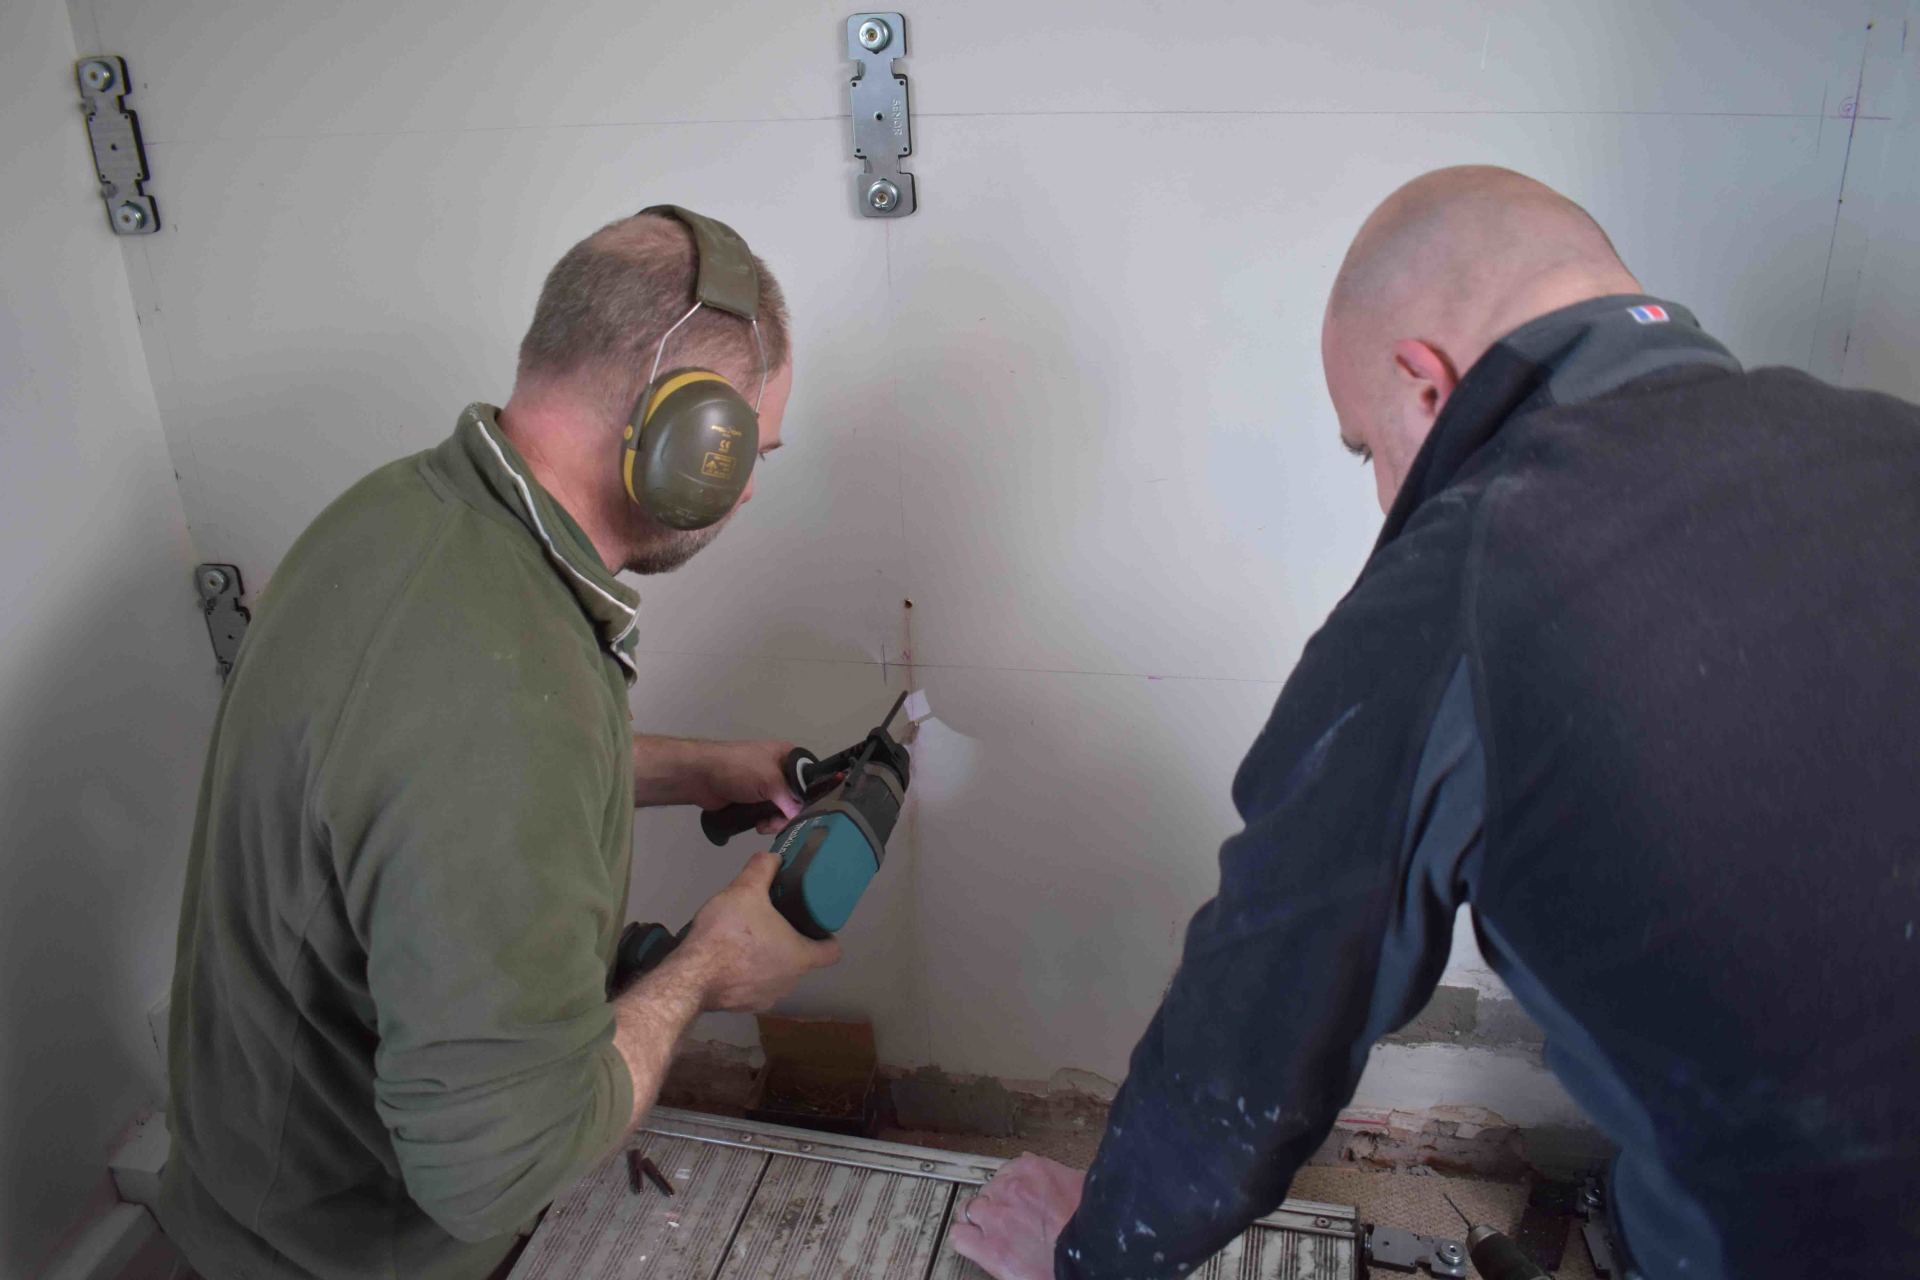
  • DIY install - can be installed by a competent DIYer or tradesperon - Mr Billanie did the whole installation himself with the help of a friend

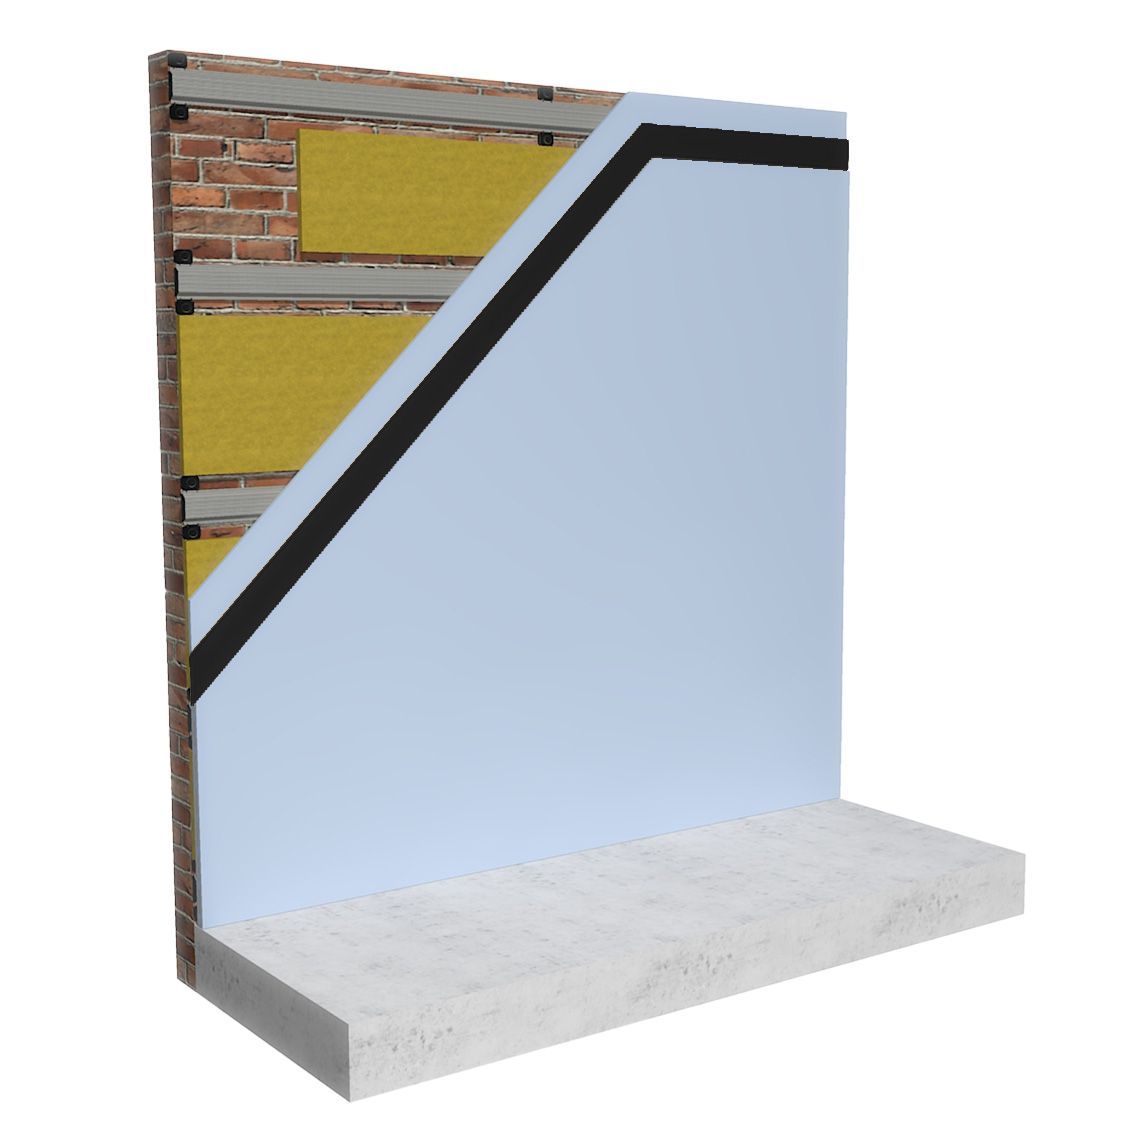
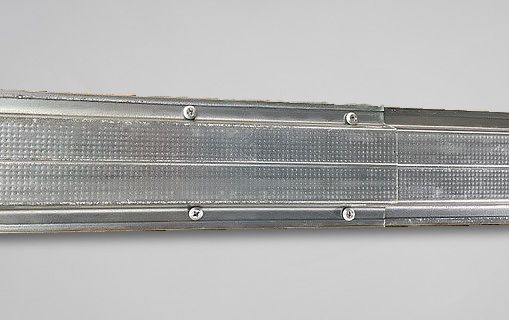
ReductoClip™ Wall Soundproofing Product Overview

What about soundproofing the chimney breast?

There was a chimney breast in the lounge of the wall in question, but it was only the alcoves that were going to be soundproofed. This is because:
  • In most cases the chimney breast doesn’t need the same level of soundproofing as the alcoves or wall 
  • Soundproofing is all about adding mass and chimney breasts are normally constructed from a double layer of fire bricks
  • Fire bricks are far heavier and more dense than the standard bricks (usually) used in the alcoves
  • There is often a small air gap behind and the same double layer of fire bricks on the neighbour’s side and this naturally makes the chimney more soundproof than the alcoves
However, there are exceptions, e.g. if the neighbour has removed the chimney on their side of the wall. This was the case with this room in question, with a log burner on Mrs and Mrs Billanie’s side and a removed chimney on their neighbours’ side. In this instance a simple ear to the chimney breast served enough to show that some sound was being heard through the chimney breast. The advice would be to soundproof the external chimney breast with soundboard 4. There is also the option to soundproof behind the log burner and then attach a fire-retardant board behind the fire. In this instance the fire was too close to the backwall to do this. Which meant the ReductoClip direct to wall system was fitted on the alcoves only and the chimney breast remained as it was.

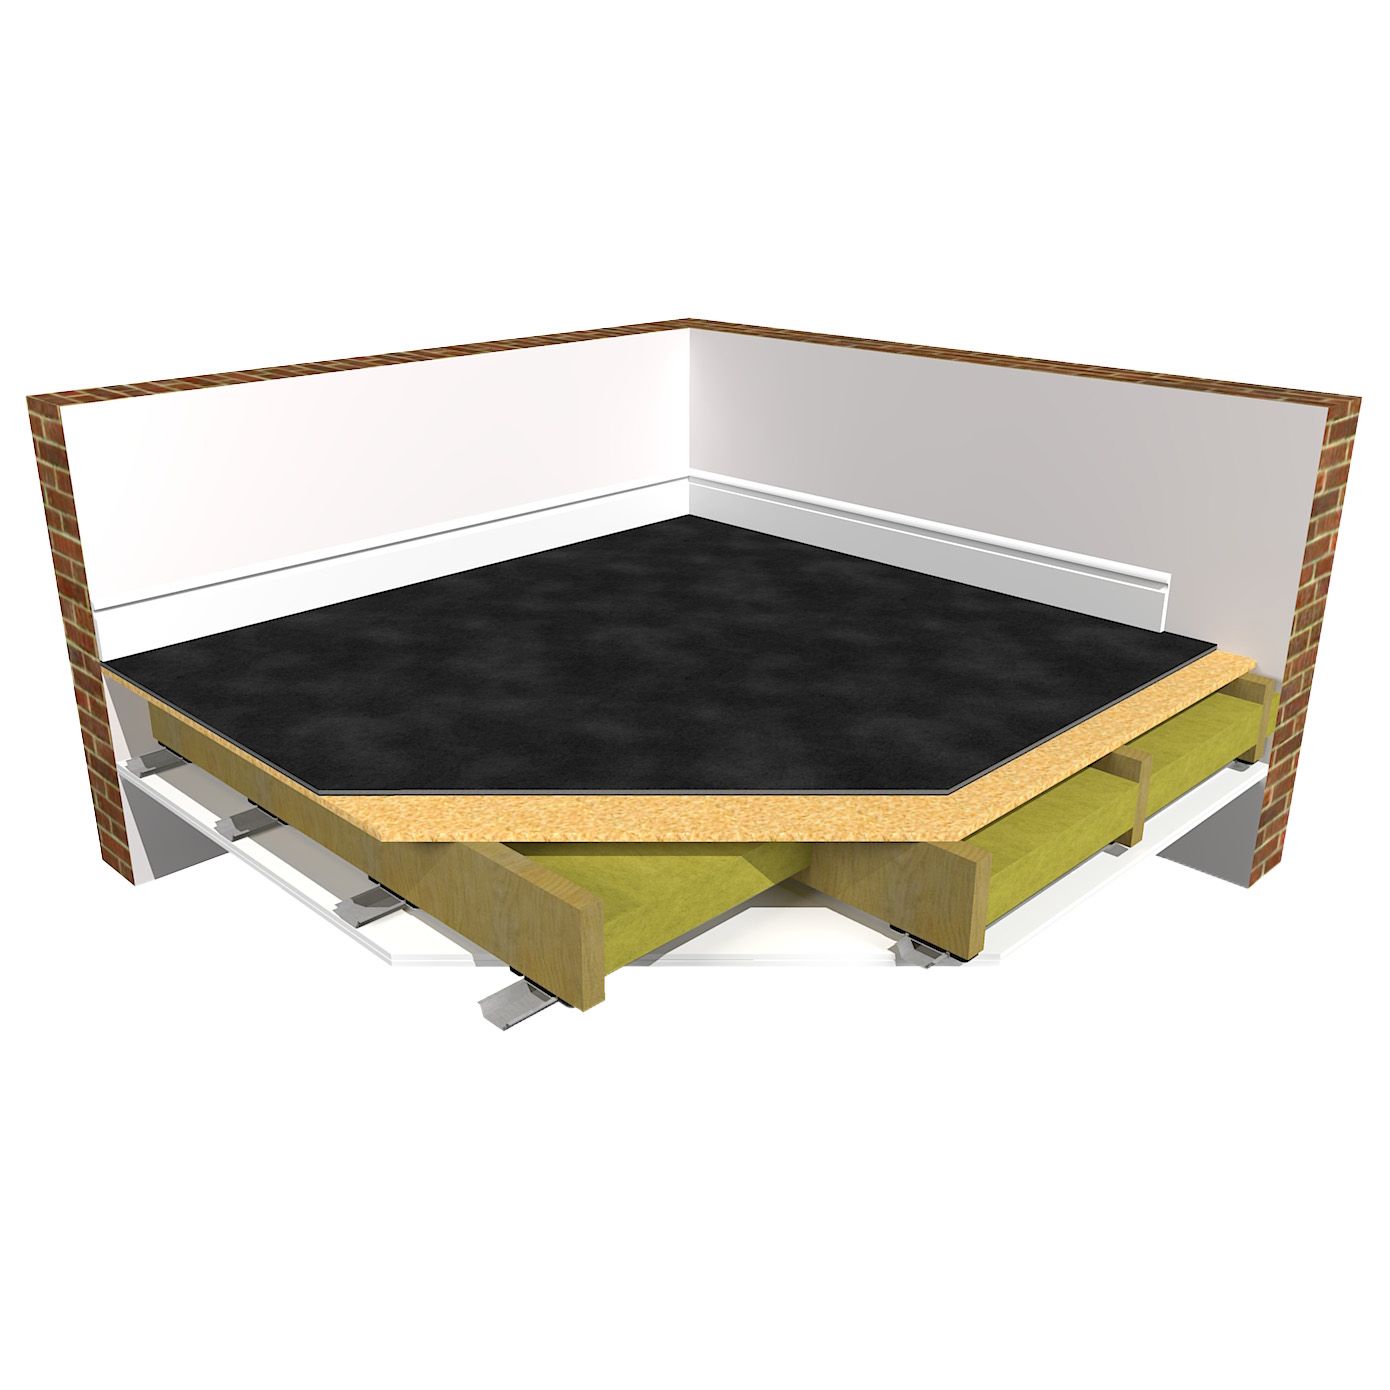
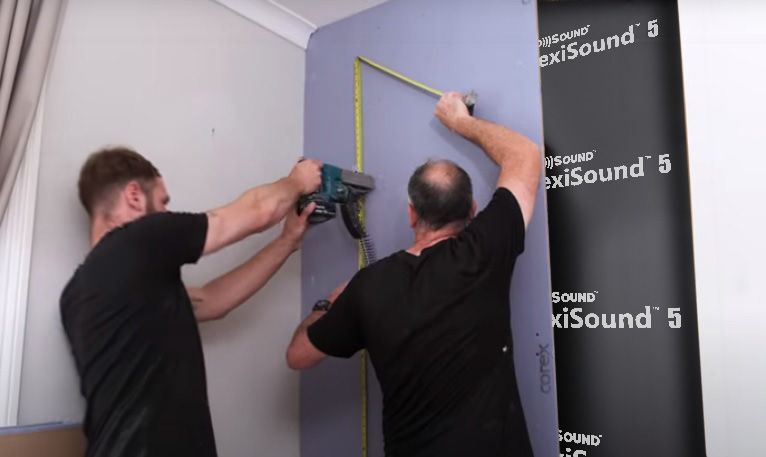
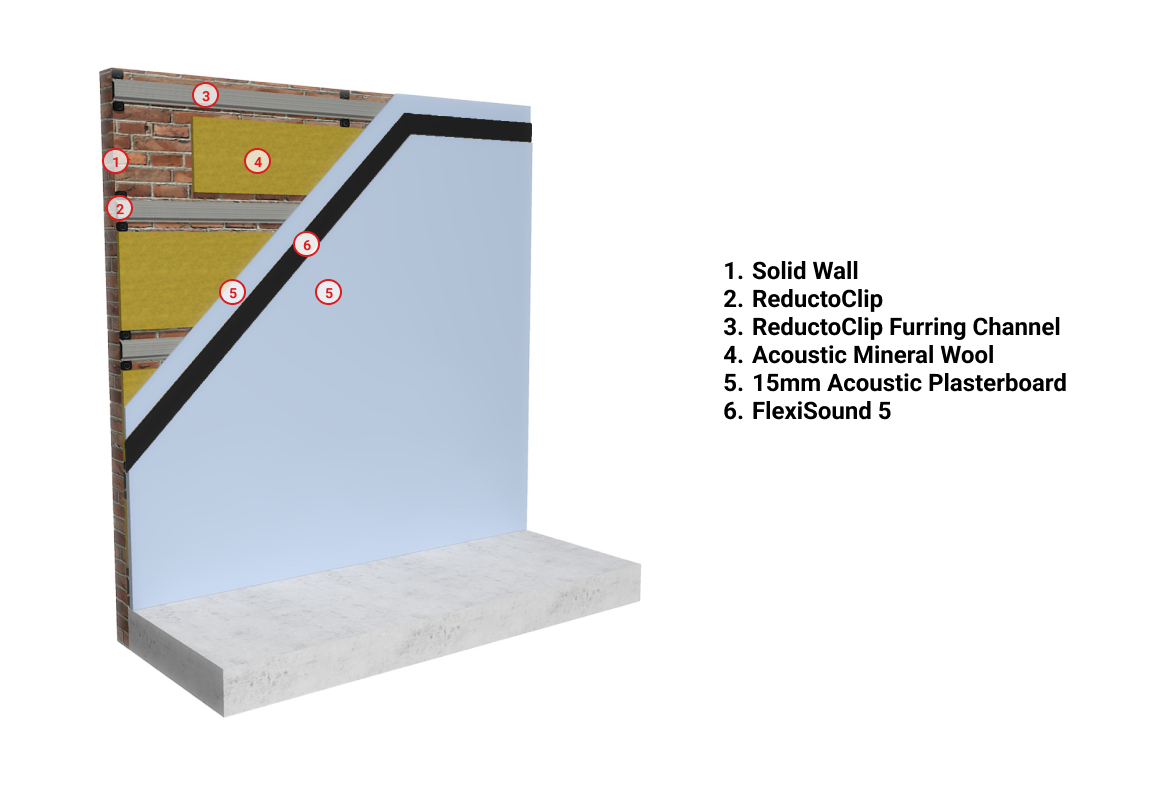
Installing the ReductoClip™ Direct To Wall Solution     

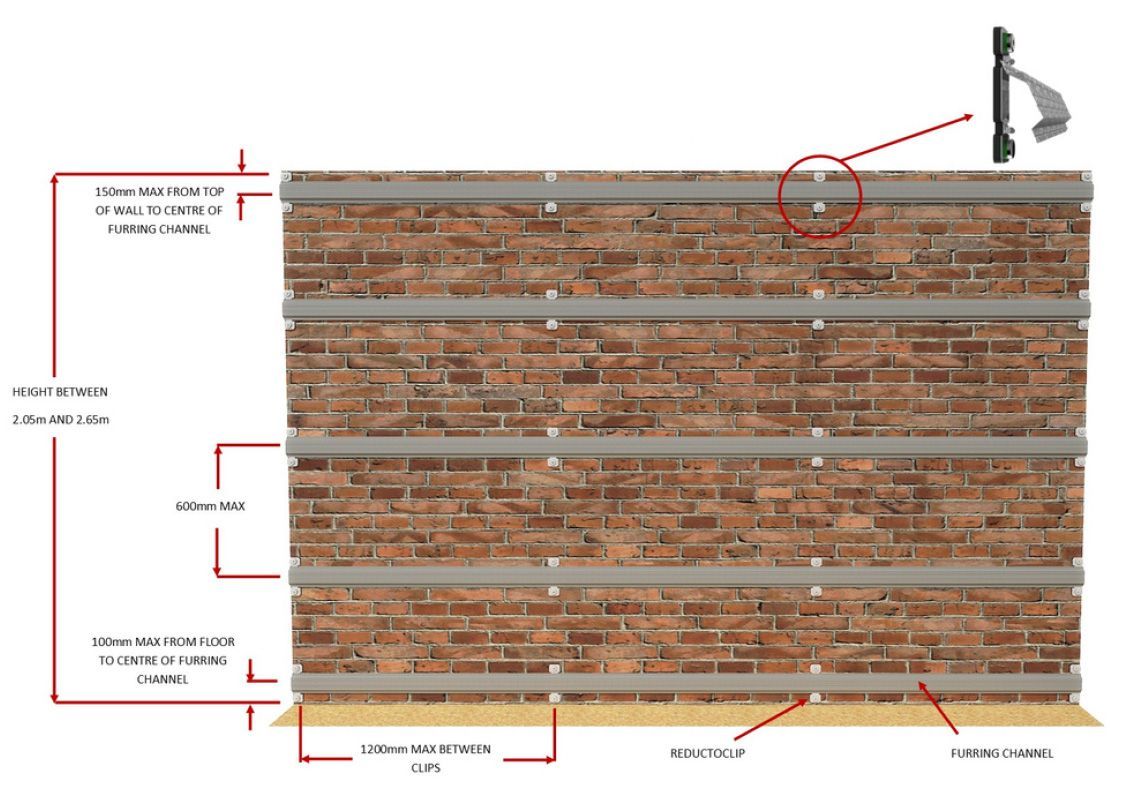
Marking out the position of the ReductoClip™ and Furring Bars 

Measuring and attaching ReductoClips™
1. Firstly, Mr Billanie marked out on the wall the position of the ReductoClips and fixed the ReductoClips to the wall:

• Maximum space between clips 1200mm (every two vertical battens on a 600mm centre frame)
• Maximum space between furring bars (vertical clip positions) 600mm
• Top row of clips should be a maximum of 150mm away from the ceiling (centre of furring bar)
• Bottom row of clips should be a maximum of 100mm from the floor (centre of furring bar)

ReductoClip™ Direct To Wall Positioning Diagram

Attaching the Furring Bars

Attaching Furring Bars to ReductoClips™
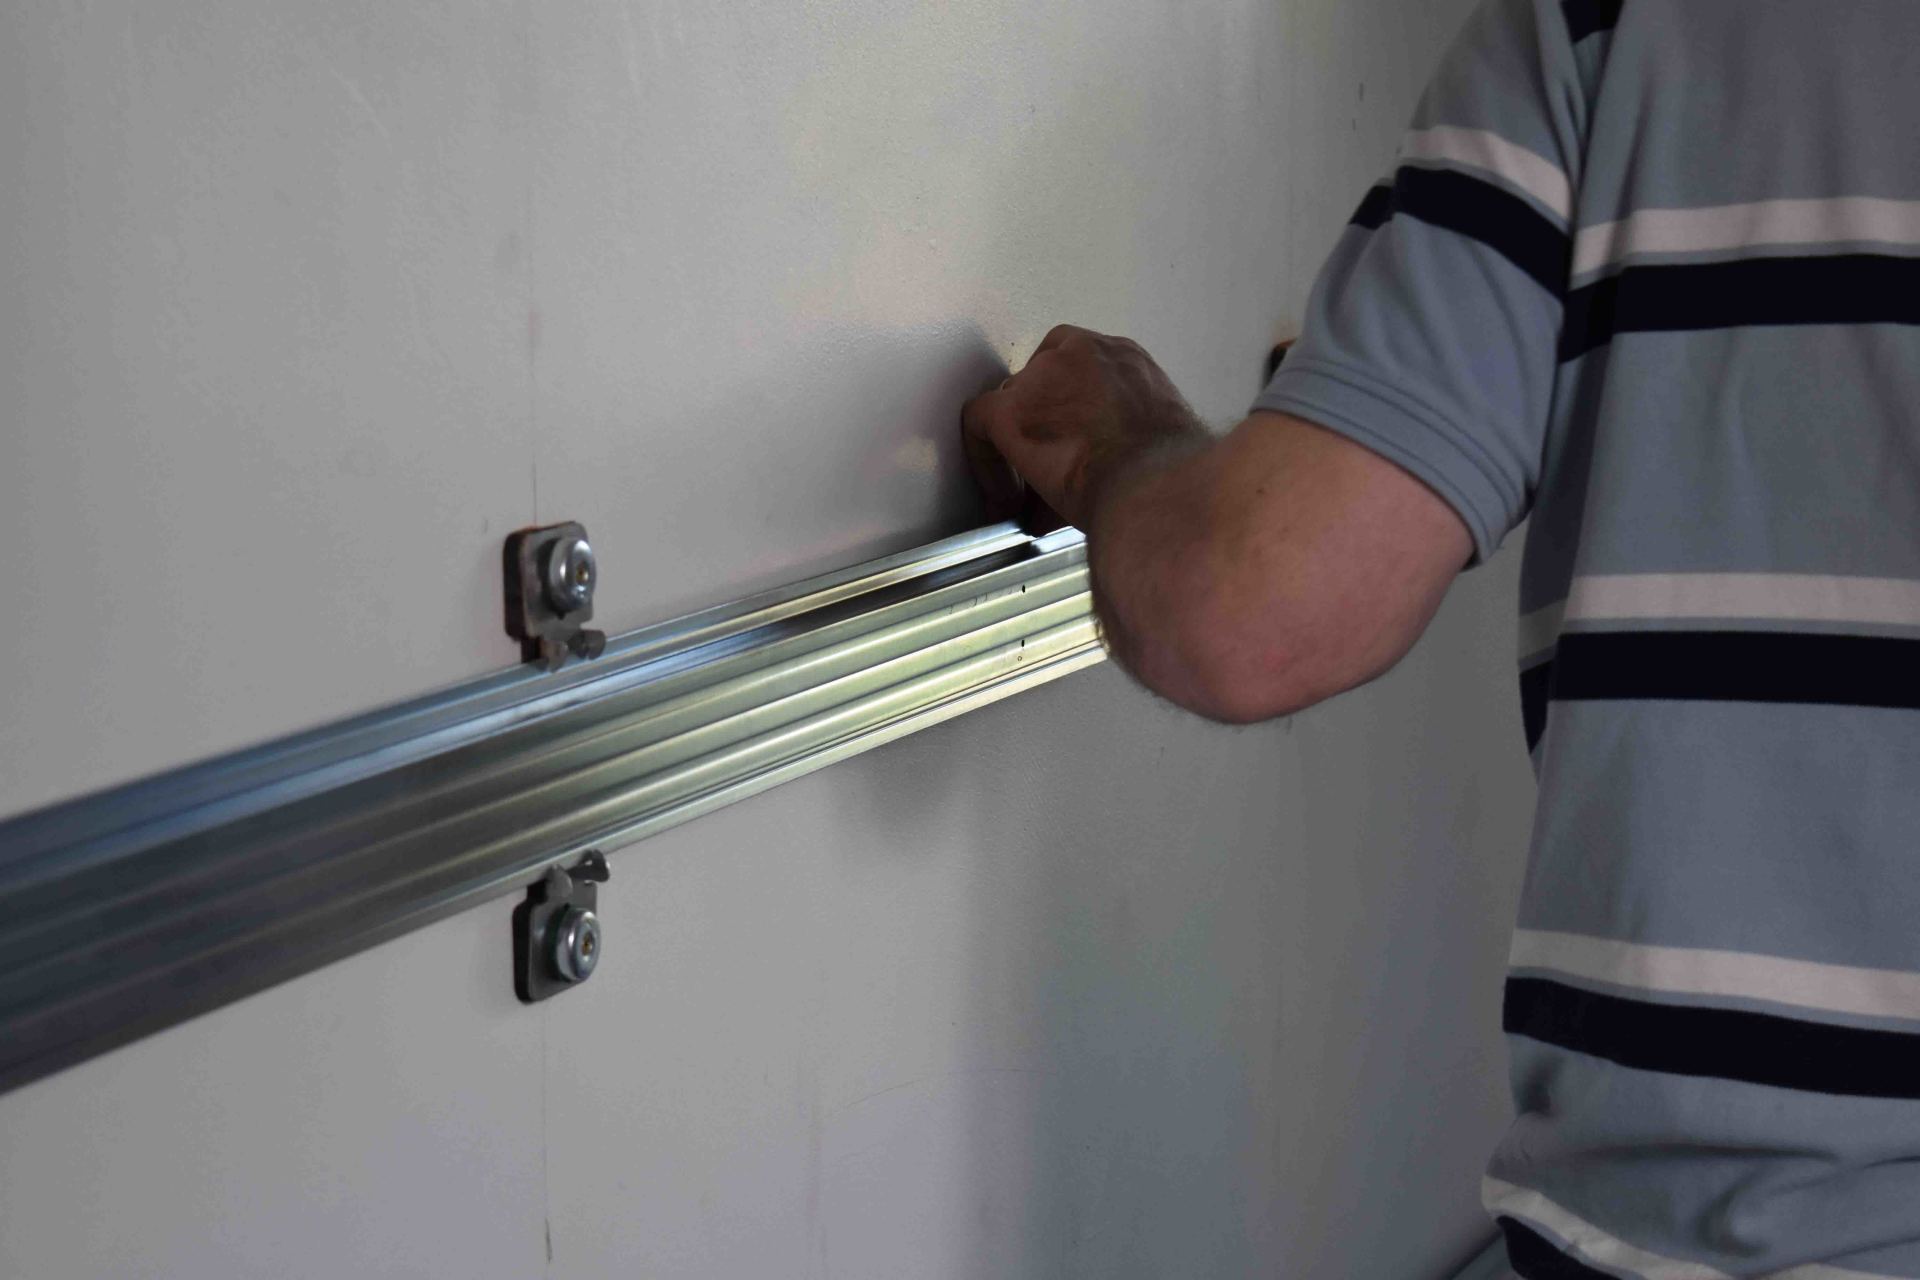
2. Next the furring channels were measured, cut and attached, ensuring they didn’t touch the edge of the wall. They were then easily installed by simply bending and releasing the furring bars within the clips. 

With the furring channels, in certain cases where the wall is longer than the 3m length of the bars, or as in this case when utilising as much of the materials as possible without any unnecessary waste. Rather than using whole lengths on every section, you can overlap the bars by 150mm and secure the overlap with a couple of self tapping screws either side of the overlap. 

Overlapping of furring bars

Adding the Acoustic Mineral Wool

Adding acoustic mineral wool
3. 25mm Acoustic Mineral Wool (which is much denser than loft installation) was then attached between the furring bars and affixed using Contact Spray Adhesive. There was no need to cover the whole wall, there can be gaps (as per the image opposite). The acoustic mineral wool shouldn’t touch the furring bars. (It can touch the clips). The acoustic mineral wool is used to ensure that any cavity space between the wall and the plasterboard is absorbed. Should any sound get into the cavity it is going to bounce and resonate between the two layers and amplify the sound. Although unlikely, adding the acoustic mineral wool between the wall and the plasterboard ensures this doesn’t happen.

The first layer of Acoustic Plasterboard

First layer of acoustic plasterboard
4. The first layer of acoustic plasterboard is then installed. Tip! Before installing plasterboard layers, it’s useful to mark the locations of the furring channels on the surrounding walls in chalk or pencil. This will help you to locate the position of the furring channels later once the first layer of plasterboard is on and channels are no longer visible.
Acoustic plasterboard is much heavier and more dense than standard plasterboard. This increased mass blocks airborne sound. The acoustic plasterboard was installed using self drilling dry wall screws, which are designed to screw into the metal of the furring channel. The recommendation would be to start at the bottom in one corner. Raise the plasterboard onto shims to keep the board at least 5mm off the ground. Also make sure to leave a 5mm gap between any boards and the surrounding walls and ceiling. Secure the plasterboard to the furring bars with dry wall screws. At the end, the 5mm gap will get filled with acoustic sealant. This is also when you would need to cut any holes necessary for electrics.

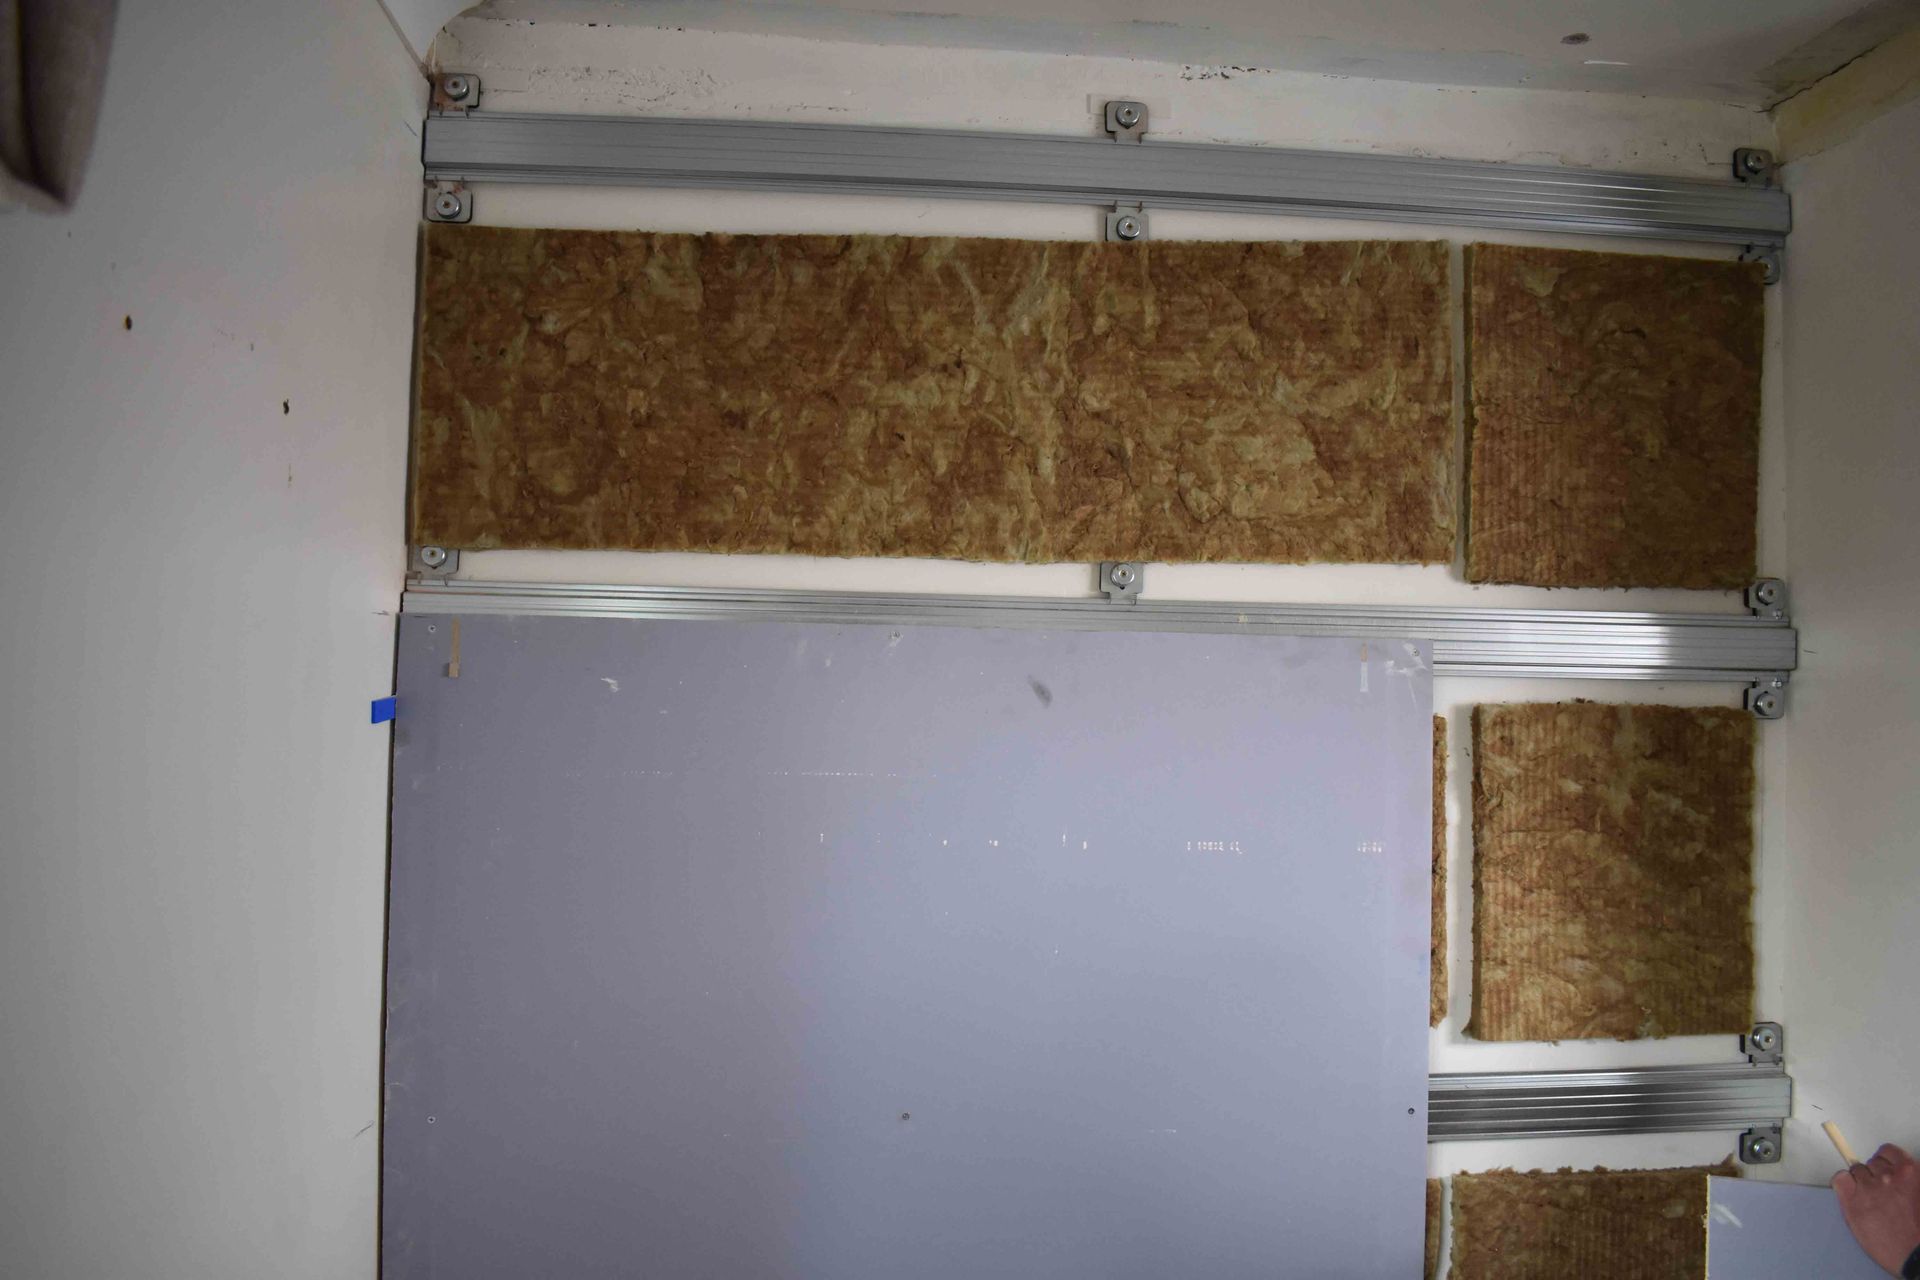
Installation checklist so far

  • The seams of the very first layer of acoustic plasterboard should always align at the centre of a furring channel (so two plasterboards meet on one furring channel)
  • The first row of acoustic plasterboard sheets at the bottom of the wall should be installed with the long dimension supported on shims or Isolation Strip to keep the sheets off the floor
  • Furring channels are installed horizontally across the wall
There weren’t any windows or outlets for sound leaks on this wall. However, should there have been, then all gaps around outlets, windows, or door frames; pipe penetrations and the like would need to be sealed with a non-hardening acoustic sealant.
Care was taken to not overtighten the clips. The clip should feel secure, without moving and without compressing the foam layer more than 1mm.

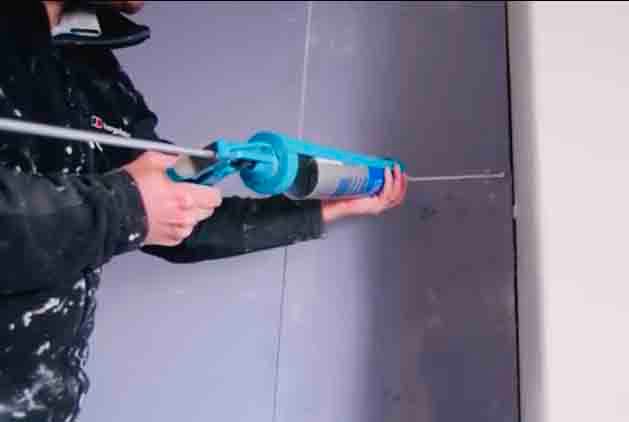
Acoustic Sealant is added to fill in any gaps

Acoustic sealant fills in any gaps
5. Because it was an older property and the ceiling and walls weren’t perfectly straight, in achieving the 5mm gap around the perimeter, it meant the odd gap between the joins of the board where they met in the middle. This was easily rectified by using acoustic sealant in-between the gaps. Soundproofing is a lot like waterproofing and it’s important not to have any gaps where sound could leak through.

Adding FlexiSound 5

Tecsound SY100

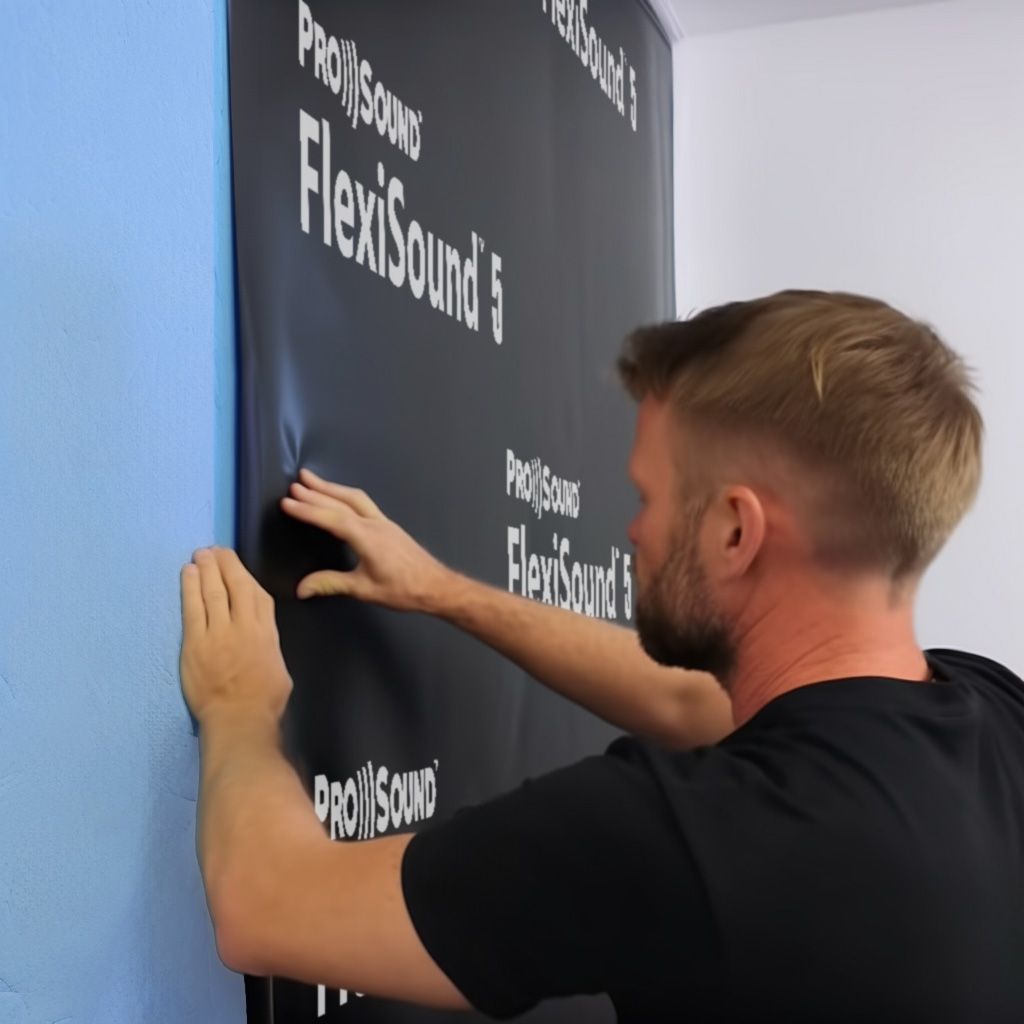
6. Next it was the installation of the FlexiSound 5. An extremely heavy, dense visco-elastic rubber, originally designed as a replacement for lead. Because it’s visco-elastic, this means it also dampens vibrations. It’s extremely heavy and does require two people to lift it. Being self-adhesive, it can be stuck directly to the plasterboard, requiring no fixings or secondary adhesive. The FlexiSound has a backing paper which is removed in the top corner, line it up, stick the very top part on and once the top is lined up and stuck down, the rest of the backing paper can be peeled away. The FlexiSound was stuck to the plasterboard covering the entire wall, leaving just the 5mm gap around the perimeter. TIP! It is much easier to cut the FlexiSound into smaller, more manageable pieces. FlexiSound is very sticky and is difficult to remove if stuck down incorrectly.

N.B. Mr Billanie ensured the FlexiSound was joined together without any gaps, although if you like, you can also overlap the FlexiSound to avoid gaps.


Ready for the second layer of Acoustic Plasterboard

Second layer of Acoustic Plasterboard

7. The second layer of acoustic plasterboard is then installed on top of the FlexiSound 5, sandwiching it between the two layers. The second layer of 15mm acoustic plasterboard is installed as before, but by staggering the joins by starting at the opposite side from where you started, so the seams aren’t matched up.

Adding Acoustic Sealant to the perimeter

Adding acoustic sealant to the perimeter
8. Finally remove the shims and fill the gaps around the perimeter with acoustic sealant along with any other small gaps that may be in between plasterboards.

Soundproofing plug sockets

9. Use acoustic putty pads inside any electrical fittings to minimize the weakness created by any holes. You are now ready for standard plasterboard finishes.

The final finish

Second layer of acoustic plasterboard
10. The wall is now ready for a plaster skim and painting, the same as any standard plasterboard finish.

ReductoClip™ Direct To Wall Summary

ReductoClip Direct to Wall Summary

How long did it take to install the ReductoClip™ Direct To Wall System?         

The wall measured 1.7m x 2.44 for alcove 1 and 2.58m x 2.44m for alcove 2. The installation took a day and a half and was installed by Mr Billanie, with the help of a friend. A large proportion of time was spent cutting the plasterboard to size, as the wall didn’t provide any straight edges!

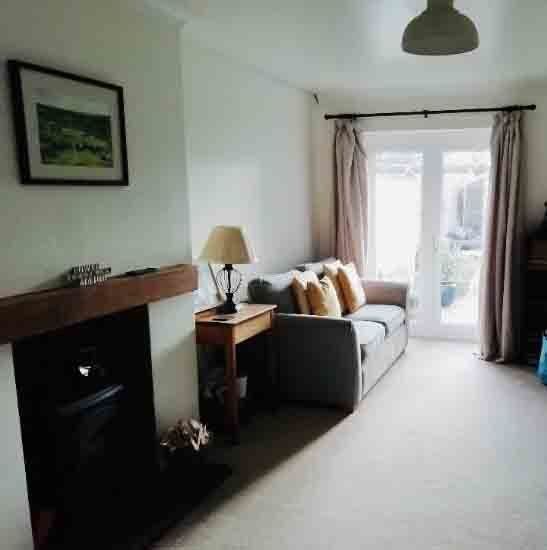
Decorating the wall once the system has been installed         

A coat of plaster was added on top of the final layer of plasterboard and painted. In Mrs Billanie’s own words; “To look at the wall, you’d never even know the soundproofing had been installed”.                                                                                                                                                                                                  

The soundproofed wall has been redecorated

The finished wall after the ReductoClip Direct to Wall System was installed

ReductoClip™ Direct To Wall Soundproofing Testimonial 

On the below video, Mrs Billanie talks through the difference the ReductoClip Direct To Wall System has made to their everyday living. Now their wall is soundproofed, they can no longer hear the unwanted noise from next door and their noisy neighbours are a thing of the past.
Learn More ReductoClip Direct To Wall
We hope you have found this noisy neighbour wall soundproofing case study of interest. 
If you need any help or advice on soundproofing your own home, please do get in touch.

Please share this article if you find it useful:

"We don’t expect you to become an overnight expert in soundproofing, that’s what we’re here for."

The best soundproofing for walls
By Ian Baker 01 Mar, 2024
How to soundproof a wall. 3 wall soundproofing solutions for solid and stud walls. Achieve peace and quiet against noisy neighbour's and exceed Part E Building Regulations.
Best soundproofing for floors
By Ian Baker 26 Feb, 2024
The 5 best acoustic floor solutions when looking to successfully soundproof a timber floor to achieve a high level of airborne and impact noise reduction
Best Floor Soundproofing 2024 SoundMat 3 Plus
By Ian Baker 06 Feb, 2024
A guide for the best floor soundproofing 2024
ProSound Acoustic Timber Slatted Panels
By Sam Fessey 22 Jan, 2024
The function of acoustic timber slatted panels lies in absorbing and dampening sound within a room, not blocking its transfer in and out. Learn more about sound absorption and soundproofing solutions.
Top Tips
By Phil Lyons 03 Jan, 2024
Achieve peace and quiet from noisy neighbours by understanding the core principles of soundproofing. Follow these essential steps and top soundproofing tips to enable you to create a tranquil living space.
SEN classroom
By Sam Fessey 16 Nov, 2023
Easily improve the room acoustics within SEN educational settings using ProSound Acoustic Panels. Sound Absorption can greatly increase the acoustic quality within learning spaces and help to enhance communication, concentration and promote effective learning.
ReductoClip Direct to Stud Wall
By Ian Baker 02 Nov, 2023
Insulate stud cavities using acoustic mineral wool. Add mass to help block airborne sound. Isolate or decouple the stud wall to create a sound breaker and add damping materials to help absorb sound vibrations. Highlighted are the 3 best stud wall soundproofing solutions which combine these essential principles.
Noisy neighbours
By Ian Baker 01 Oct, 2023
Looking to soundproof a wall against noisy neighbours? Take a look at the top 3 soundproofing solutions for solid walls. Detailing their performance, thickness and cost.
By Ian Baker 20 Sep, 2023
Do soundproofing quick fixes really exist? Uncover the myths of soundproofing and explore if cheap soundproofing options really work
Feet on wooden floor creating impact noise
By Ian Baker 18 Sep, 2023
A guide on the best soundproofing acoustic underlays for timber and concrete floors. Performance against airborne and impact noise and final floor finish suitability
More Posts
Share by: