
Case Study: Basement Music Studio Conversion
Converting A Terraced Basement Into A Drum Practice Room
Background Of The Project
We were contacted by a client who is a full-time professional drummer and drum tutor. The client had recently moved into a new terraced house. A very old property dating back to the Victorian period.
Being a professional drummer the client needs to practice regularly every day to keep his skill level maintained, he also privately tutors pupils at home.
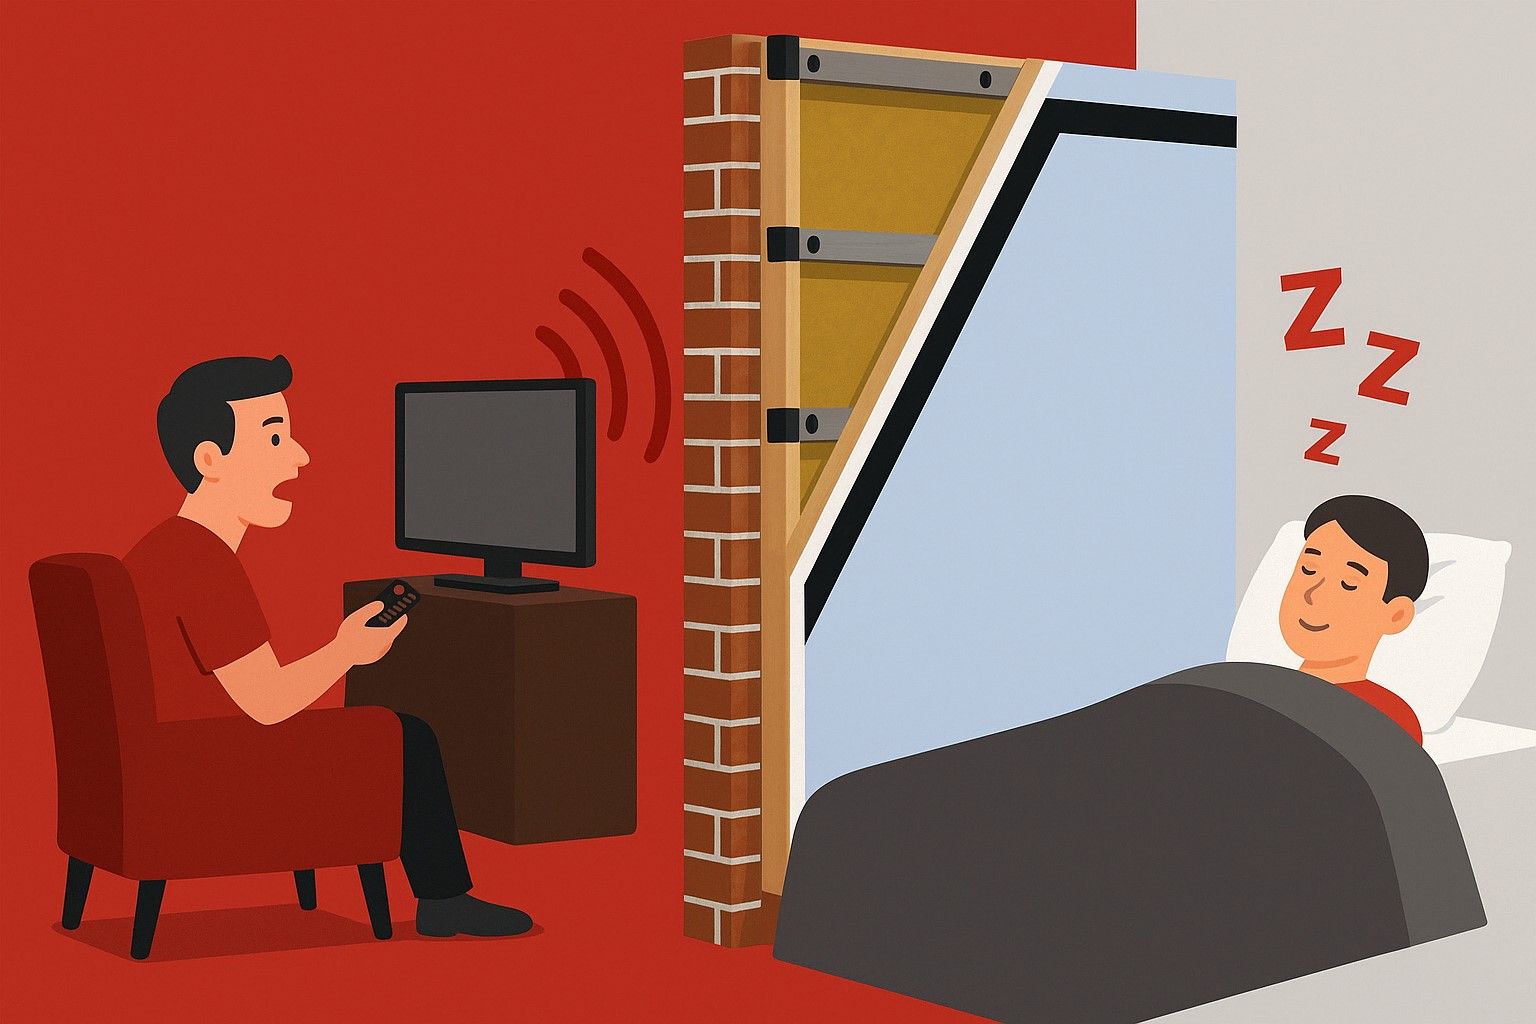
Now, this is a problem for anybody in a terraced house but made harder as the next door neighbours work night shifts and need to sleep in the daytime.
The clients plan was to utilize the unused basement in the property by damp proofing and then soundproofing, converting the basement into a fully soundproofed basement studio. His main worry being that the soundproofing needed to be of the highest level, as any noise that could travel through the thin, single brick party wall, would result in him still not being able to use the room.

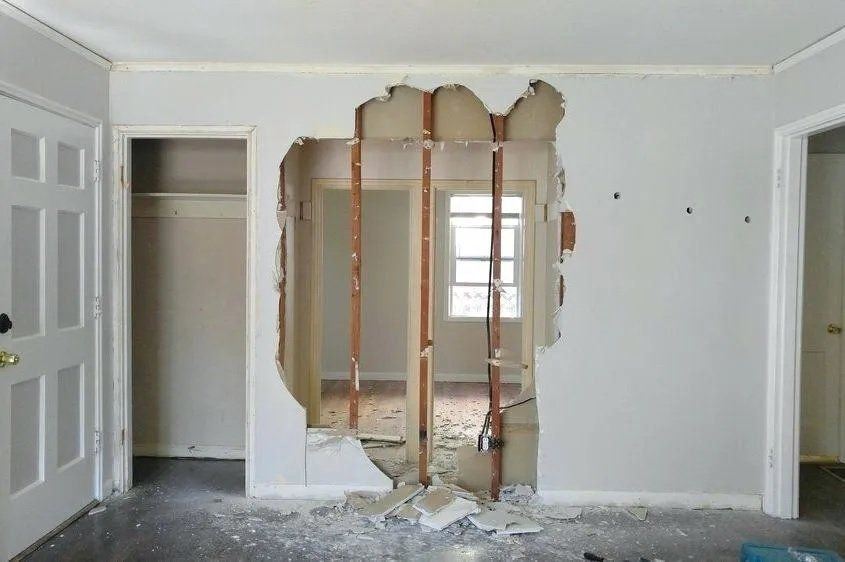
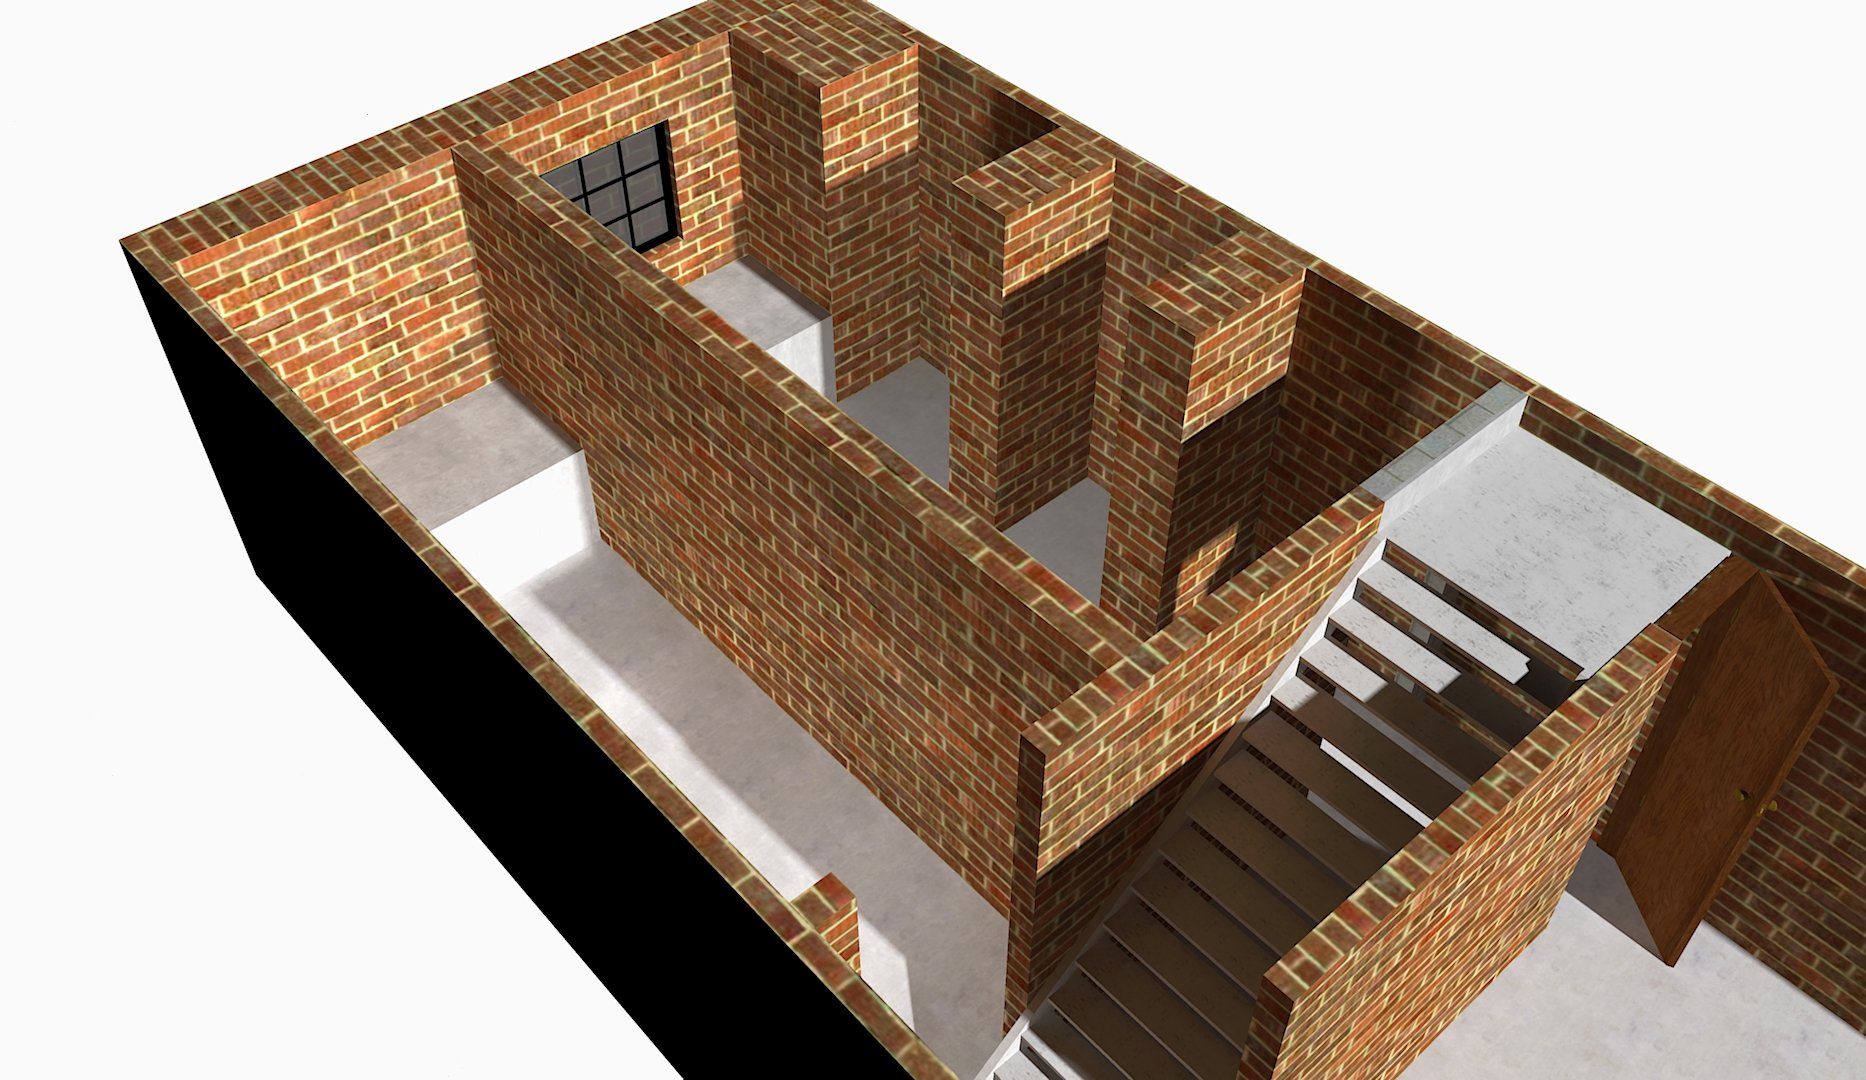
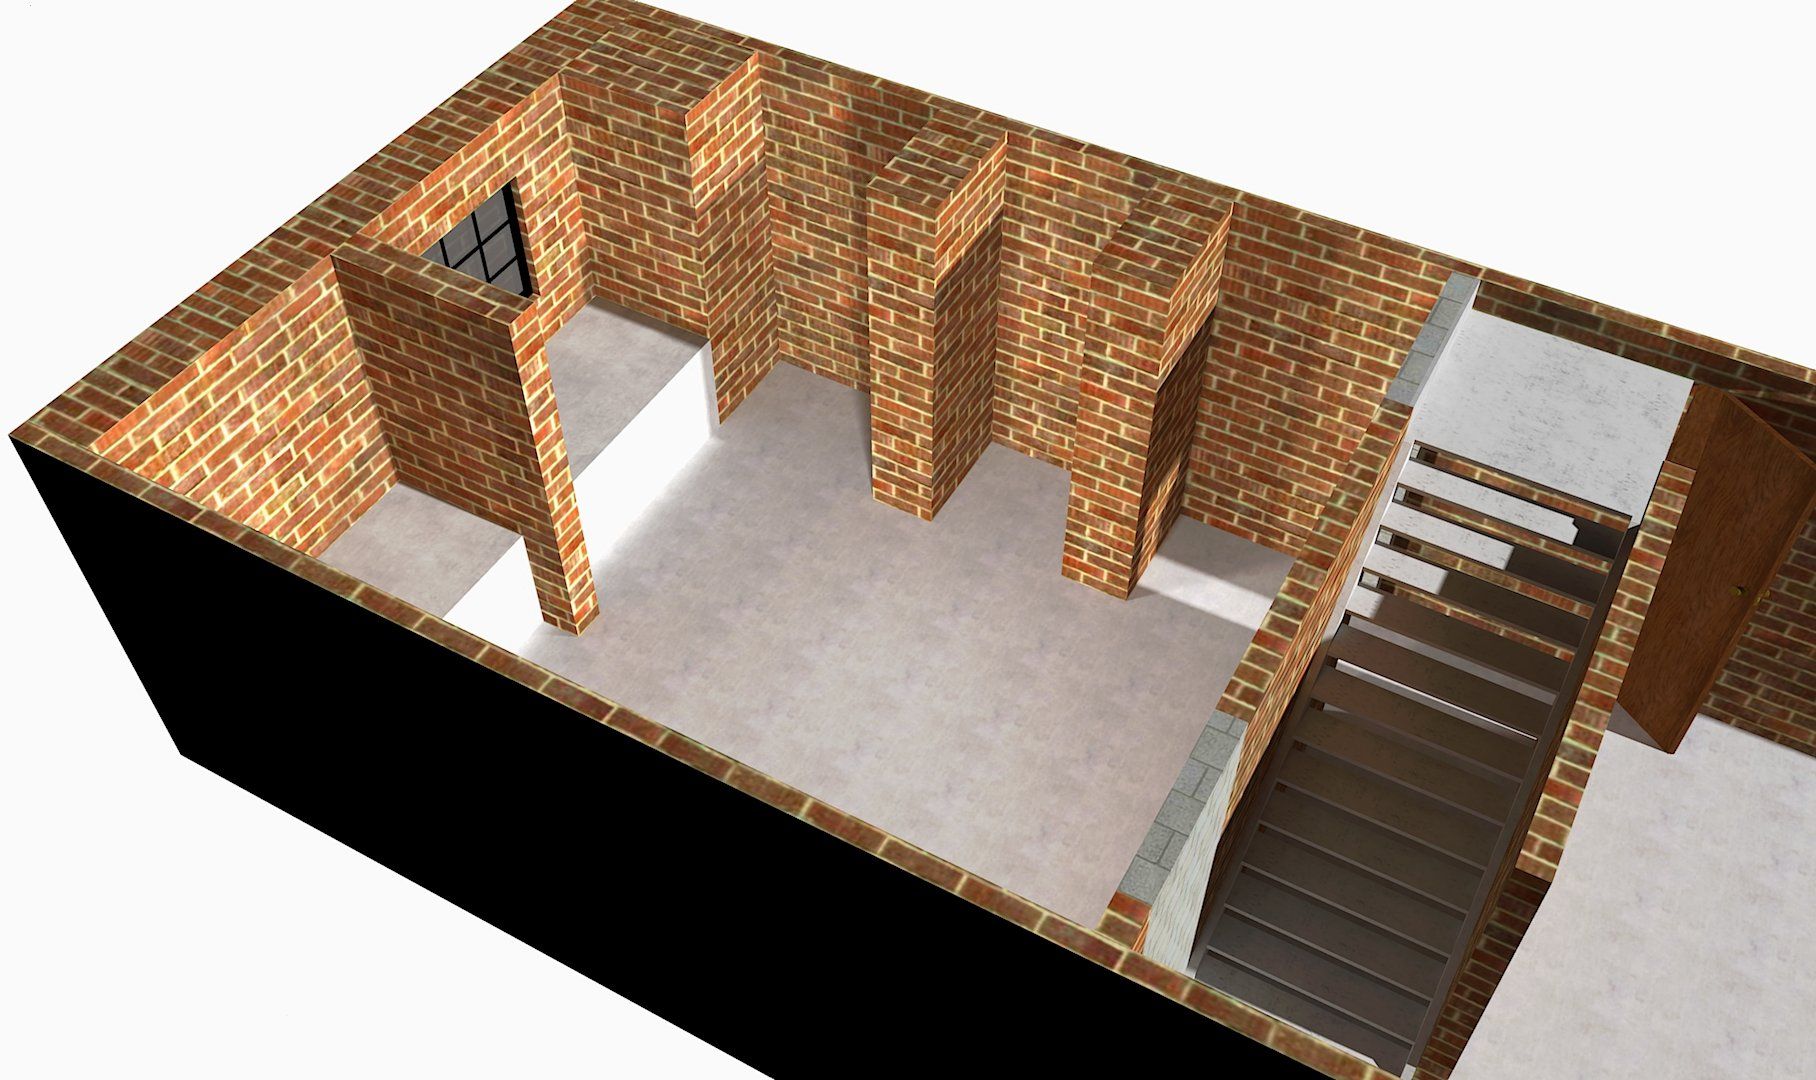
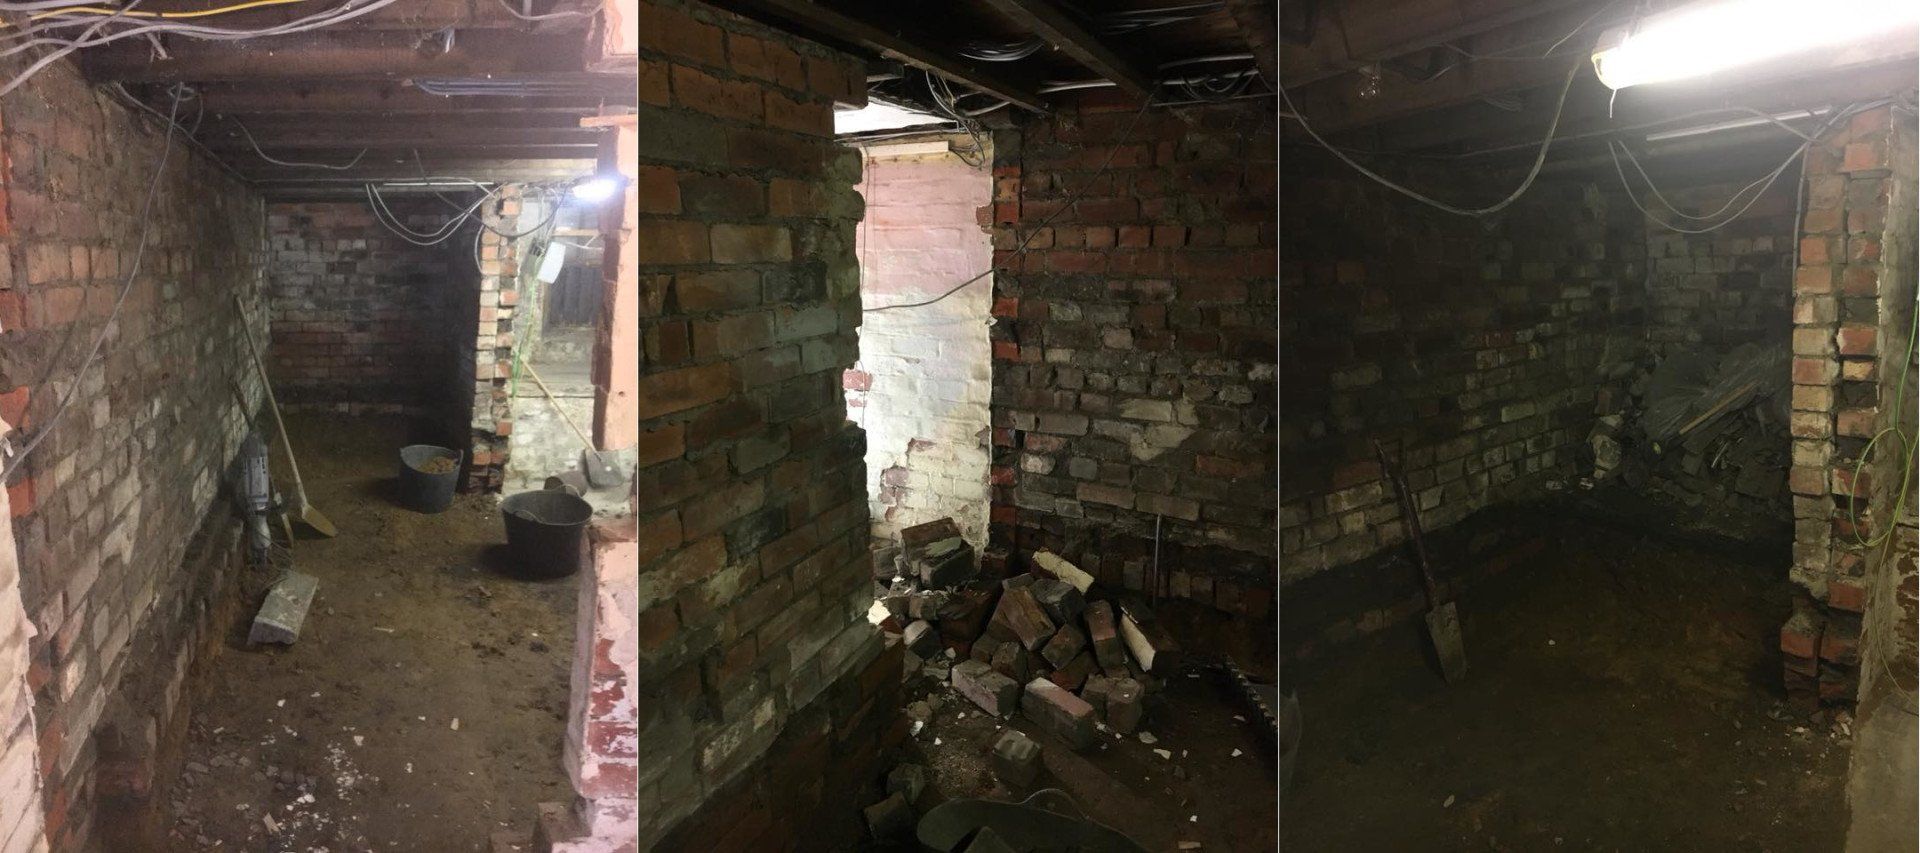
The Basement
We carried out an initial site visit as the property isn’t too far away from The Soundproofing Store HQ.
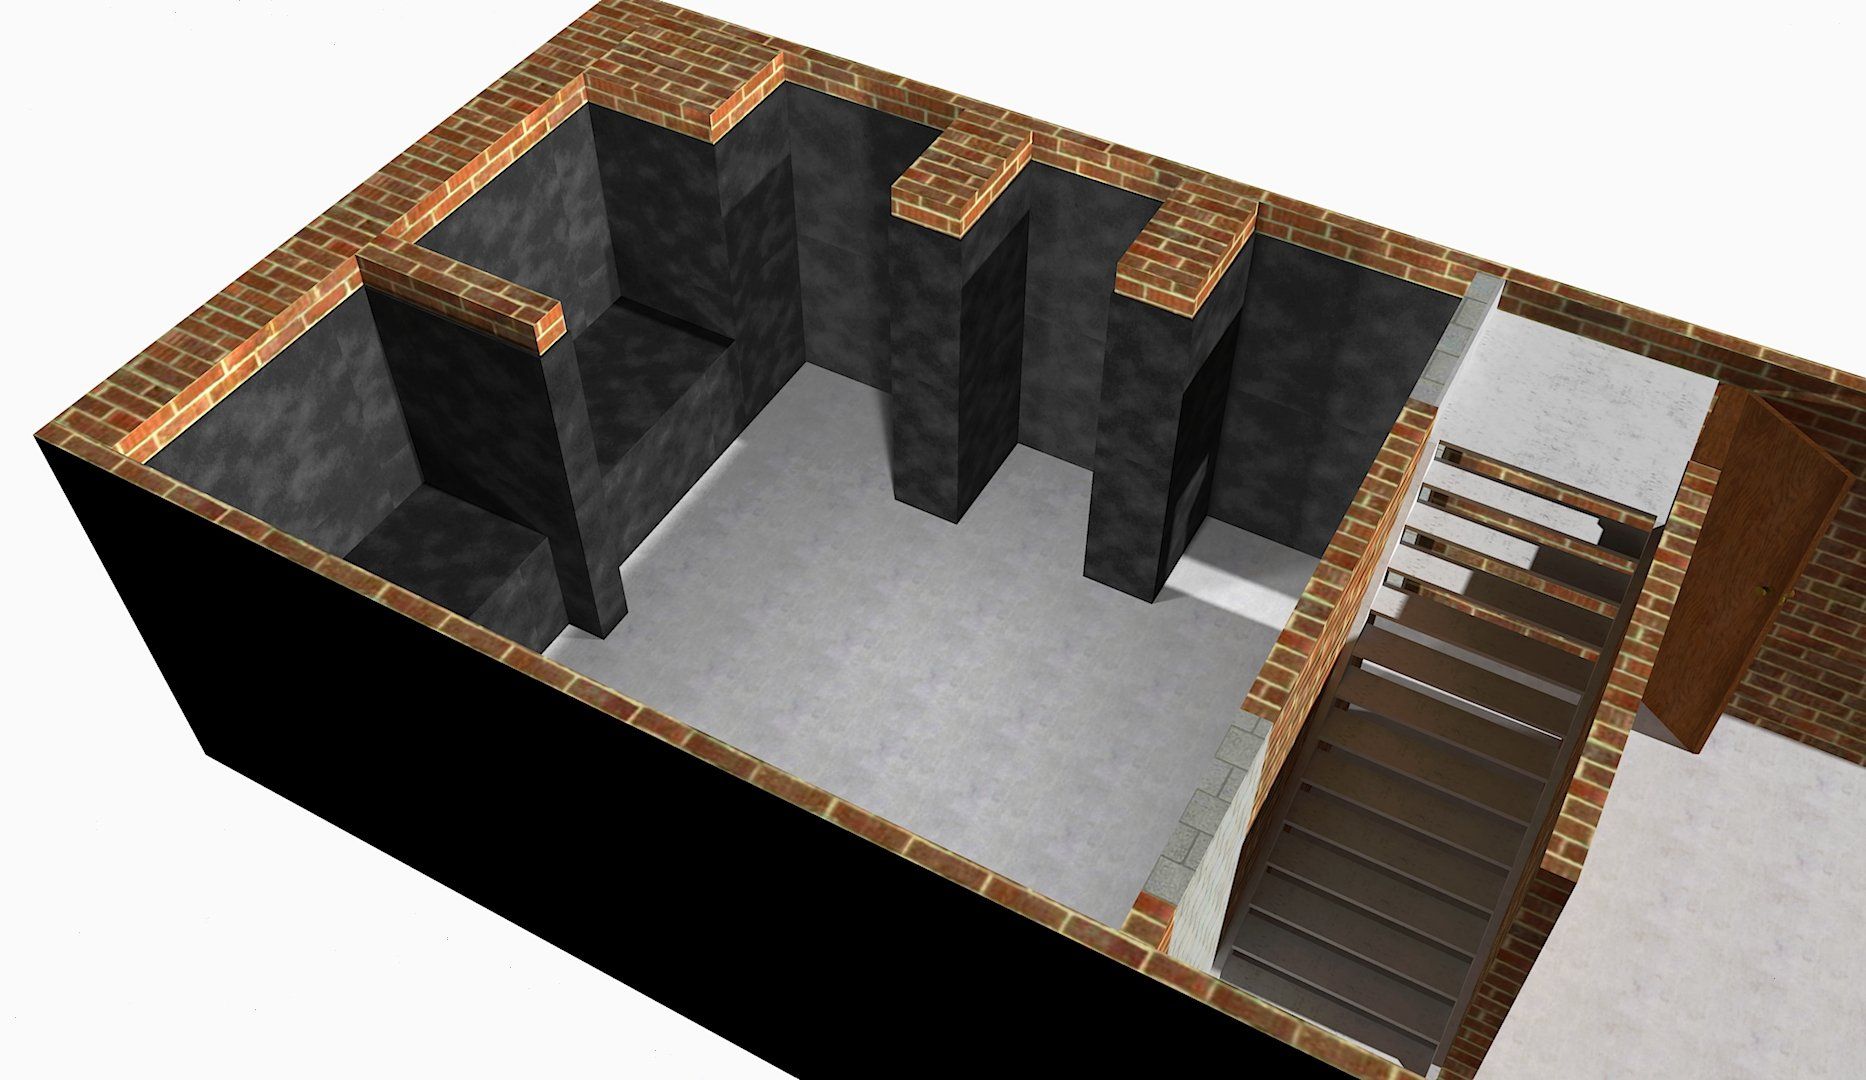
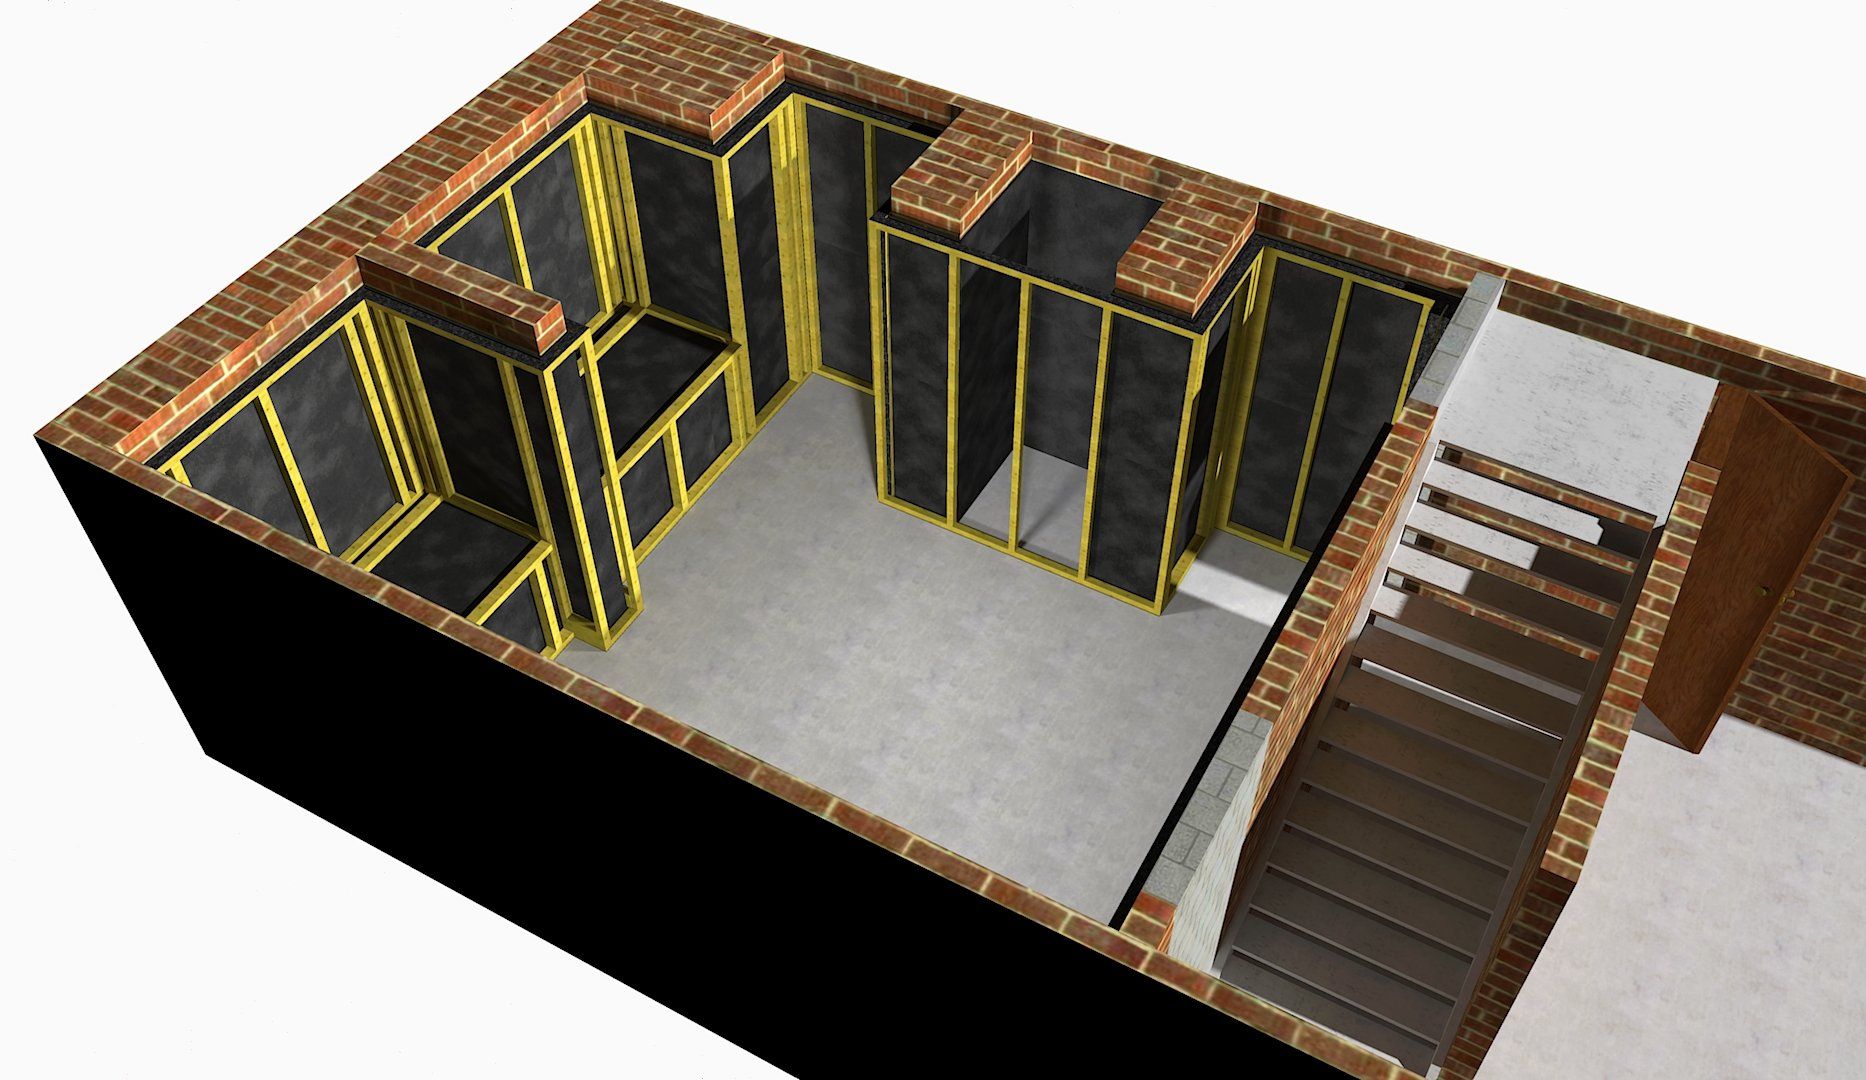
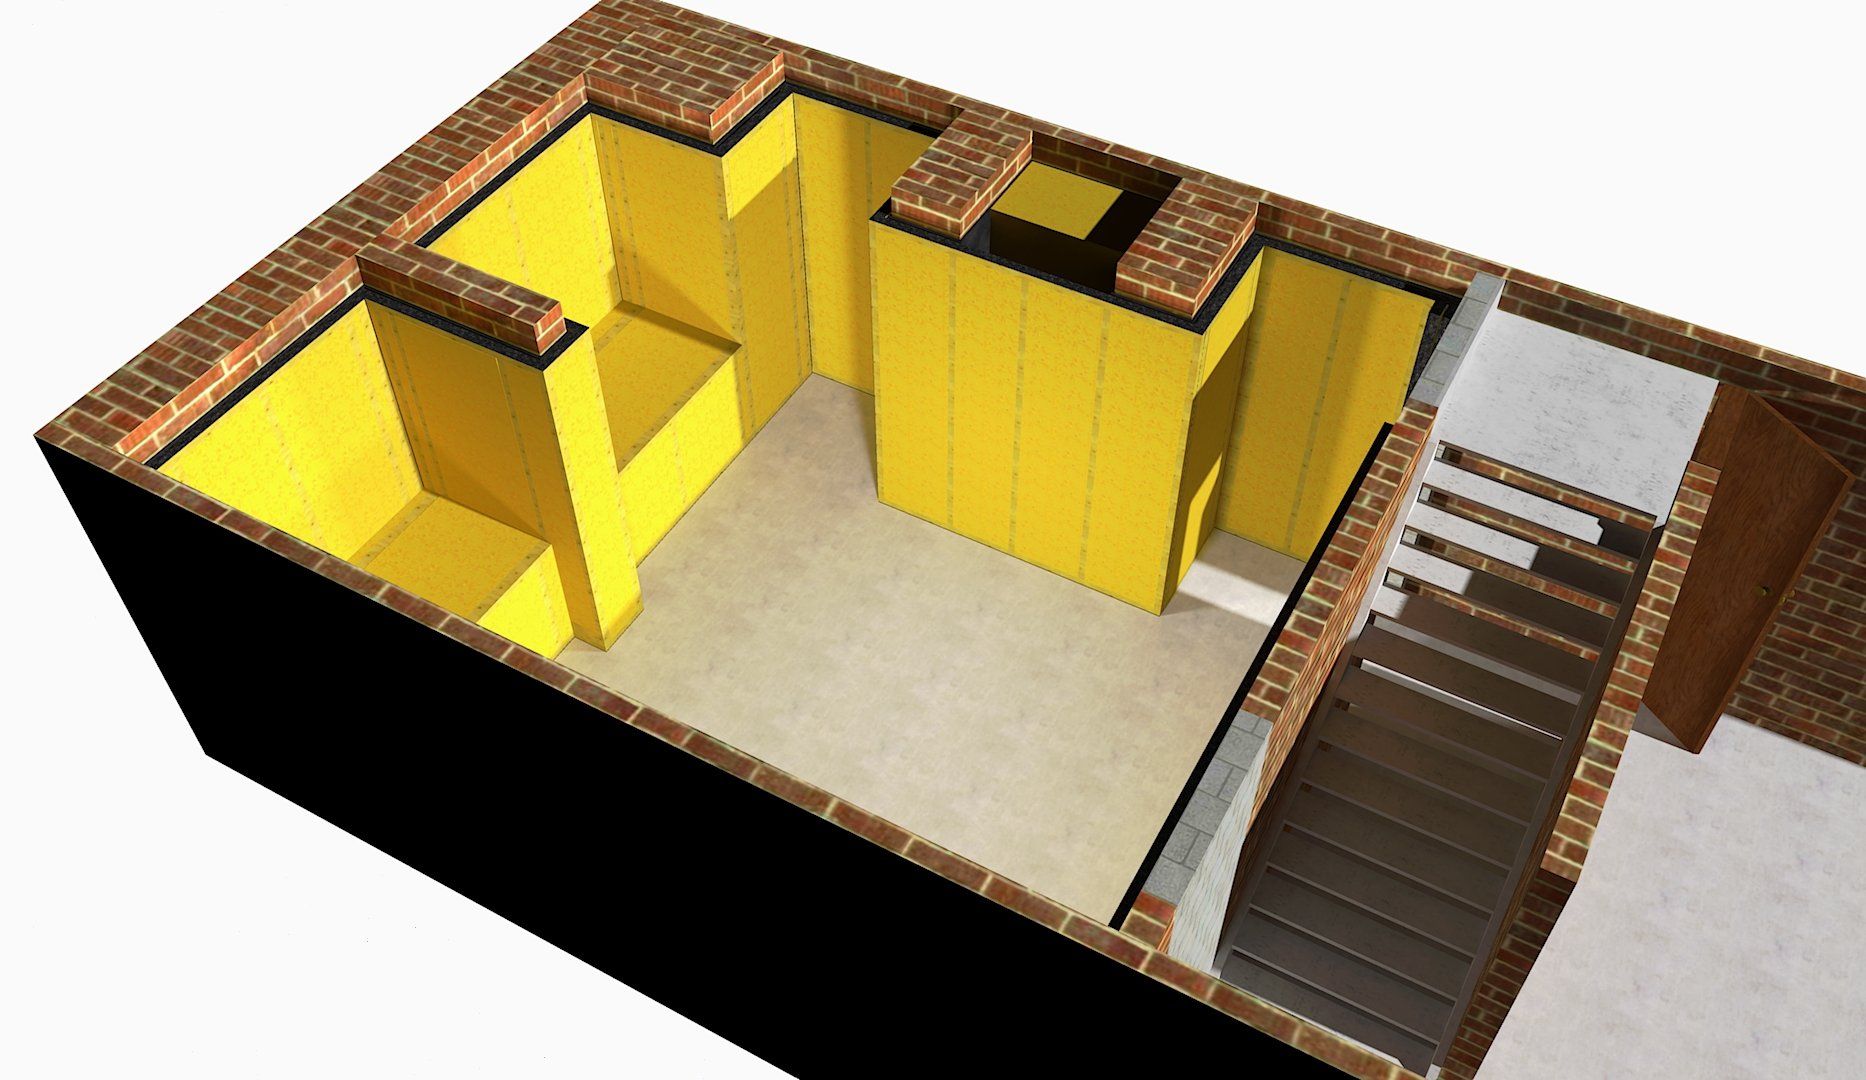
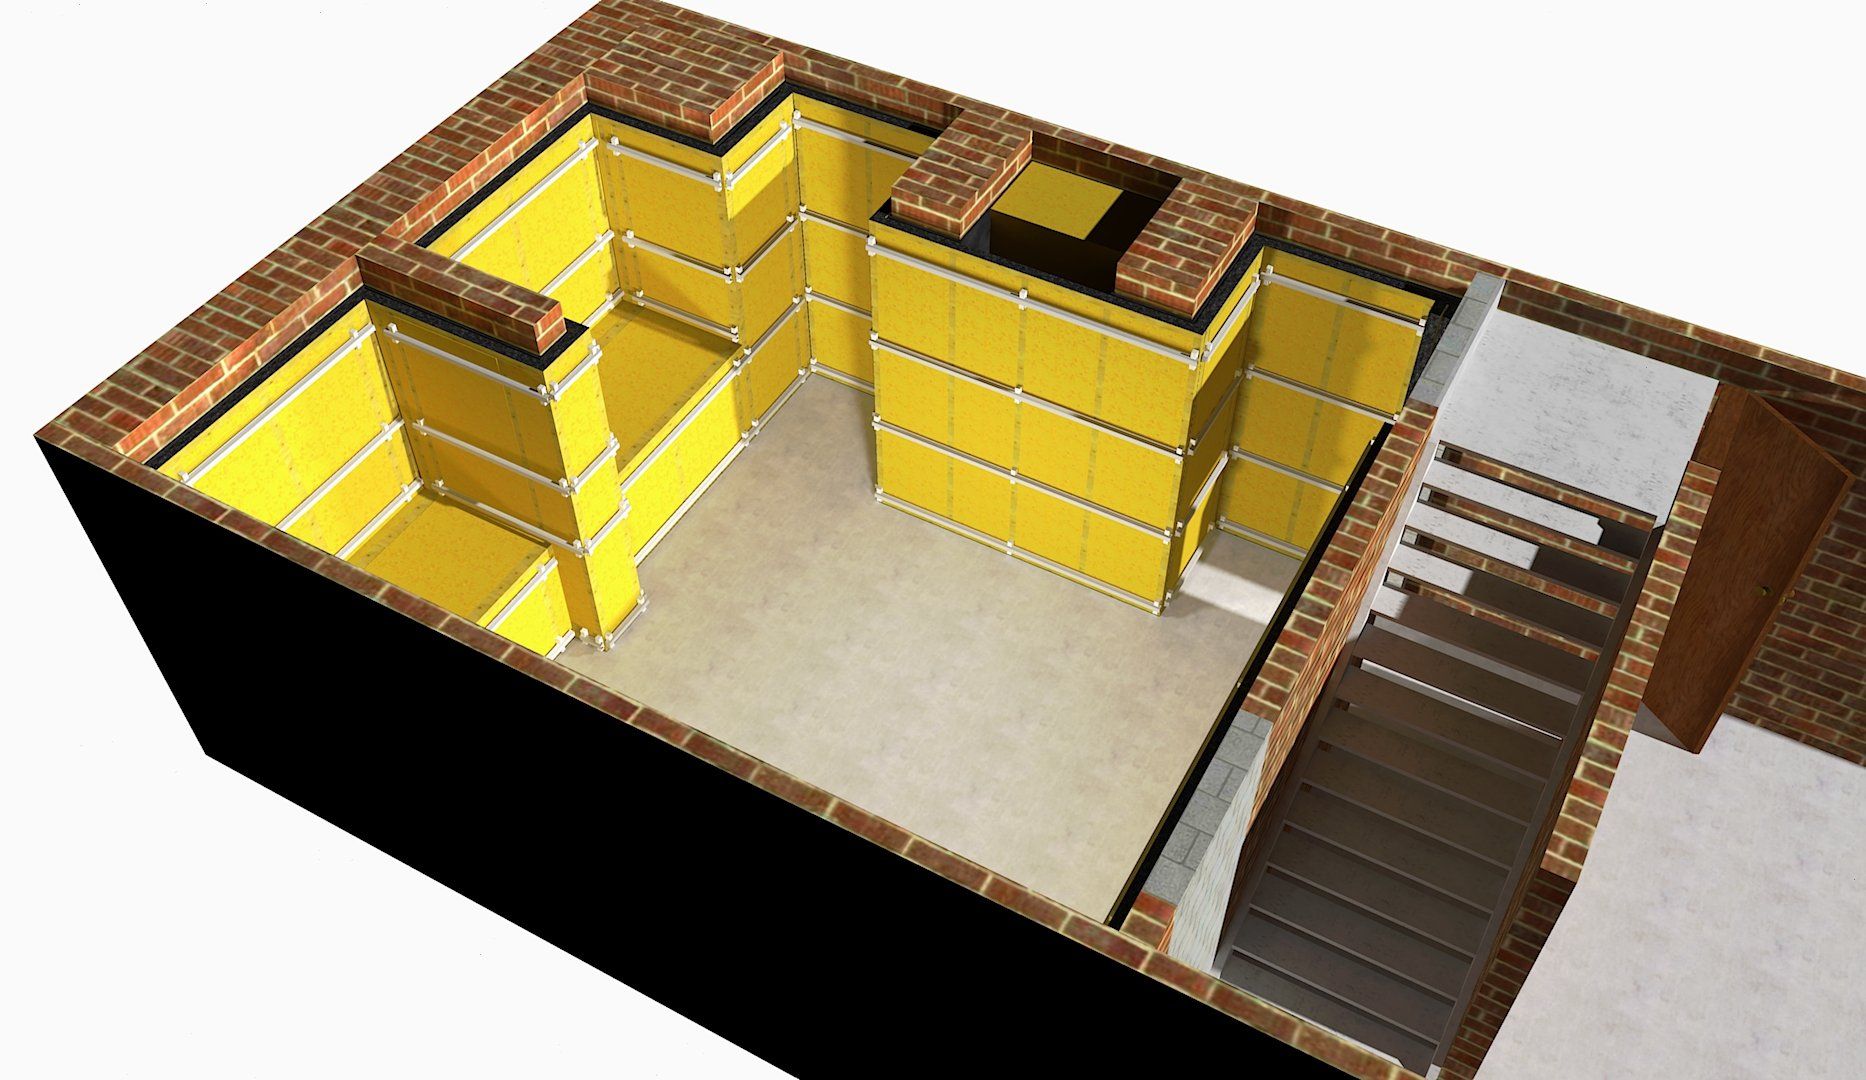
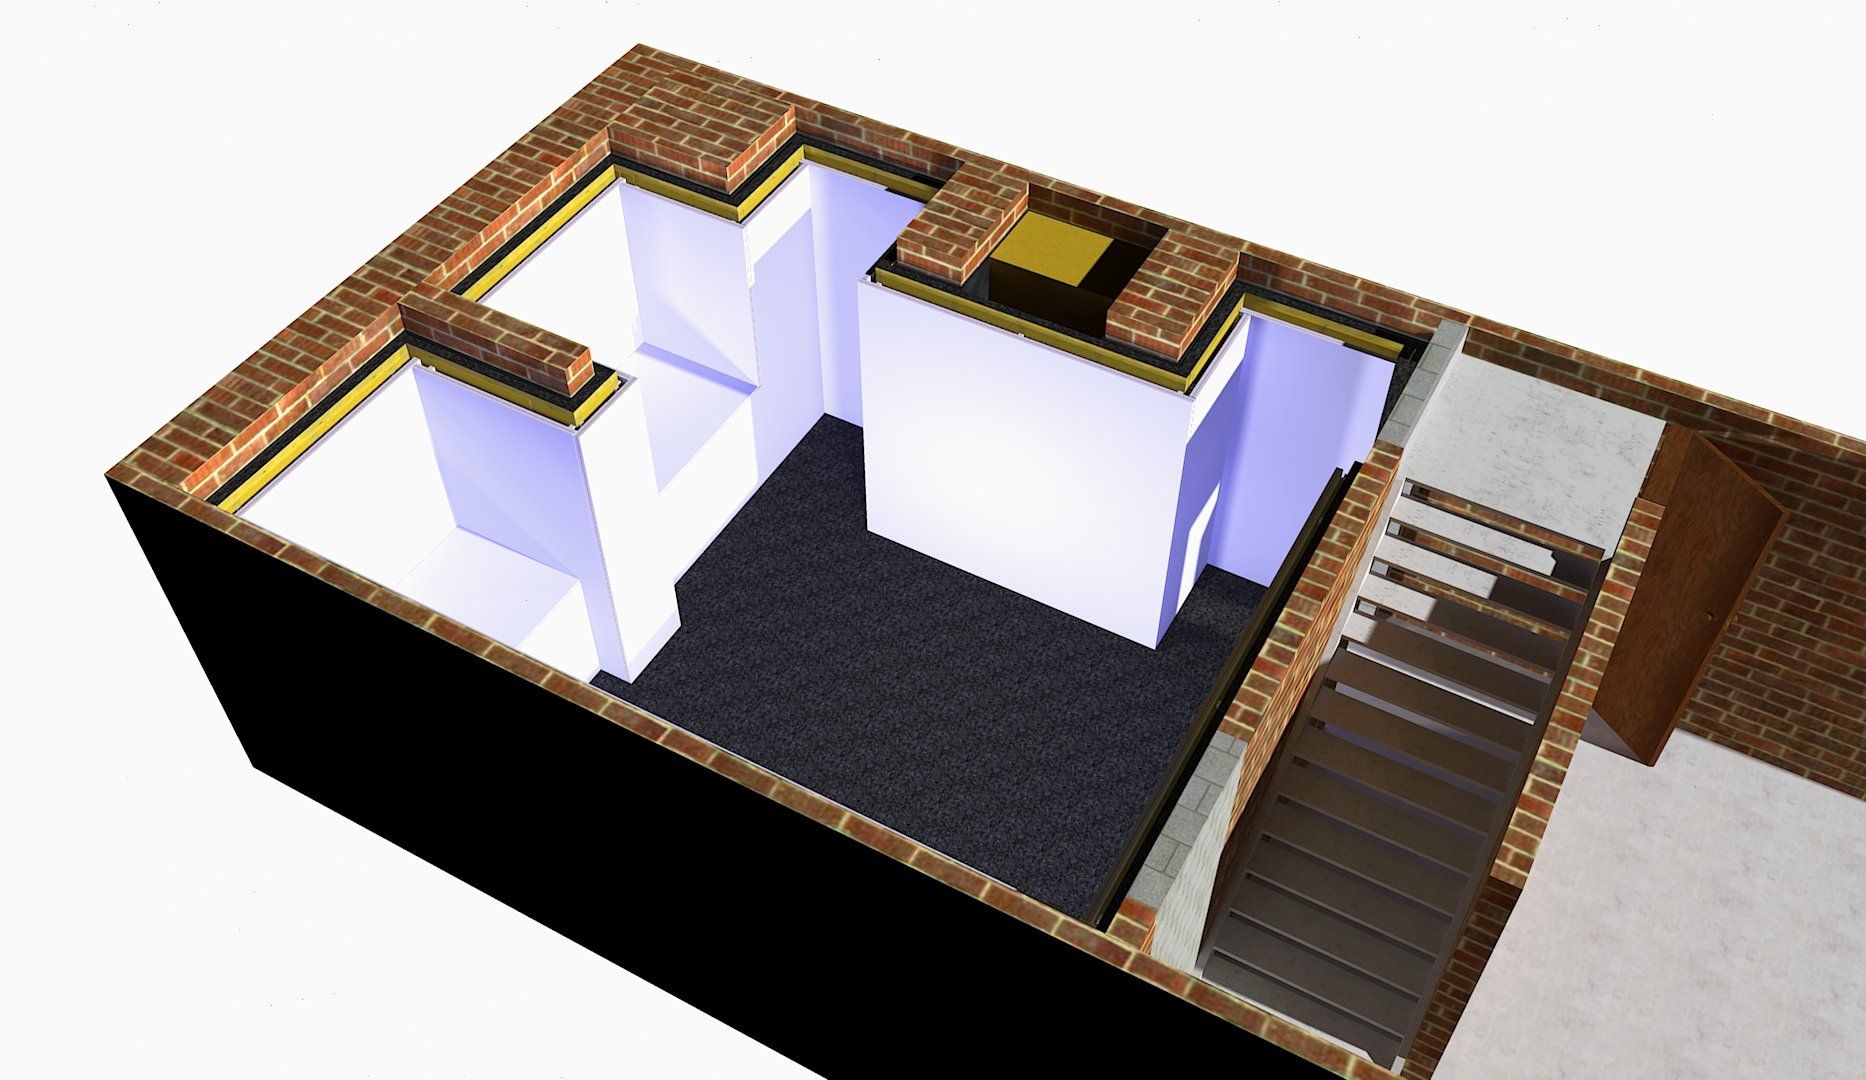
The basement was rather large, but with very low ceilings as we would expect. The staircase down to the basement divided the area into two halves. The client was hoping to turn one half into the studio and the other half could be used as a lounge area.
The studio half was also then divided by another brick wall, splitting that half into two small rooms.
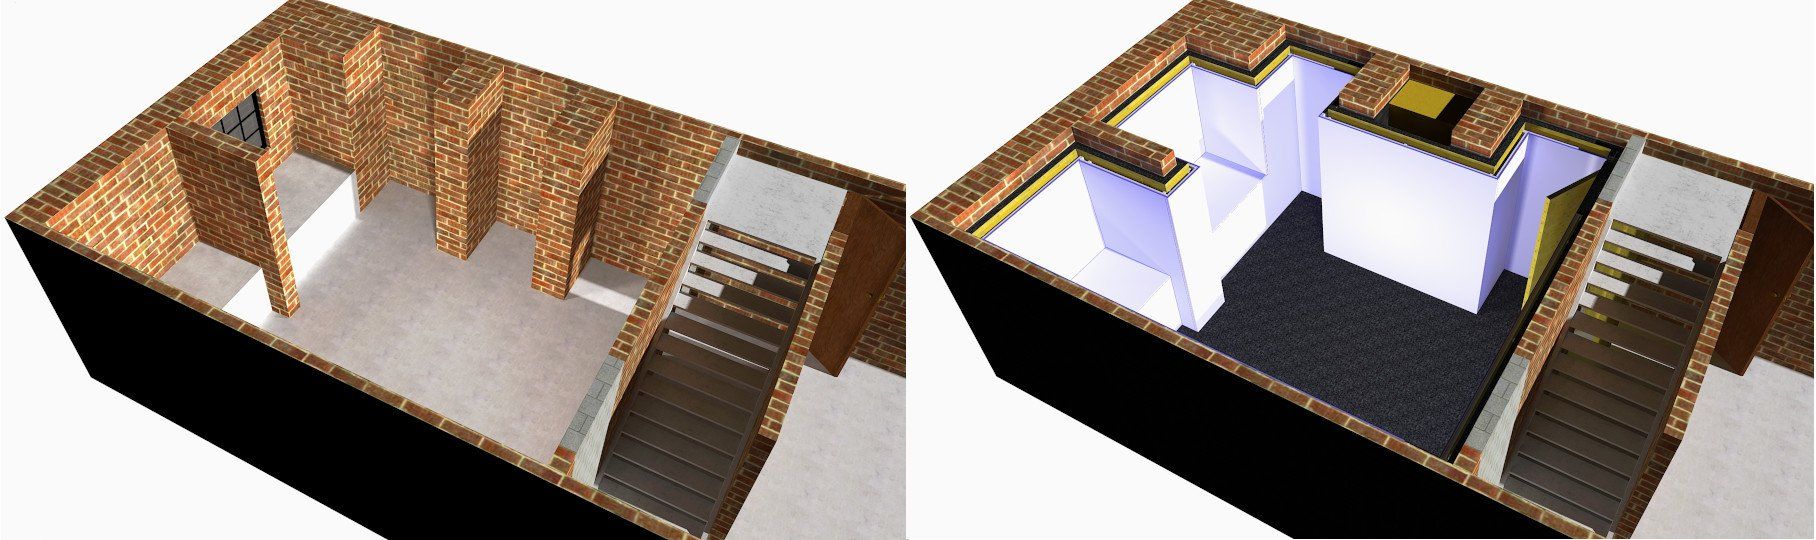
The Plan - Construction / Layout
The client had brought in a local, well respected building firm who are specialists in basement conversions. http://backtobasement.co.uk/ (Leeds)
Together we discussed the initial plan in terms of construction to be the following.
1.Knock down the dividing wall in the studio half, opening it up into one larger room.
2.Dig down into the concrete floor as far as we could go to lower the floor and therefore raise the ceiling height.
3.Block up the dividing wall separating the two halves of the basement leaving one doorway into the studio.
4.Tank the room using a damp proof membrane
The Plan - Soundproofing
My original specification for the soundproofing was as follows;
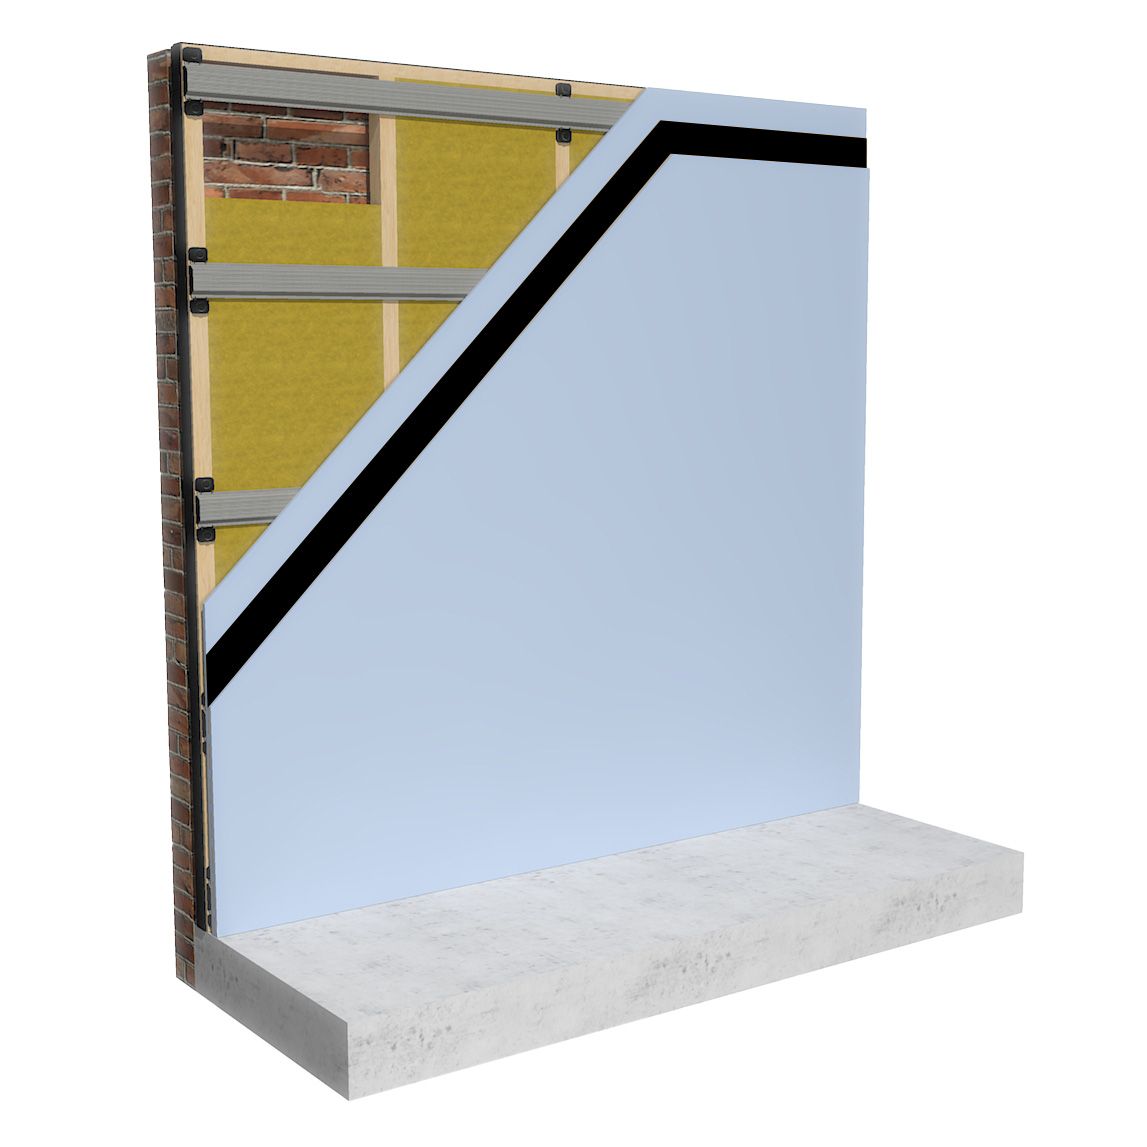
We needed to build a “room within a room” which is made up of high mass materials to block airborne sound from escaping, but those layers need to be de-coupled from the structure and able to absorb vibration so that the sound vibration energy can’t transfer through into the structure of the building.
Walls

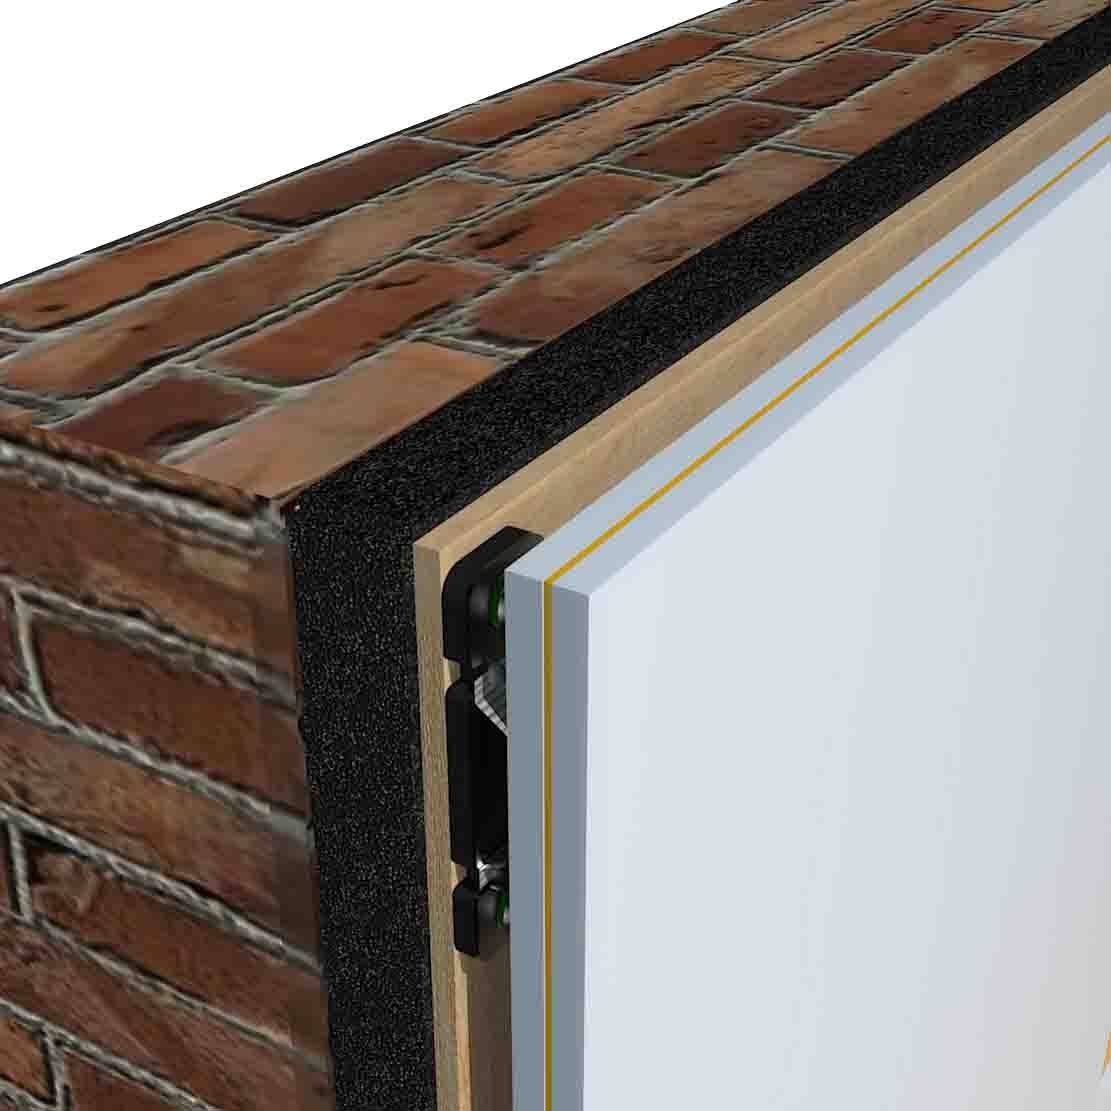
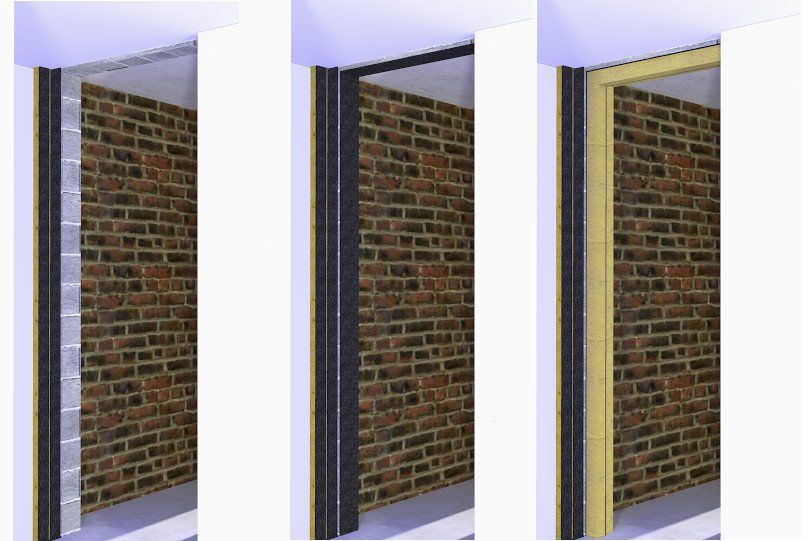
We would create secondary, internal walls by using our full ReductoClip system . This involves building a 50mm timber frame (for minimalspace loss) in front of every wall. The timber frames would be isolated aroundthe perimeter using our Isolation strip , to create a floating frame.
We fill the frame with a 50mm 60kg acoustic mineral wool to absorb sound within the cavity we are creating with the timberframe.
We then attach the ReductoClips and furring channels.
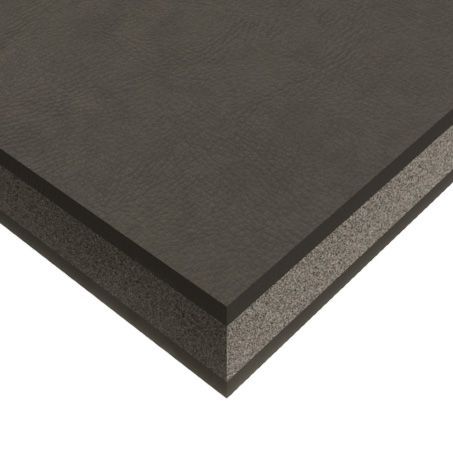
We then re-build the wall layers using two layers of 15mm acoustic grade plasterboard sandwiching a layer of FlexiSound 5.
The plasterboard and FlexiSound adds a whopping 35.6kg of mass per m2 to the walls.
The ReductoClips separate the solid wall layers form the timber frame, and absorb huge amounts of vibration energy, converting it in to heat, and stopping the vibration from travelling into the solid wall behind.
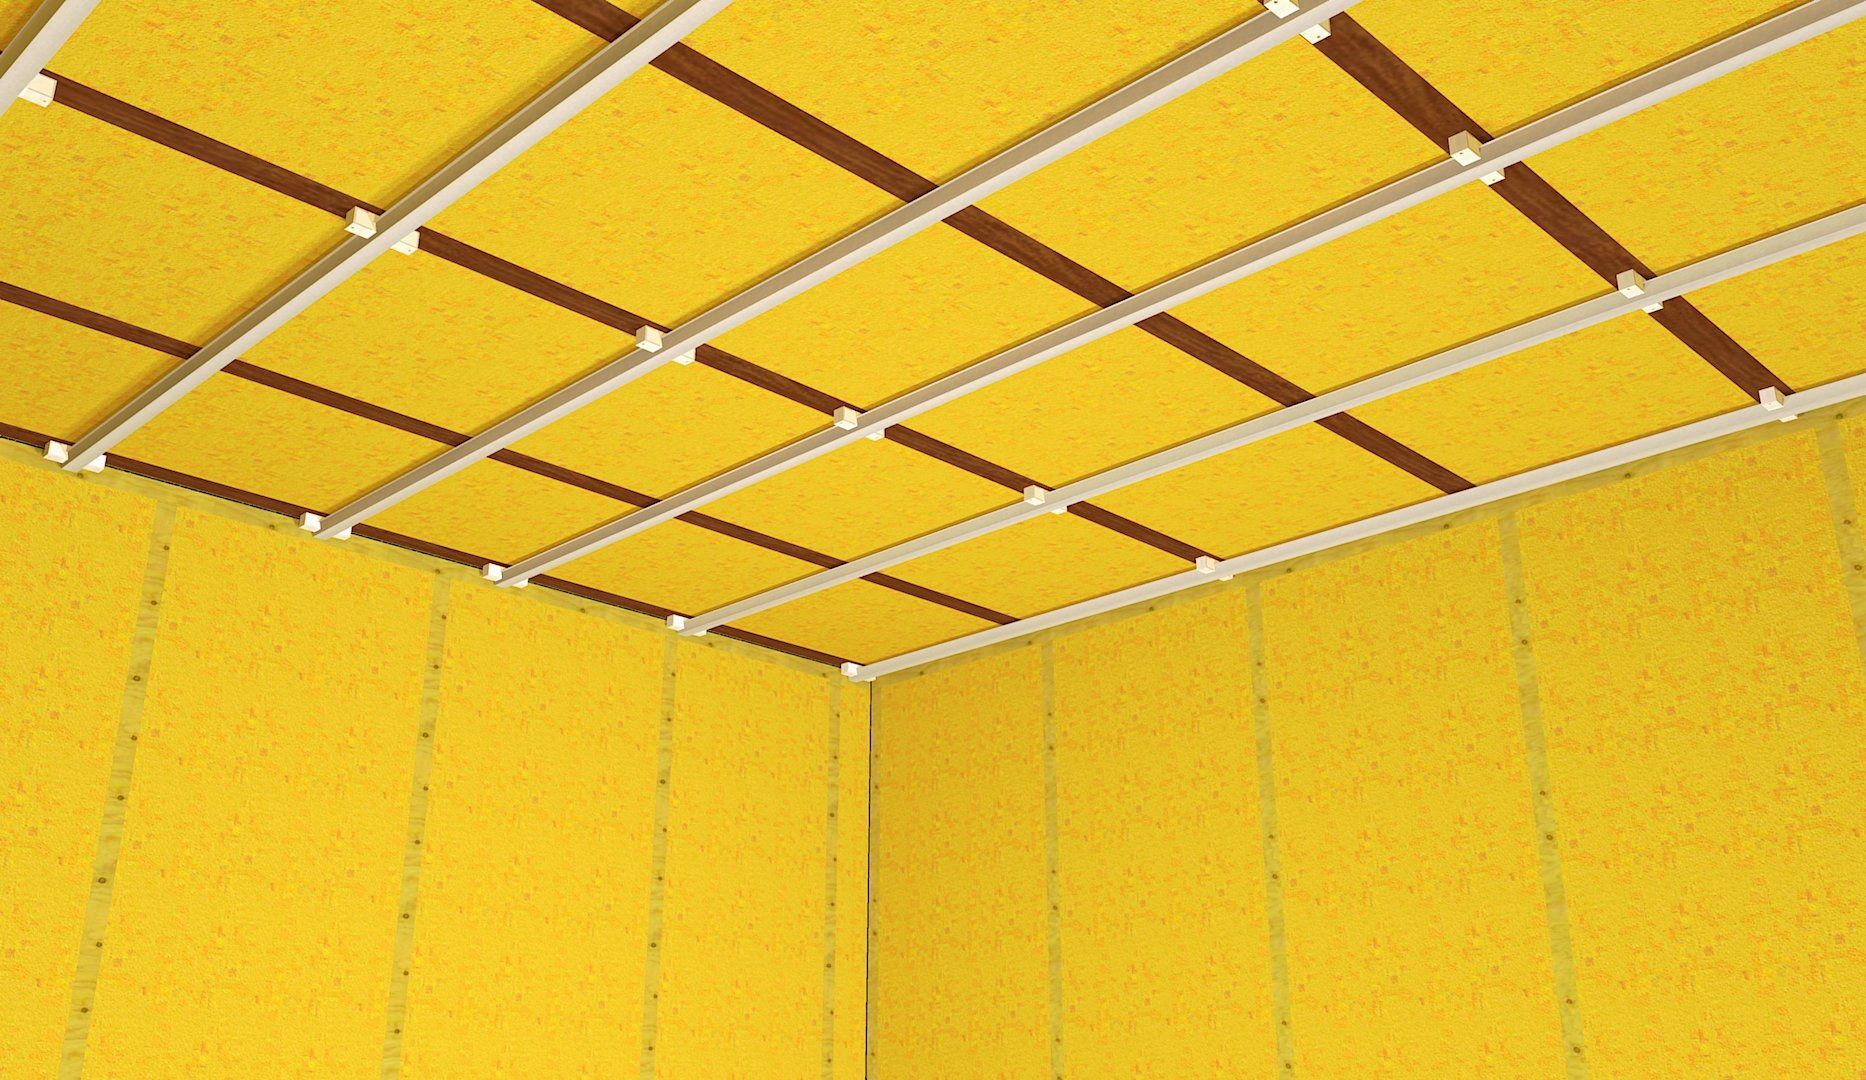
Ceiling
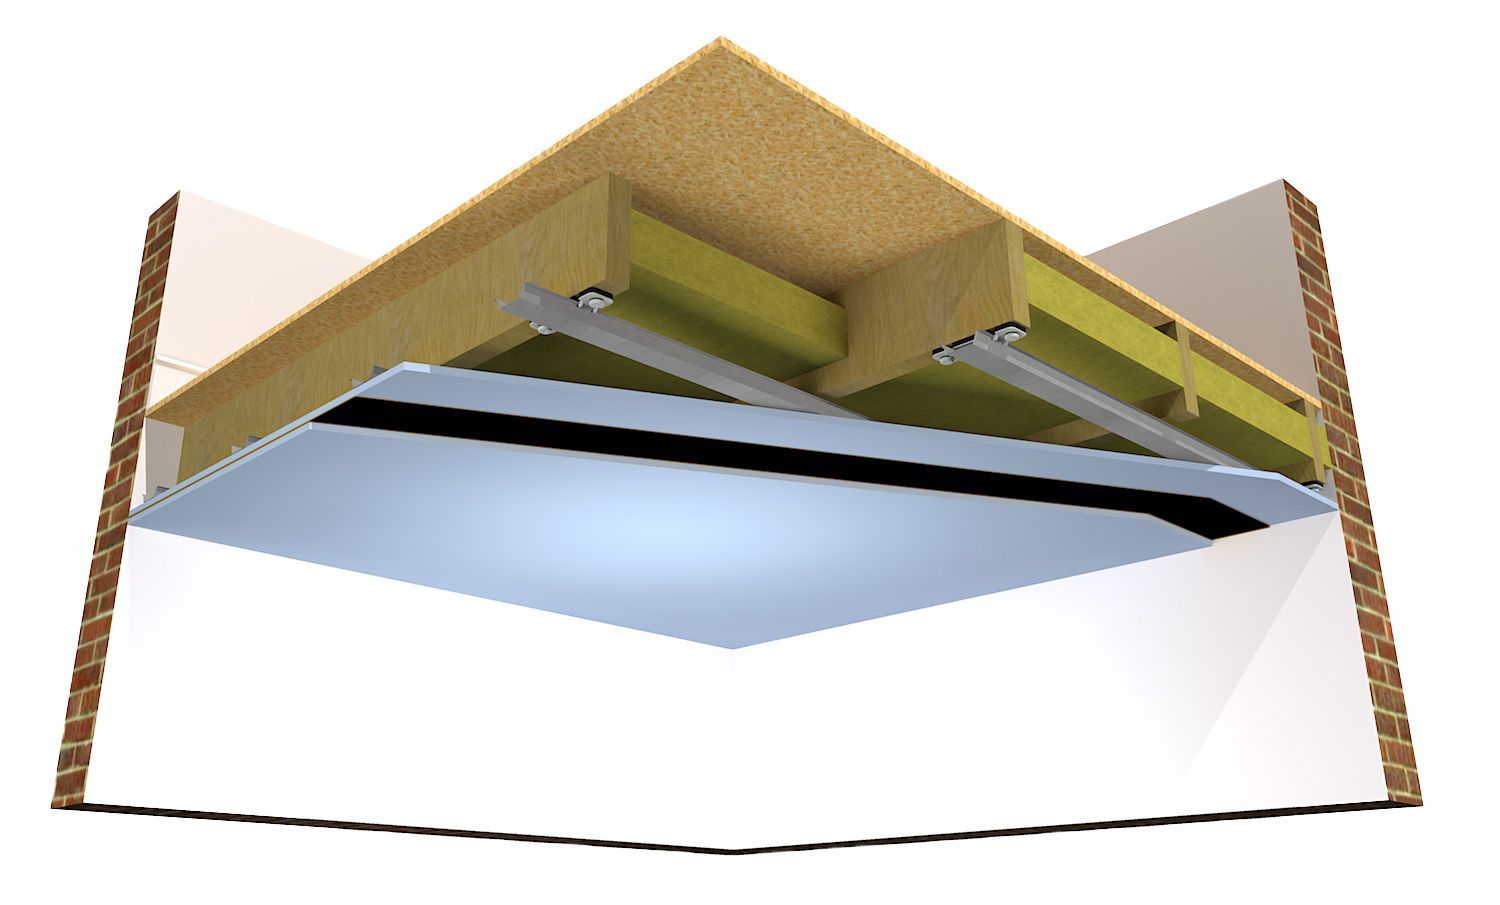
We were hoping to lower the basement floor enough to use the ReductoClip system on the ceiling as well. Filling the ceiling void with 60kg acoustic mineral wool, then installing the ReductoClips on the bottom of the ceiling joists, and again using two layers of 15mm acoustic grade plasterboard with Tecsound SY100.
My big concern was that above is just bare wooden floorboards with very little mass, lots of gaps between boards, and no other flooring. Ideally, we would want to add more mass to the floor above to really get a great result. However, the priority in this case is sound leaking into the adjoining properties not travelling above into the rest of the house, and the client preferred to keep his exposed wooden floors.
Floor
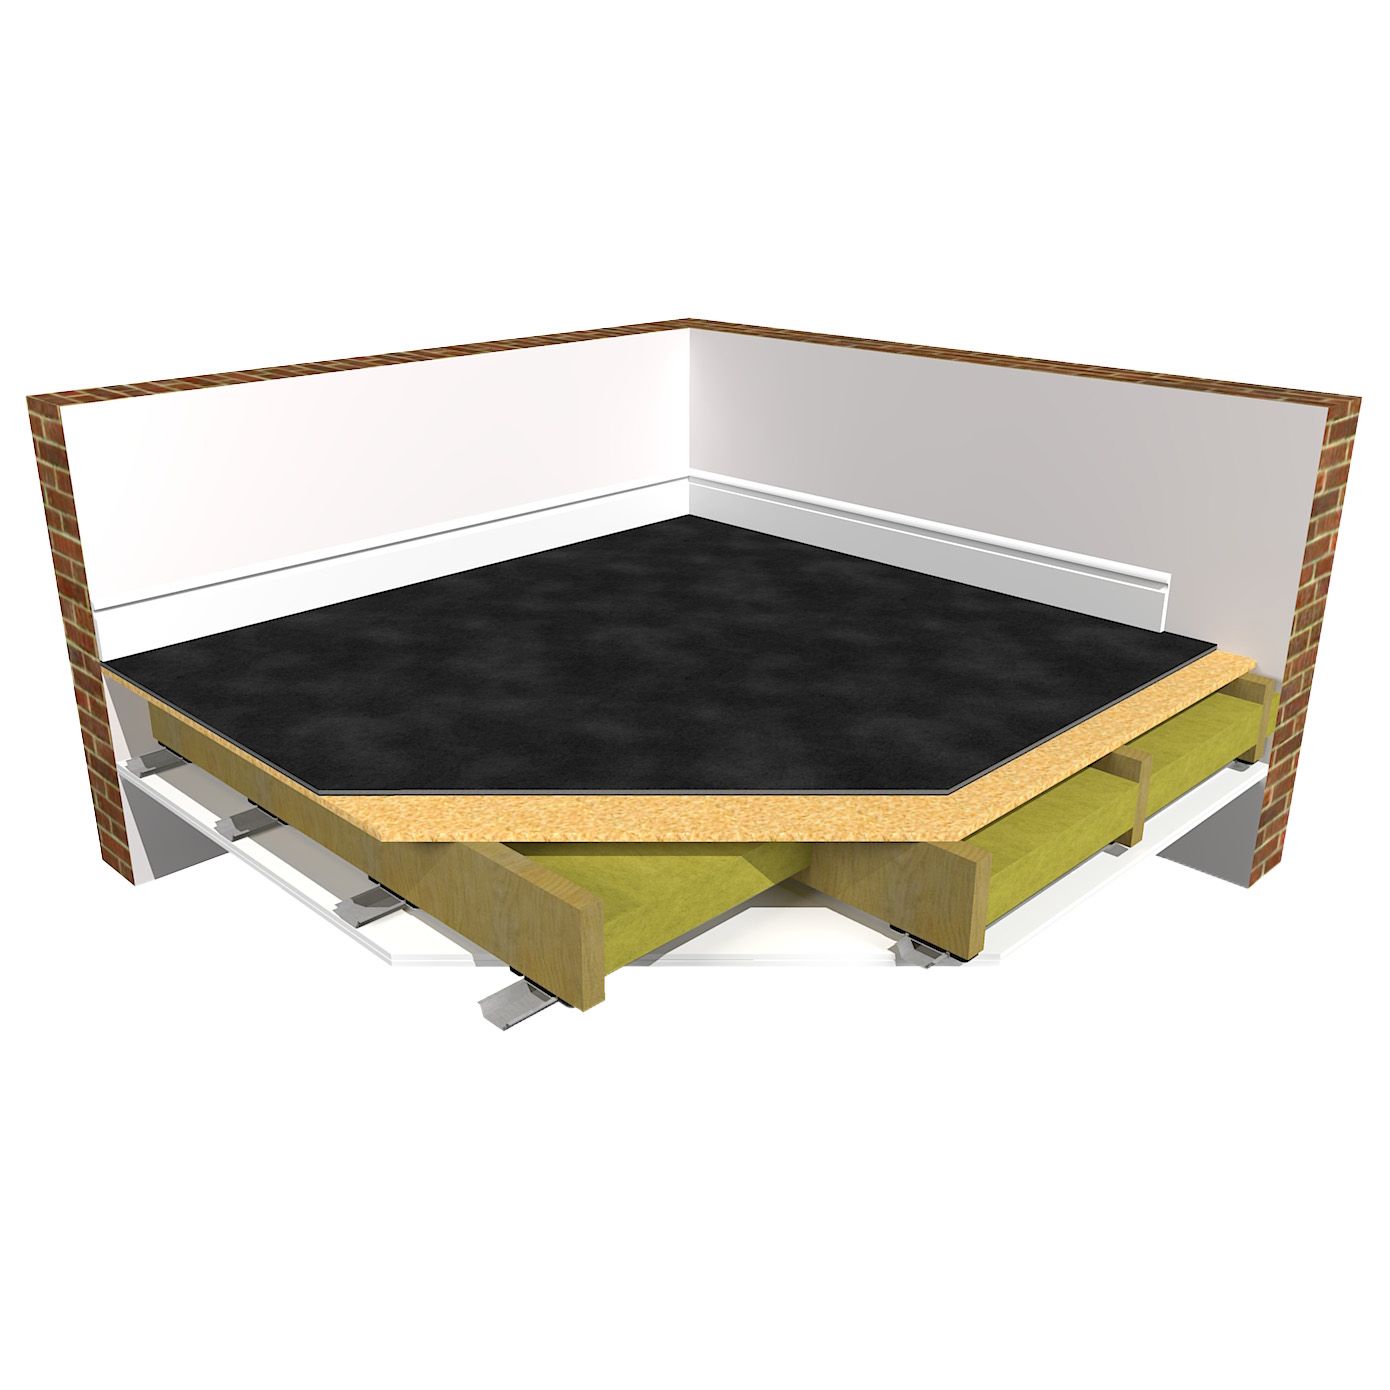
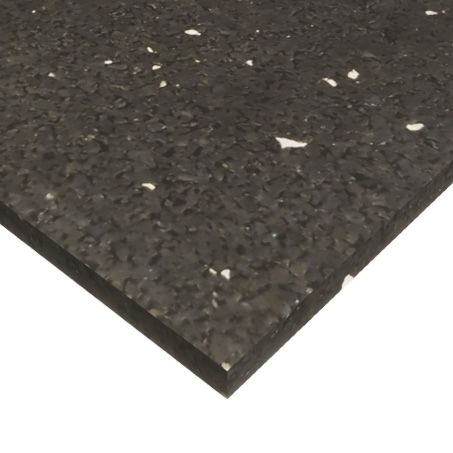
We don’t need to add mass to the floor as it’s a concretefoundation with nothing below. However, we do want to absorb vibration. If wedon’t address the floor, then the vibration will get into the concrete floorand spread under the soundproofing and into the structure. In this case ProSound ImpactoMat 5mm is all that’s needed.
Doors
I advised for a double fire door system. Using two FD60rated, solid core fire doors, back to back, with a seal around the perimeter.Combined, the doors should have enough mass to block a high level of airbornesound.
Alternatively, we can source custom made, acoustic studiodoors . These are extremely good but have a long lead time and are quite costly.We opted instead for the double fire door system in this case.
Important Amendment To The Original Specification
Just before work was due to get started, the client got intouch in a panic. He was worrying that after all the work and expense of thestudio build, what if the sound is still getting through to next door? Iexplained that the ReductoClip system is very high performing, and will offer a verysignificant reduction, but at the same time, if only installed on a singlebrick party wall, with potentially over 100dB of sound, there is a chance theneighbour may still hear a very low, muffled sound still coming through.
Determined to block as much as possible, we discussed ideasto push the performance even higher than we have ever specified before for astudio project.
I decided the best plan was to line the brick wall with our ProSound™ SoundMat 3 before building the ReductoClip system in front. This would be pinned tothe walls in overlapping tiles by rawl plugs. The SoundMat 3 is designed as afloor solution but is made up of 2 layers of very heavy, dense, mass loadedvinyl, separated by a vibration dampening foam.
This would add another 12.5kg of mass per m2 to the wall,plus, because we had not used mass loaded vinyl anywhere else in the build-up,it would block different frequencies of sound to the other materials, giving usan even broader range of frequency blocking. This would achieve much more thanadding more layers of plasterboard or Tecsound which we had already used in thebuild-up.
Adding this layer would normally be a little extreme, but for peace of mind, knowing we have done everything possible to block as much high decibel sound as we can from getting through a thin party wall, this step was worth it.
The Build
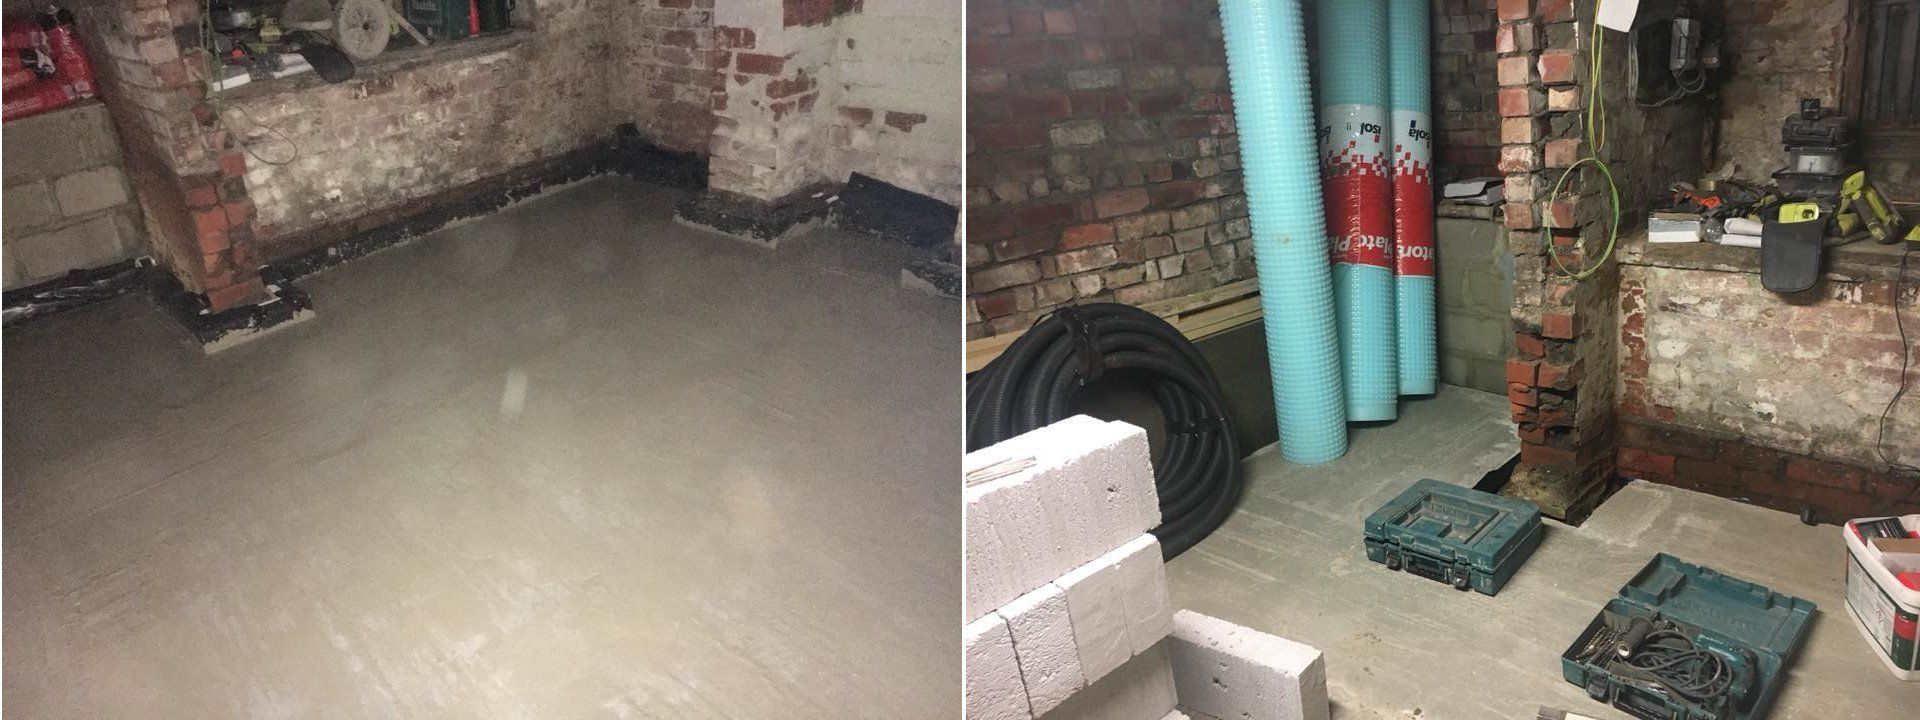
So, work finally got started, and the builders did a great job knocking down the separating wall, opening the studio room out, and digging down into the concrete floor. We managed to gain a lot of height, getting the height to the ceiling joists at roughly 2.4metres. So once the new ReductoClip Ceiling is installed, this would bring the ceiling height down to roughly 2.34m.
The builders poured a new cement floor to get things nice and flat and even, and left channels for the damp proofing. Then lined the walls with a damp proofing membrane. Not something we see much of in studio builds, as most tend to be ground level, but this was very important with it being a basement conversion.
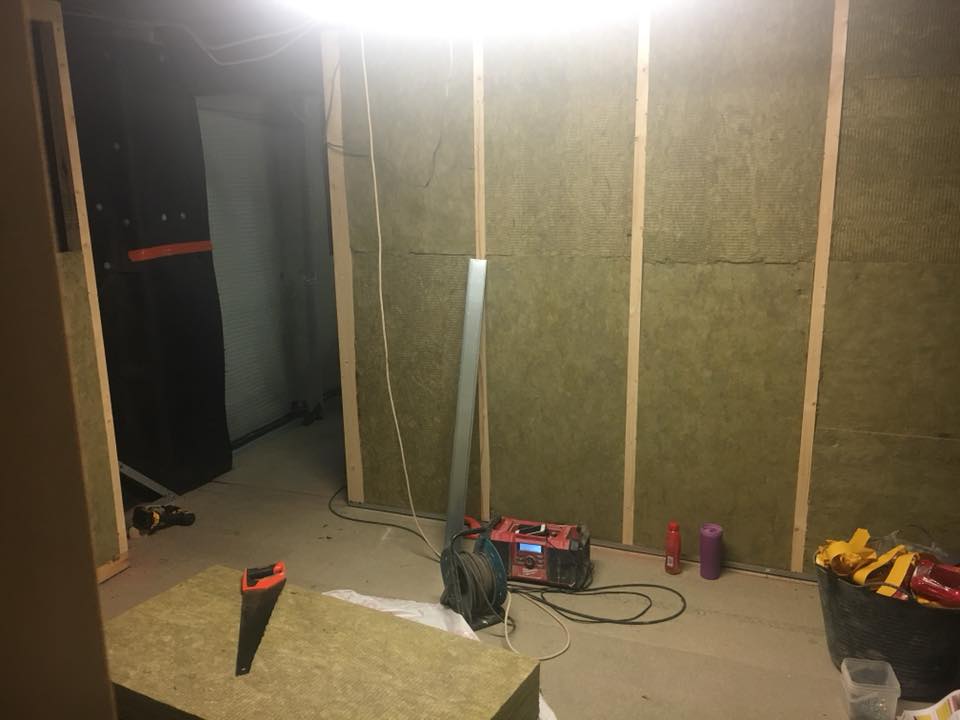
Soundproofing Installation Step 1
SoundMats pinned to wall.
In an ideal world we would want to cut each mat perfectly to size, butt them up against each other, seal and tape all the joins and have a fully sealed layer. However, this would take up far too much time and man power. Instead the installers opted to bend the mats around corners and columns and overlap the mats instead of sealing them. This is much easier to do, takes far less time, and would still have a great result for what we needed the mats for in this situation. SoundMats are easy to work with and have enough flexibility to work around awkward shapes.
Soundproofing Installation Step 2
Building the frame work.
You can use either timber or metal framework, in this case the installers opted for a combination of metal tracks on the top and bottom with timber studs. This is a very fast system to put together.
5 Key points for building a good independent frame for the ReductoClip system.
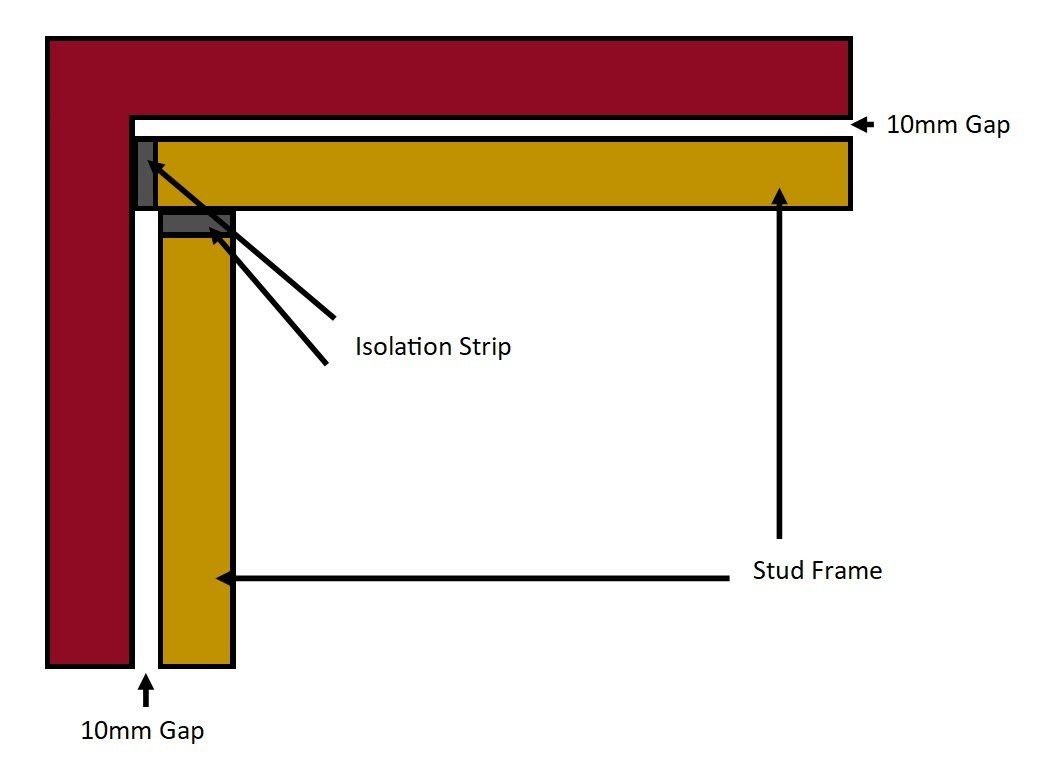
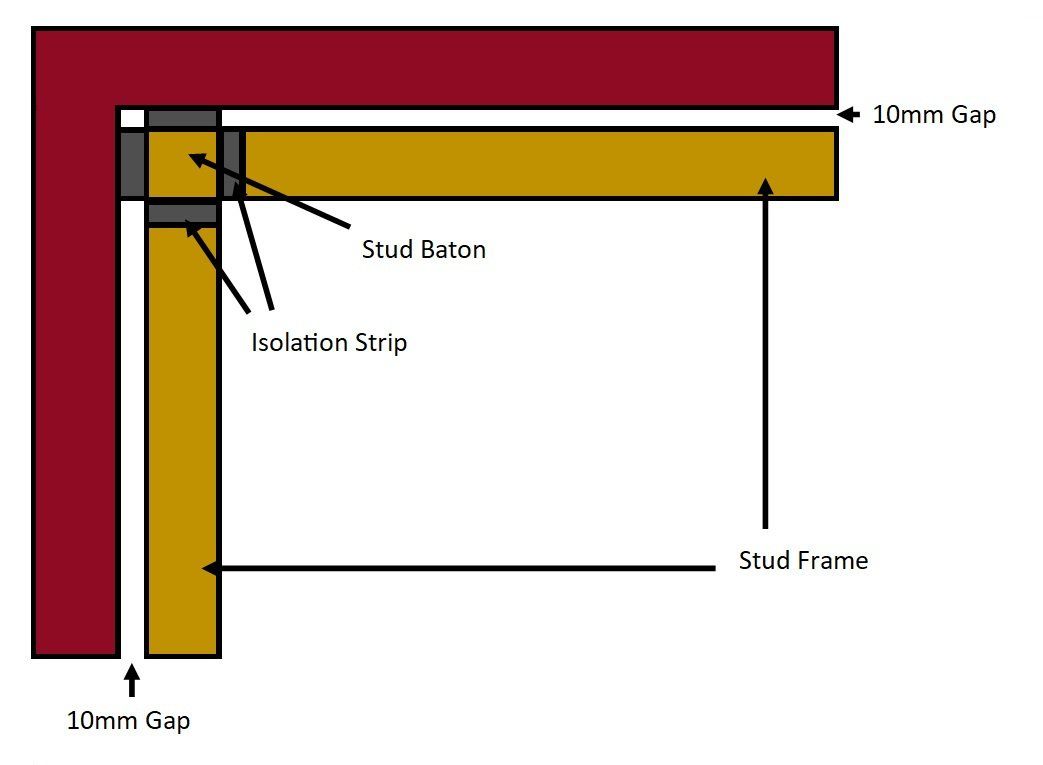
1. Build the frames at least 10mm away from the wall.
This is to isolate the frame from the wall behind, greatly minimizing the amount of sound vibration that can transfer through into the wall. Instead of fixings going through the frame and into the wall behind, we fix the frames around the perimeter into the floor, ceiling joists and adjoining walls and or frames. TIP – the bigger the gap the better the result, but 10mm is enough while keeping space loss to a minimum.
2. Isolate or ‘float’ the frames.
To minimize contact between the frame and the structure(floor, ceiling and sides), we isolate the frame around the perimeter using our 6mm Isolation strip . This is designed to hold the weight of the frames but alsoabsorb the vibration. This means that the only solid contact point between theframe and the structure of the building is the screws going through. The amountof vibration that travels through a screw is so small it is basicallynegligent.
3. Use 600mm centres between studs.
Acoustic Mineral Wool comes in 600mm wide slabs, so this is the ideal width between studs to minimize cutting. Also, the ReductoClips are installed at 1200mm centres meaning you can fix one clip every two studs. Not every wall will be at lengths that are perfectly split into 600mm centres, so extra studs can be used in the corners if needed.
4. Thickness of studs?
The thicker the frame the better the result. This is because the thicker the frame, the bigger the separation between the solid wall and the new ReductoClip Wall. Also, it allows us to use a thicker acoustic mineral wool inside of the frame so we get a better level of sound absorption. However, you do need to consider your space loss. In this case we opted for a minimal 50mm thickness. This is enough to hold the weight of the ReductoClip system securely, give a great result but with minimal space loss.
5. Corners
Corners in a studio build are the most complicated area as one frame is meeting another frame on the adjoining wall. There are two ways you can approach this. Fix one frame to the wall (isolated with isolation strip as usual), then fix the adjoining frame onto the first frame at a 90 degree angle. Isolate one frame from the other with isolation strip.
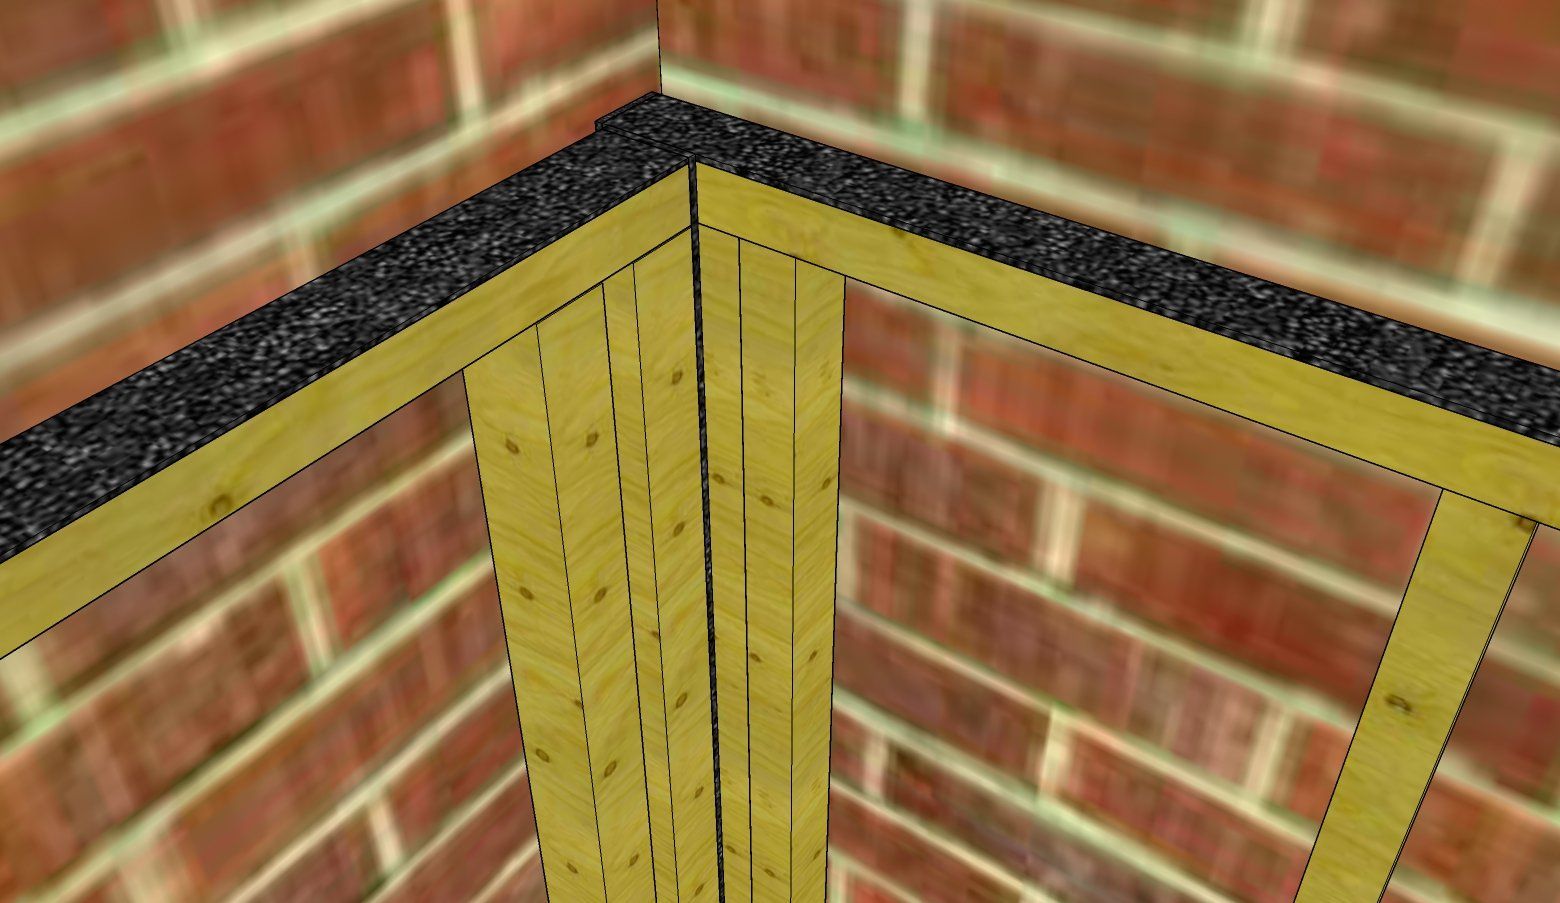
Alternatively, fix batons (isolated) into corners of the room, and then fix your stud frames to the batons (again, isolating as before).
A quick guide in how to build a basic stud wall (not soundproofed)
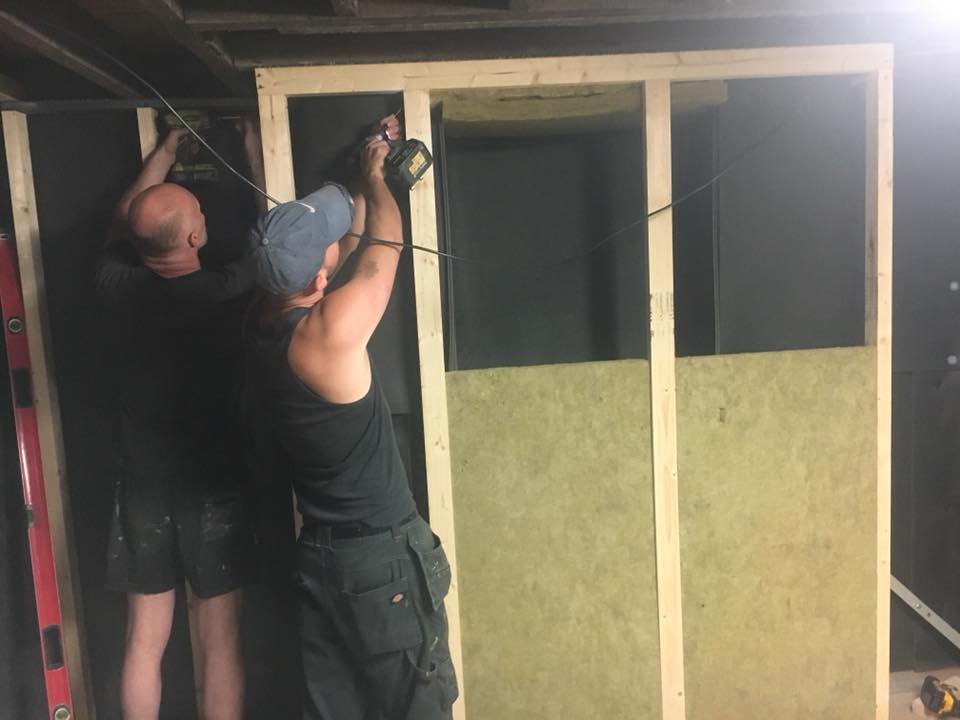
Soundproofing Installation Step 3
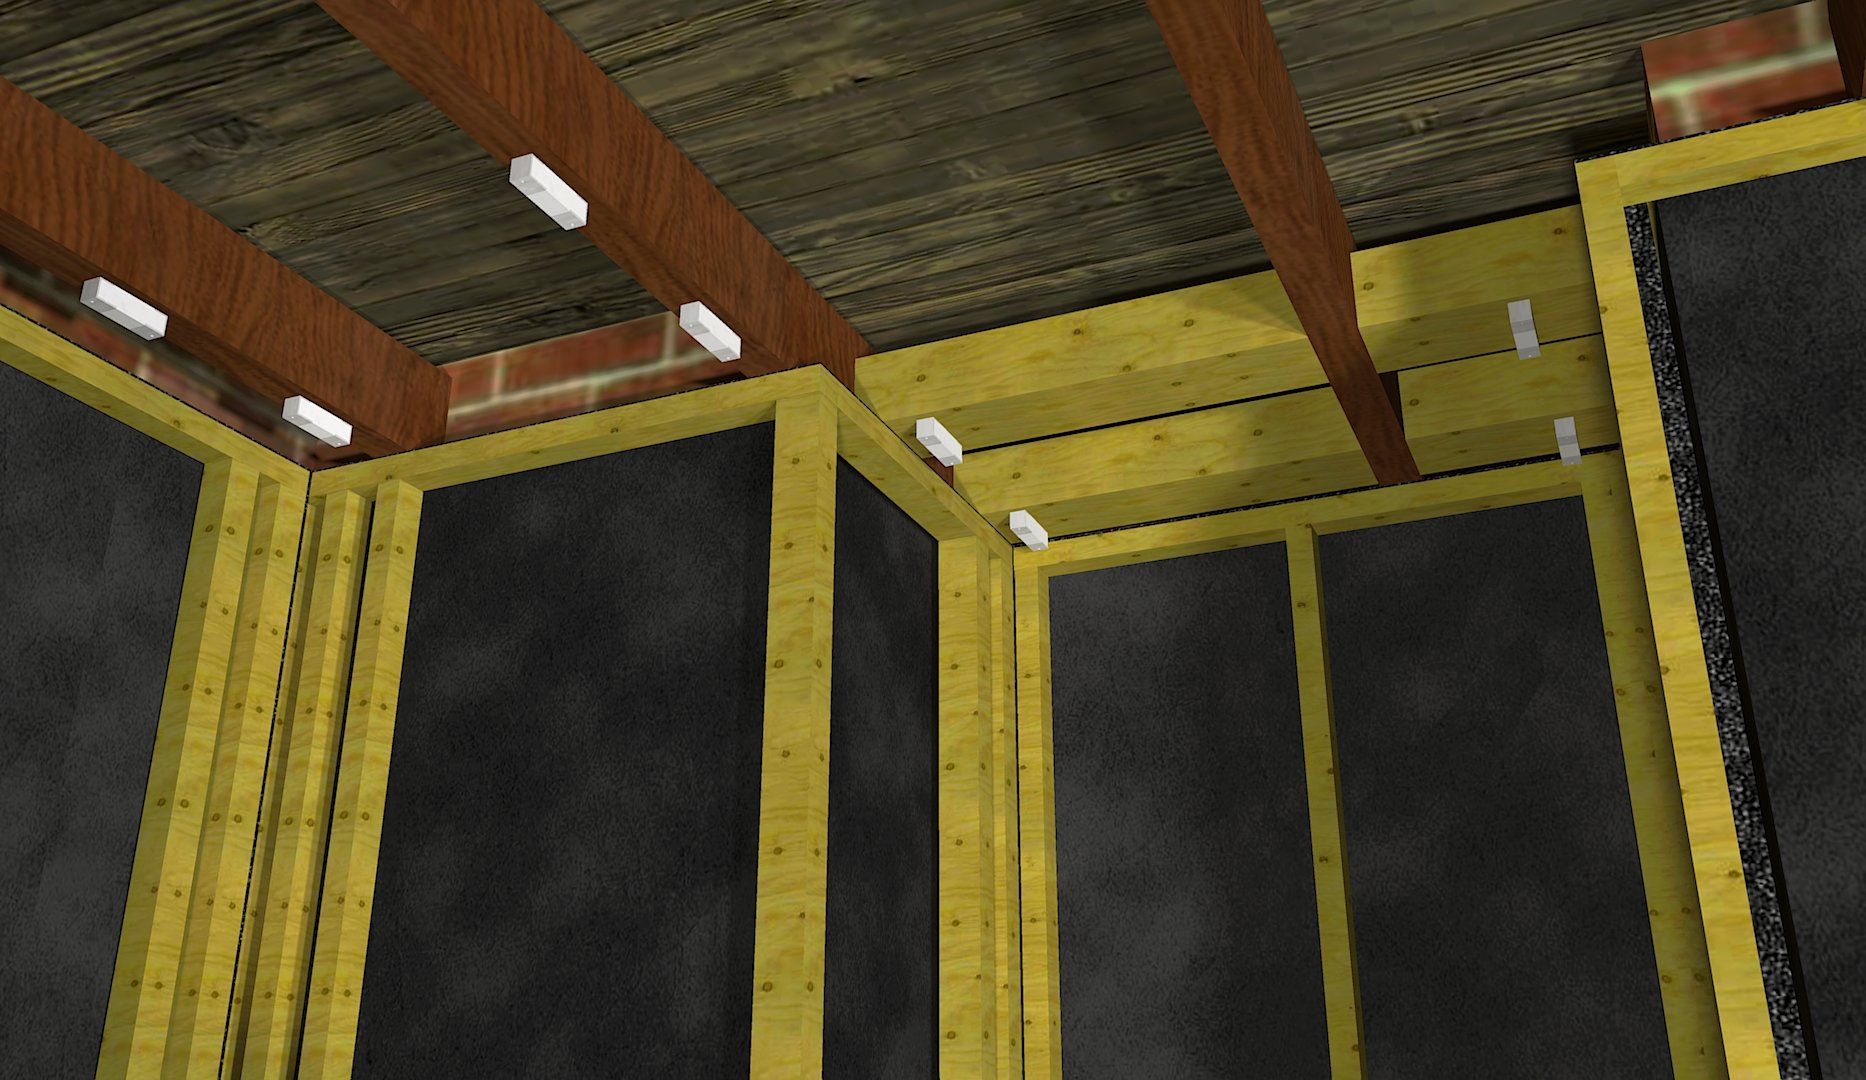
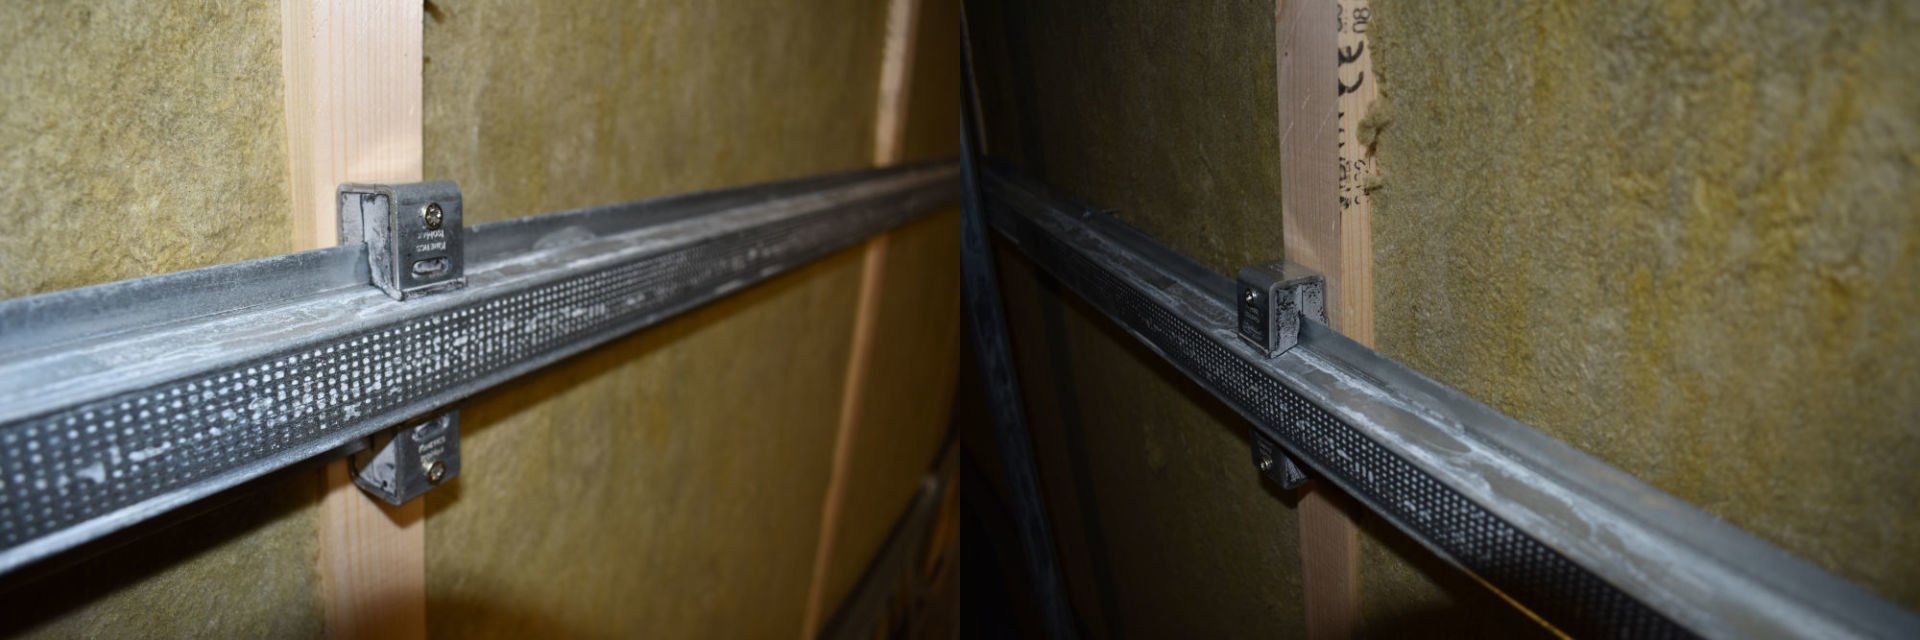
Fixing ReductoClips to Ceiling.
Now that the stud frames are up, we know the internal dimensions of the room and we can get started with the ReductoClips Its generally easier to start with the ceiling. Once the ceiling layers are installed, we then know exactly where to install our rows of clips on the wall.
We fix the ReductoClips directly onto the bottom of joists with strong 65mm length minimum screws. Clips are installed at 1200mm spacings maximum which worked out at every three joists in this basement. The furring channels are then installed at 400mm centres from each other. You also need to make sure that there are plenty of clips around the perimeters to hold the weight of plasterboards around the edges.
In this instance, because the room wasn’t a simple square room and we have awkward things to work around such as old chimney breast columns and parts of old walls, it meant that there isn’t always a joist to fix clips to in areas that need to hold plasterboards. In which case we need to fix timber noggins between the joists so that we have something to fix to.
TOP TIP: When fixing clips, just fix one side of the clip at first so that the other side hangs a little loose. This makes it much easier to clip in the furring channels, as the clips can bend and flex. Once the furring channels are clipped in, then screw your other side to make secure.
Furring Channels
Furring channels are very simple. Simply bend the ReductoClip slightly and your furring channel should slot straight into the clip. Once clipped in, screw the other side of the ReductoClips to secure.
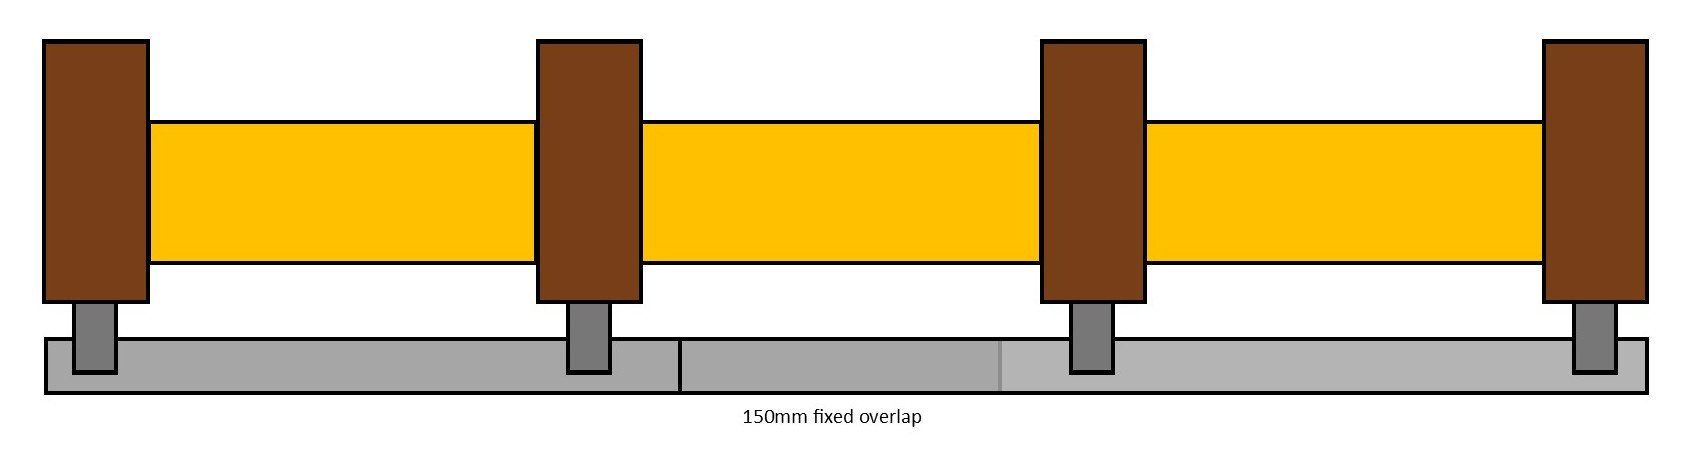
The furring channels come at 3m lengths. Where you need multiple furring channels across the length, channels will need to overlap to make sure the plasterboard is being secured properly. Channels should overlap by 150mm with two screws either side of the overlap to secure.
Soundproofing Installation Step 4
Insulating with Acoustic Mineral Wool
Now we’ve got any noggins in place and our ReductoClips are fixed, we can now address the voids between joists. If sound gets into these hollow voids, it will echo, resonate and amplify, so we always need to insulate any cavities or voids.
100mm of Acoustic Mineral Wool is ideal. You don’t want to completely fill from the floorboards to the ceiling boards. But you want at least 50% of the depth to be filled. In this case the joists were quite shallow at around 150mm, so 100m acoustic mineral wool is perfect.
Because of the high density of mineral wool, you shouldn't need to pin or hang the slabs in place. The mineral wool should just friction fit between the joists and hold itself in place for a very quick and easy installation.
Once the ceiling joists are insulated, we can then install acoustic mineral wool between the timber frame studs on the walls. In this case, we are using 50mm thick Rockwool for our 50mm timber frames.
Note: footage from a different project for demonstration purposes
Soundproofing Installation Step 5
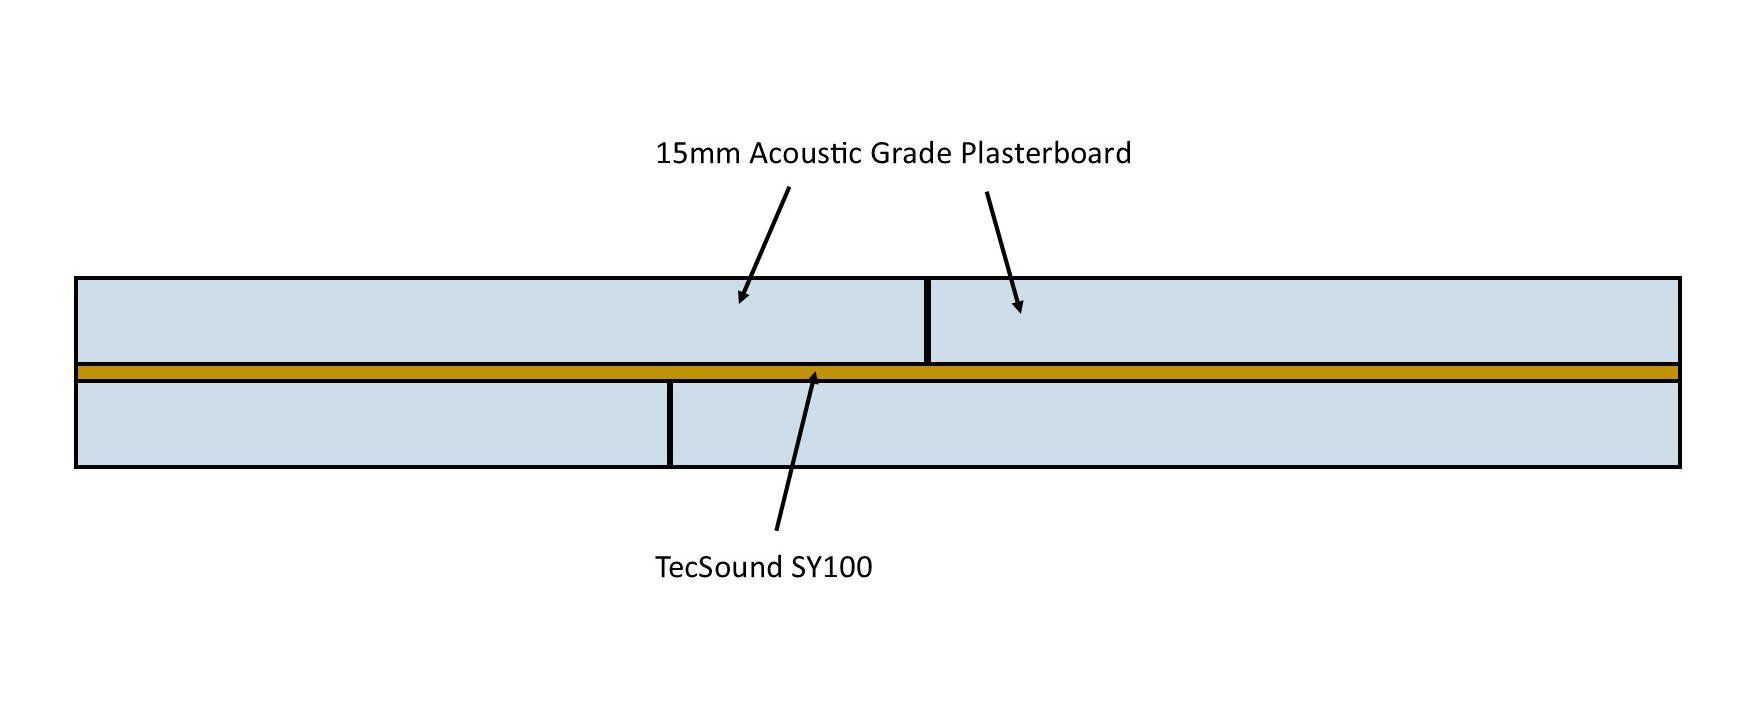
Fixing ceiling layers
For this job we used the maximum ceiling layers that we can use on the ReductoClip system. This is two layers of 15mm acoustic grade plasterboard with a layer of 5mm Tecsound SY100 sandwiched in between. Thecombination of layers adds a huge 35.6kg of mass per m2 and because of the mix ofdifferent materials it also blocks a large spectrum of sound frequencies.
The first layer of plasterboard is screwed onto the furringchannels using self tapping plasterboard screws.
The Tecsound is then stuck onto the second layer ofplasterboard using its self adhesive backing. This layer of plasterboard isthen raised on a plasterboard lifter, sandwiching the Tecsound between and thenwe screw through the plasterboard, all the way through the other two layers andinto the furring channels.
IMPORTANT NOTE: We don't want the plasterboard layers to butt all the way up to the wall frames. We want the ceiling to be flexible and not hindered in its movement. So leave a small gap of around 5mm around the perimeter.
Note: footage from a different project for demonstration purposes
Soundproofing Installation Step 6
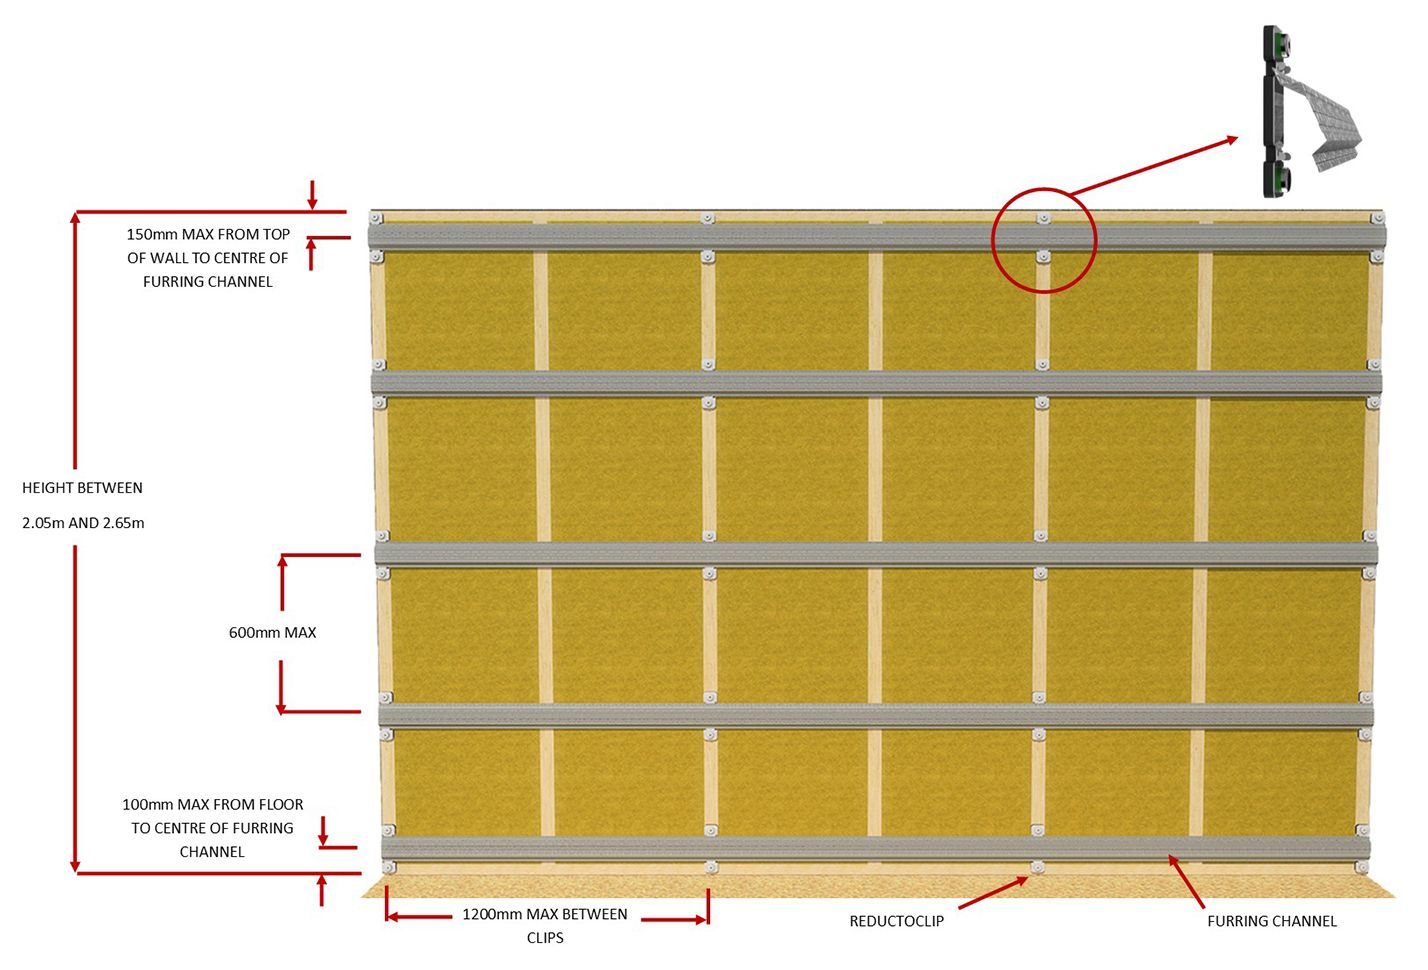
Fixing ReductoClips to Wall Frames
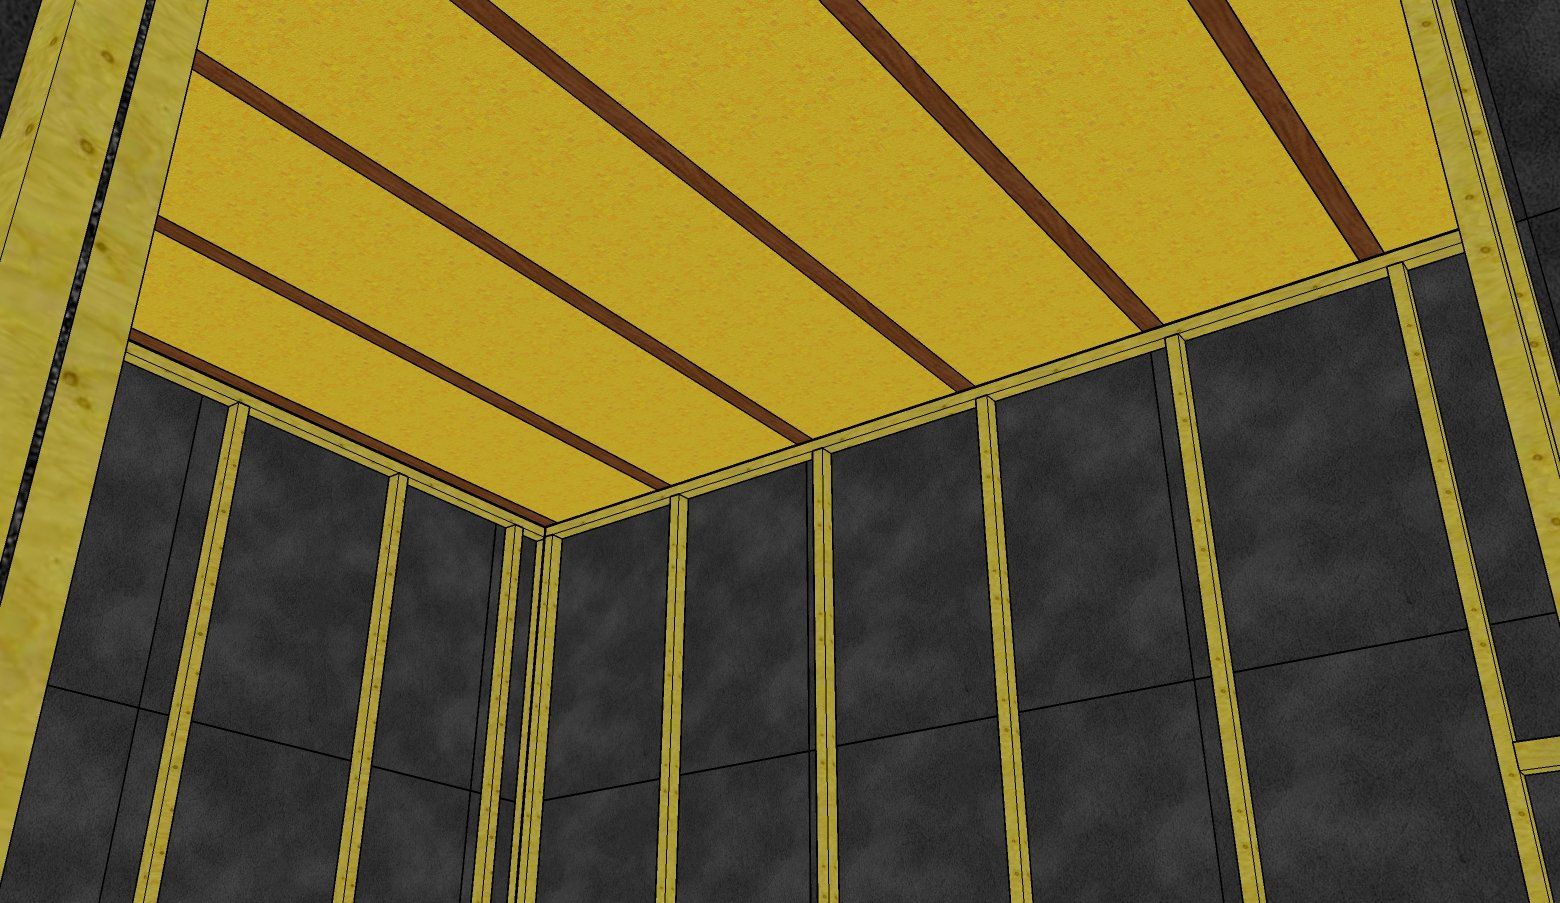
Now that the ceiling is finished and we now know the final height of our walls, we can now start fixing the ReductoClips at the correct spacings. The first row of clips needs to be within 150mm of the ceiling, and our bottom row needs to be within 76mm of the floor. This is to make sure that the weight is securely distributed. We will then need rows between the top and bottom fixed at no more than 600mm apart.
Along each row, the clips should be no more than 1200mm apart making sure that there are clips around all perimeters.
ReductoClips are very easily screwed into the stud work. Then furring channels are easily clipped into the ReductoClips with no fixings.
As with the ceiling, the easiest way to install the furring channels is to only screw one side of the ReductoClips to the stud work, leaving the clips able to move and flex. This way the furring channels will easily clip in. Once the channels are clipped in then screw your second fixing point to make it secure.
Soundproofing Installation Step 7
Fixing first layer of plasterboard
Starting from one side of the wall, we begin to fix the first layer of plasterboards on to the ReductoClip furring channels.
Just like the ceiling layers, we don't want the plasterboards to butt up against other surfaces such as the floor, ceiling or adjoining walls. So we use a shim on the floor to raise the plasterboard 5mm off the floor. We leave the board 5mm away from the adjoining wall, and we cut the board so that there is a 5mm gap from the ceiling plasterboard.
The plasterboard is screwed onto the furring channels with self tapping plasterboard screws. Once screwed on, you can remove the shim from below.
Continue around the wall, butting the plasterboards up to each other the best you can leaving minimal gaps (except from the floor, ceiling and adjoining walls as before).
Soundproofing Installation Step 8
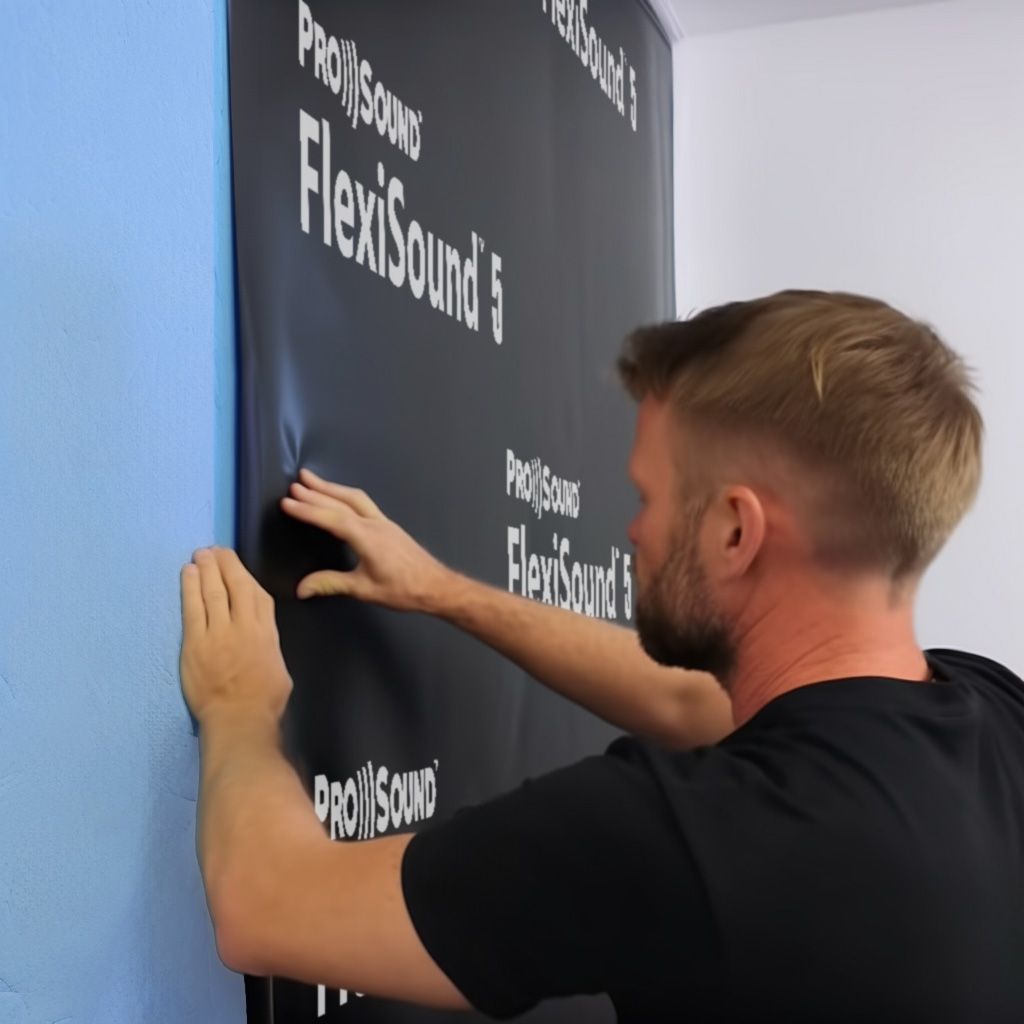
Applying FlexiSound 5 Layer
Applying
FlexiSound 5 on the walls is much easier than on the ceiling. The easiest way is to lay the FlexiSound on the ground, trim it into manageable pieces and slowly roll the FlexiSound down the wall, slowly peeling away the backing paper. Remember FlexiSound is incredibly heavy at 48kg per roll, so cutting into smaller pieces is a lot easier than trying to roll a whole roll down the wall!
Again the FlexiSound is there to add a lot more mass to the wall, while at the same time separating the plasterboard layers with a different construction material. This helps to force the sound waves to change and filter and dissipate as they try to get through different types of material.
By using the FlexiSound we will block a higher decibel level of sound and also a larger spectrum of sound frequencies than we would by just using two layers of acoustic plasterboard together.
Soundproofing Installation Step 9
Fixing Second Layer Of Plasterboard
Now we fix our final layer of plasterboard. Ideally we don't want the seams of the two layers of plasterboard to match, leaving a gap going through. Usually the easiest way to off set the seams is to start plasterboarding from the opposite end when you fix the second layer. Or start with a half width board.
The second layer will need longer screws to go through both layers of board, the TecSound and still get a good purchase into the furring channel. Screw lengths can be found in our ReductoClip Installation Guide.
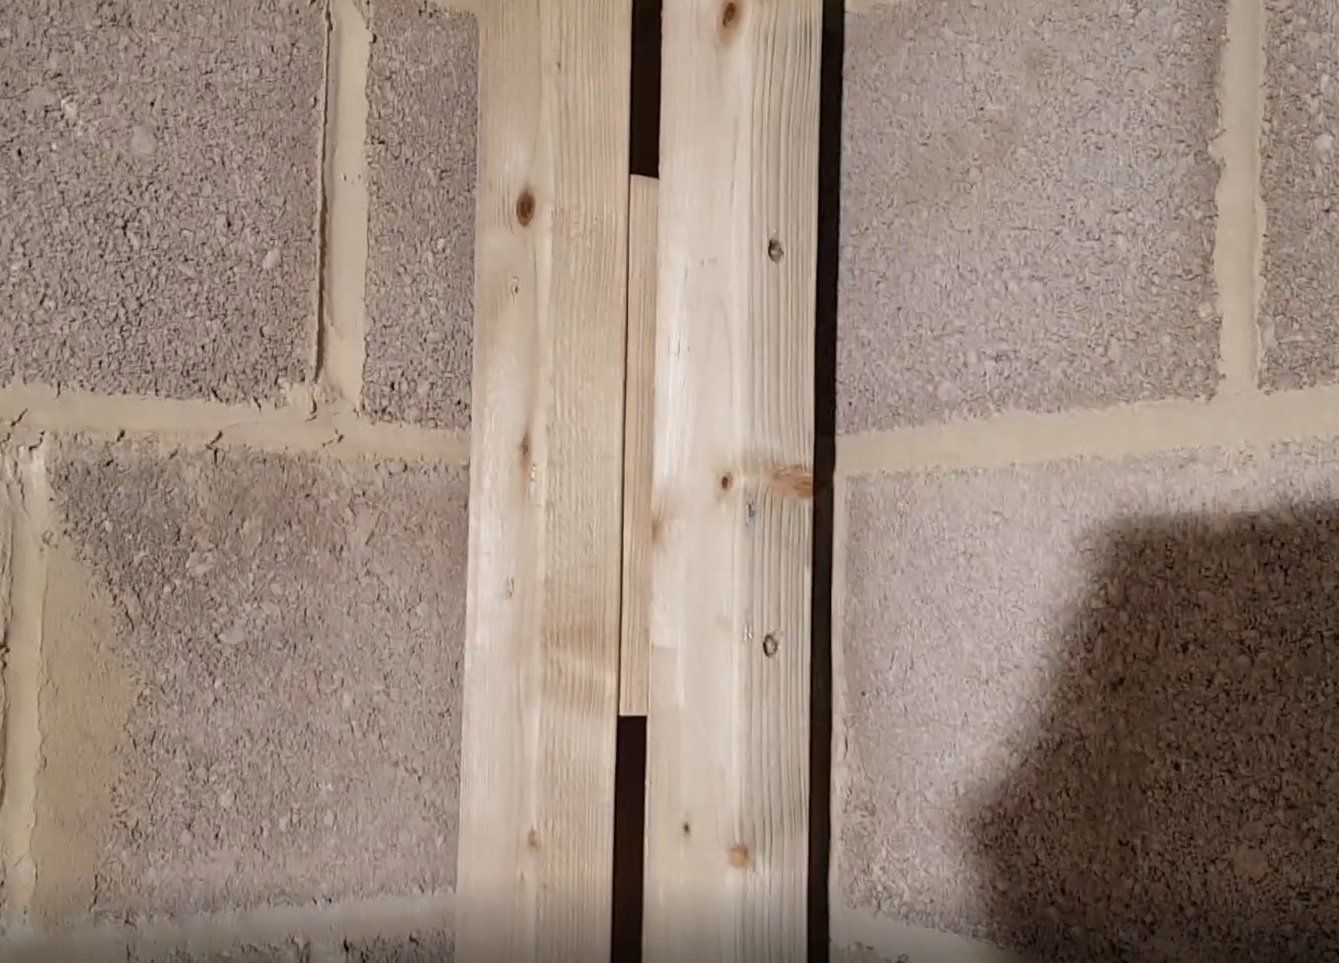
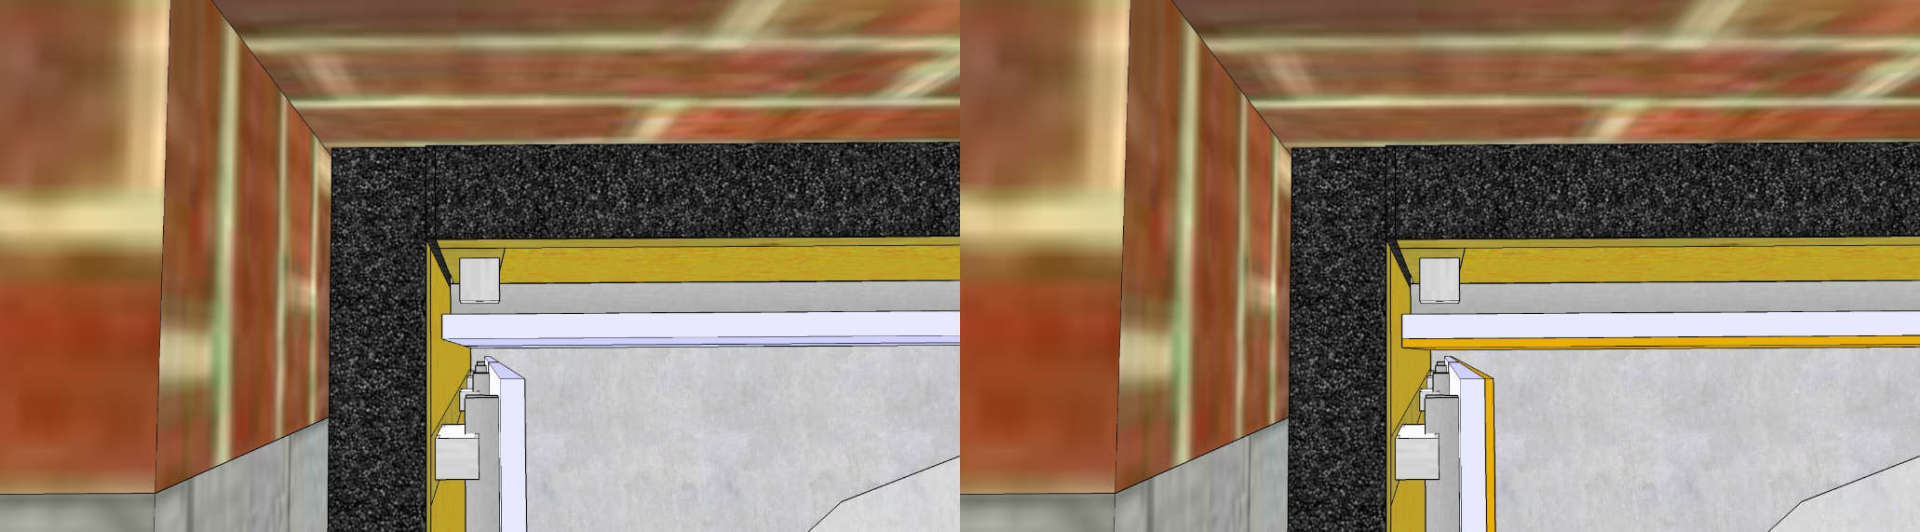
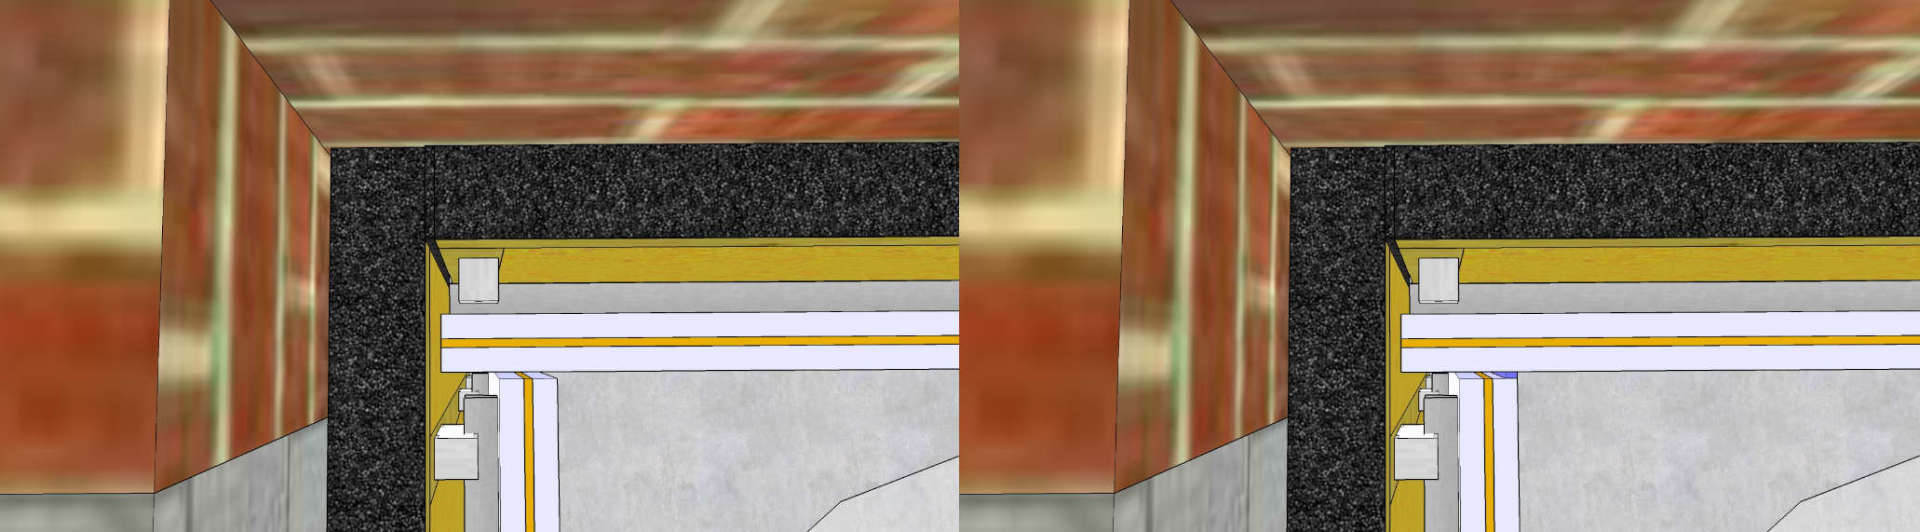
Corners
We often get asked how the plasterboards should meet in the corners. Again, the plasterboards from one wall should not butt up against the plasterboards of the next wall. This will hinder the ReductoClip system from being able to move freely and absorb the vibration energy of the sound. Instead the first walls plasterboards should go almost up to the wooden frame of the adjoining wall, with a 5mm gap. Then the plasterboards of that wall should go up to the plasterboards of the first wall with a 5mm gap. The 5mm gap should then be sealed with acoustic sealant.
Sounds confusing I know, much easier to understand from the diagrams below.
Soundproofing Installation Step 10
Sealing Gaps and Joins
We now have to make sure that all surfaces are sealed and air tight so that sound can not leak through any gaps. Its a case of going around each wall perimeter, filling in all those 5mm gaps. We recommend to use a specialist
acoustic sealant . This will not only block the sound but also stays flexible once it has dried, meaning that it can still absorb the sound vibration.
If for any reason you have any gaps between boards (due to uneven surfaces etc), then fill these gaps with the sealant as well.
Soundproofing Installation Step 11
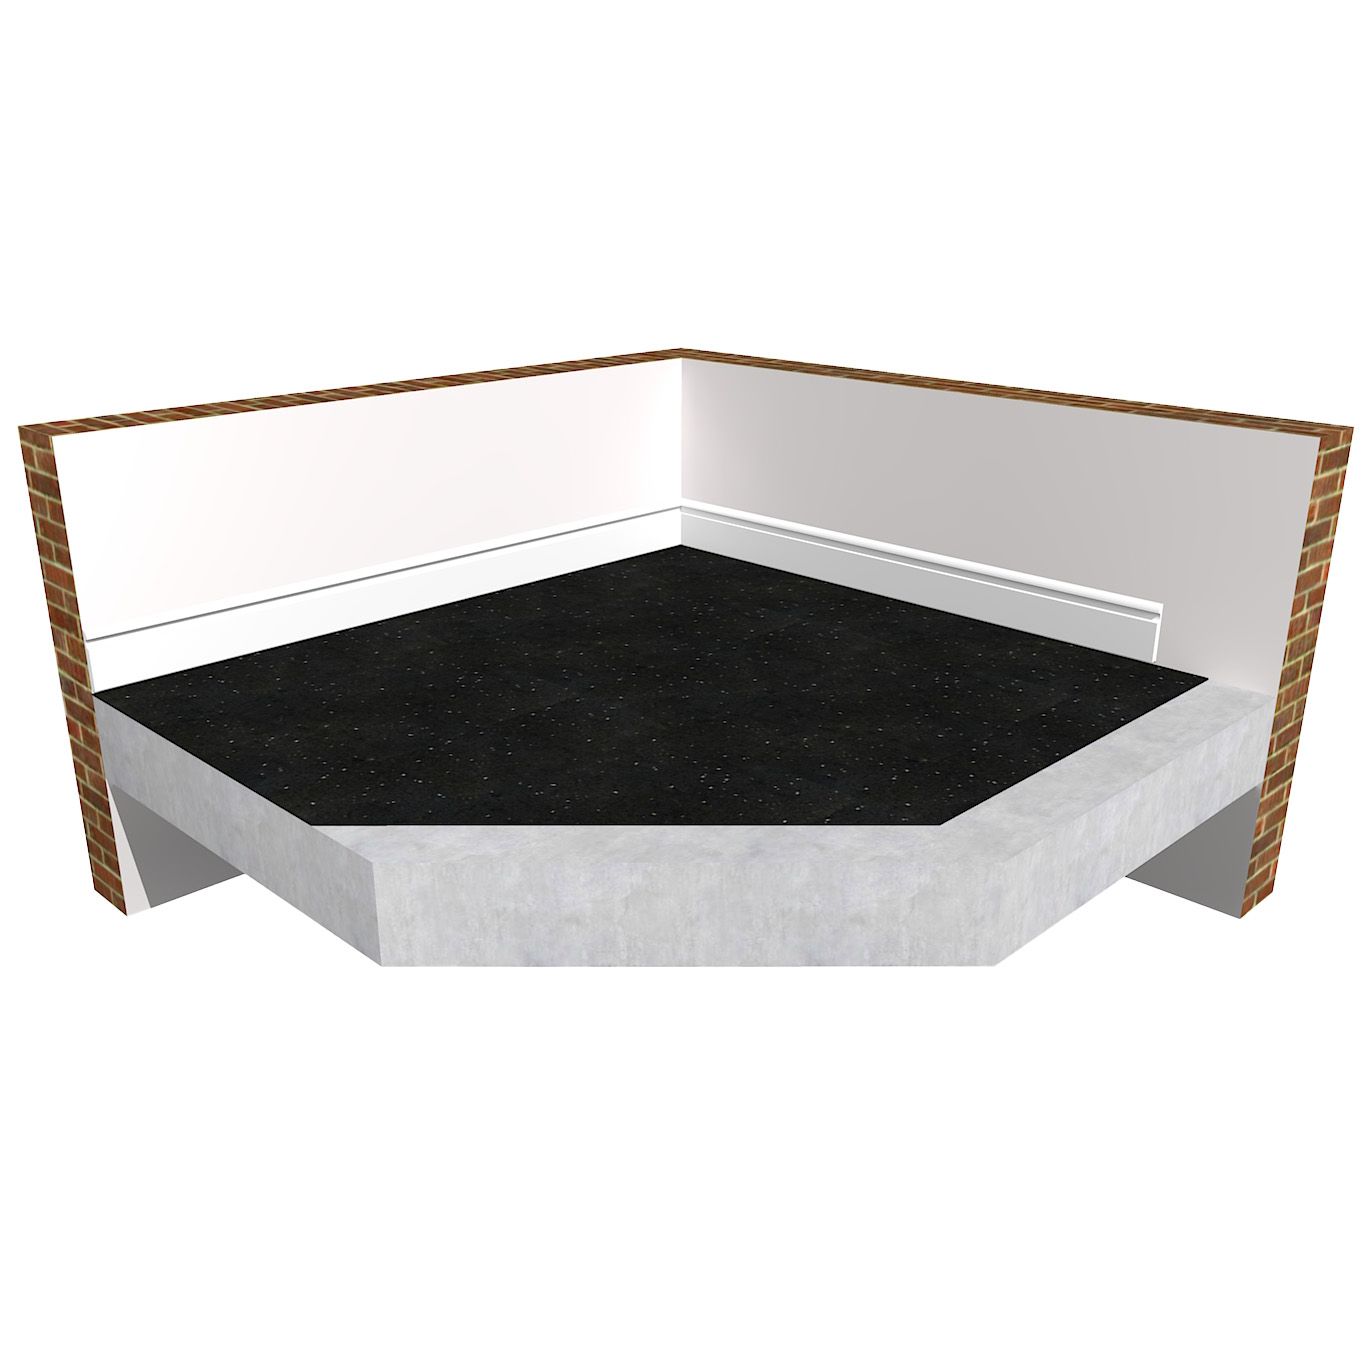
Soundproofing The Floor
A very simple solution in this case. We don't need to block sound travelling below as we have a solid concrete foundation. However, we do want to reduce the vibration that can get into the concrete floor and then spread into the structure, bi-passing the soundproofing on the walls.
The builders decided to lay an 18mm chip board sub floor on top of the concrete, we then installed a layer of our
5mm ImpactoMat on top. This is easily glued down onto the chipboard floor boards. We would ideally go up to the ReductoClip walls and slightly wrap up the wall and can go behind any new skirting board that will be attached.
Finishing The Walls and Ceiling
At this point the ceiling and walls need to be finished properly. Ideally a plaster skim is the ideal finish. We need to cover up the screw heads and joins between plasterboard. Adding a layer of plaster will add some extra mass to the surface but also help seal everything in. If you would prefer not to plaster, you can use a thick lining paper, but plaster is always preferred.
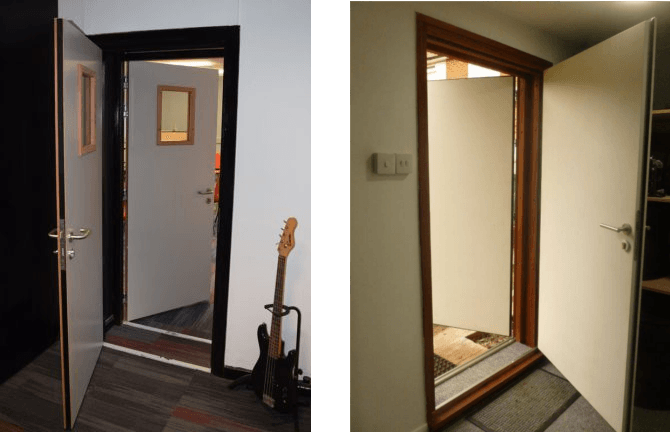
Soundproofing Installation Step 12
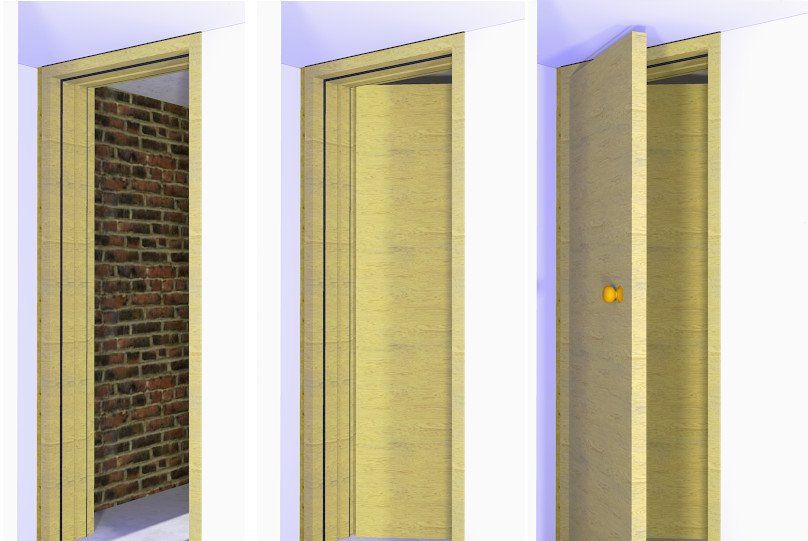
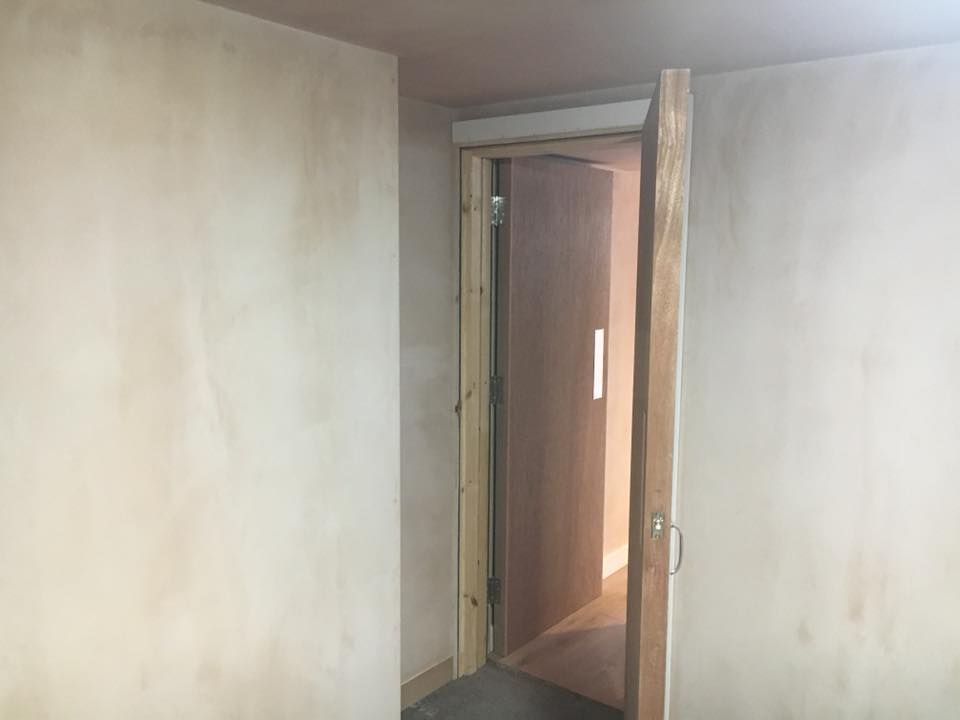
Entrance Door
On this project we decided not to go as far as an expensive, custom built studio door, but instead to use a double fire door system. The mass of two solid core, high density doors should be enough to really block a high level of sound. We install the doors back to back so that you open one door to reveal another door.
Fire doors are rated by their burn time. Typically the highest performing are FD60. These are ideal for studio doors, but remember its mass that blocks sound so the heavier the better. When comparing different doors, always look at the weight.
There was no door in this room originally, so the builders needed to build two new door frames. The first is built in the original entrance/opening of the room.
We isolate the timber of the frame from the solid wall using
isolation strip.
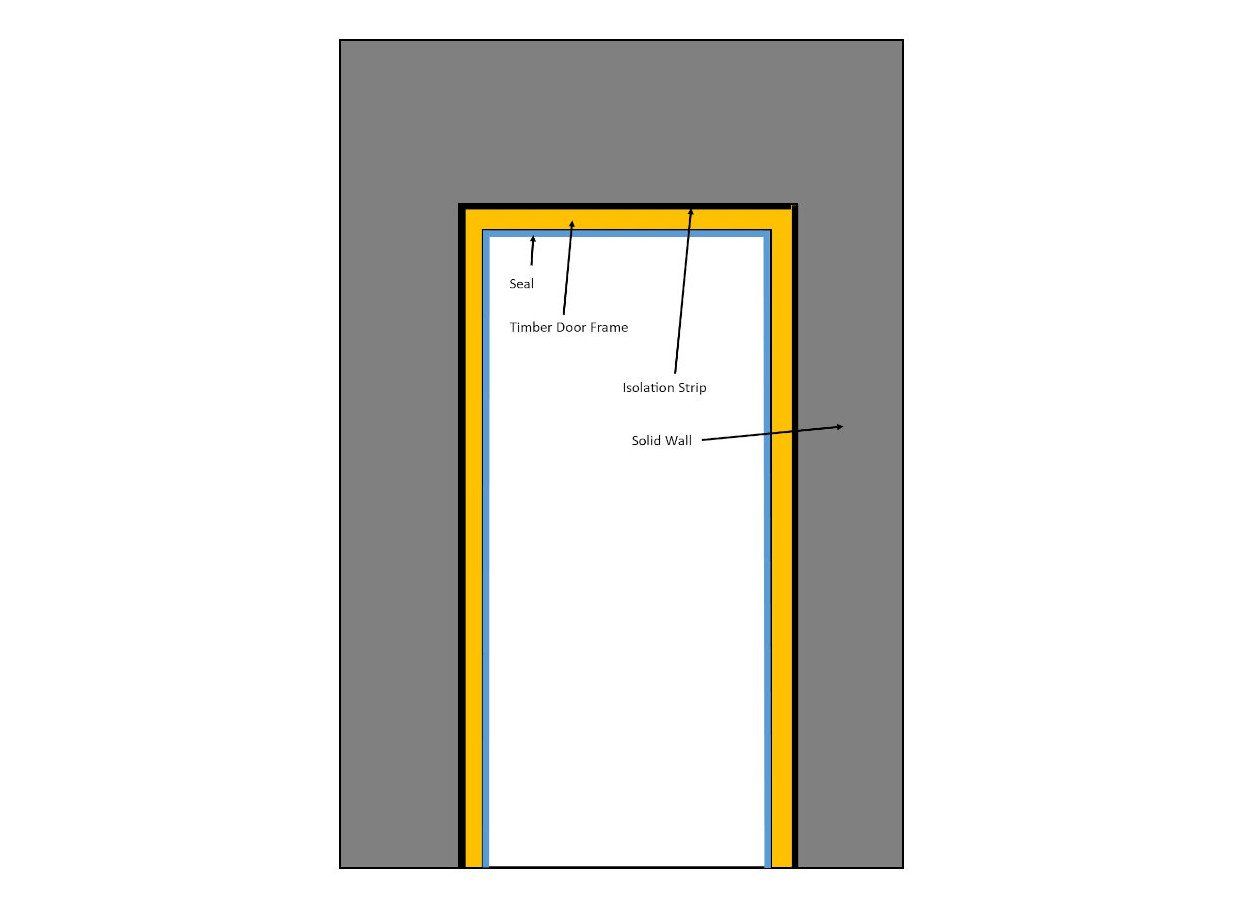
We then build the internal door frame onto the ReductoClip frame, again there should be isolation strip on the perimeter of the frame to isolate the door frame.
If the two door frames are very close as they are in this case, you can use isolation strip between the frames. Ideally having a larger gap between the doors is better for results, but if you are trying to take up as little space as possible as in this situation, then you will only have a 10mm gap between the wall and door frame.
In this case we built the door frames before adding the plasterboard for ease of access in the basement. You can leave the doors until the end if you wish.
Other Important Things To Consider
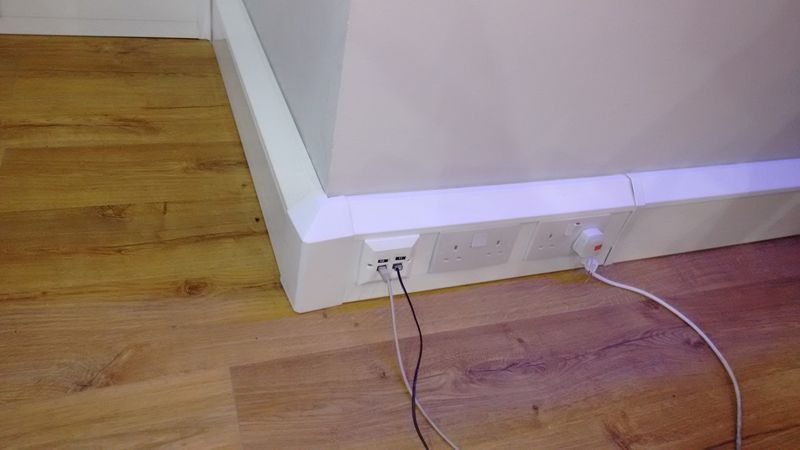
Power Sockets
One major problem in some builds is that after adding all of this extra mass onto the internal walls, the builder then cuts lots of big holes in it for cabling, power sockets and light switches. These holes then allow sound to leak through and creates a weak point in the soundproofing.
Solution
Ideally have your sockets and switches surface mounted on top of the walls instead of inside the walls. This saves having big holes! It may not look as pretty as a nice flush, counter sunk socket, but lets face it, with studios we are looking for maximum performance.
In terms of cabling, if your sockets are surface mounted, you only need a small hole in your wall to pull through cables, seal around the cable and fix your socket on top. Or... even better.... have your cables surface mounted as well. Use plastic trunking as in the picture below. This is going to be much easier for cable management as well.
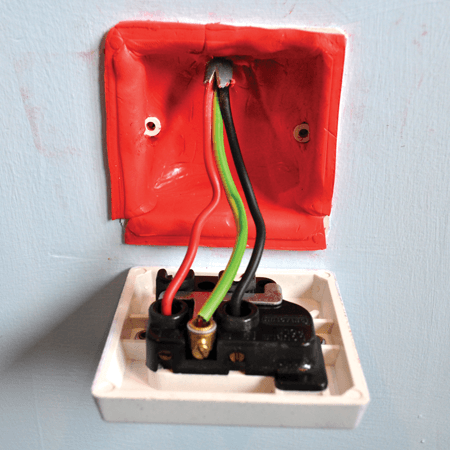
If you absolutely must have your sockets sunk in the wall and need to cut holes in the soundproofing, you can at least minimize the problem by covering the back of the socket box or inside of the socket box with our Socket Putty Pads .
Lighting
Just like with sockets, a lot of people like to use nice flush spotlights inside the ceiling. These look great, but again require lots of holes to be cut out of your ceiling soundproofing.
Instead, go for traditional pendulum style lighting, requiring just a small hole for one cable, or surface mounted spotlights, or even free standing lamps which can be moved as needed and actually be very handy.
Ventilation
Materials that block sound also block heat, so a soundproof room can get very hot! At the same time, a well soundproofed room is relatively air tight, reducing natural airflow. So ventilation is important if you use your studio for long periods.
I'm no expert in ventilation so I would suggest talking to a ventilation company to know exactly what you need for your space but you basically have two choices. A simple in and out, passive vent such as our
Acoustic Vent or a fancy digital, motorized vent/air conditioner unit. In this case the customer opted for a fancy digital system that controlled the airflow and temperature.
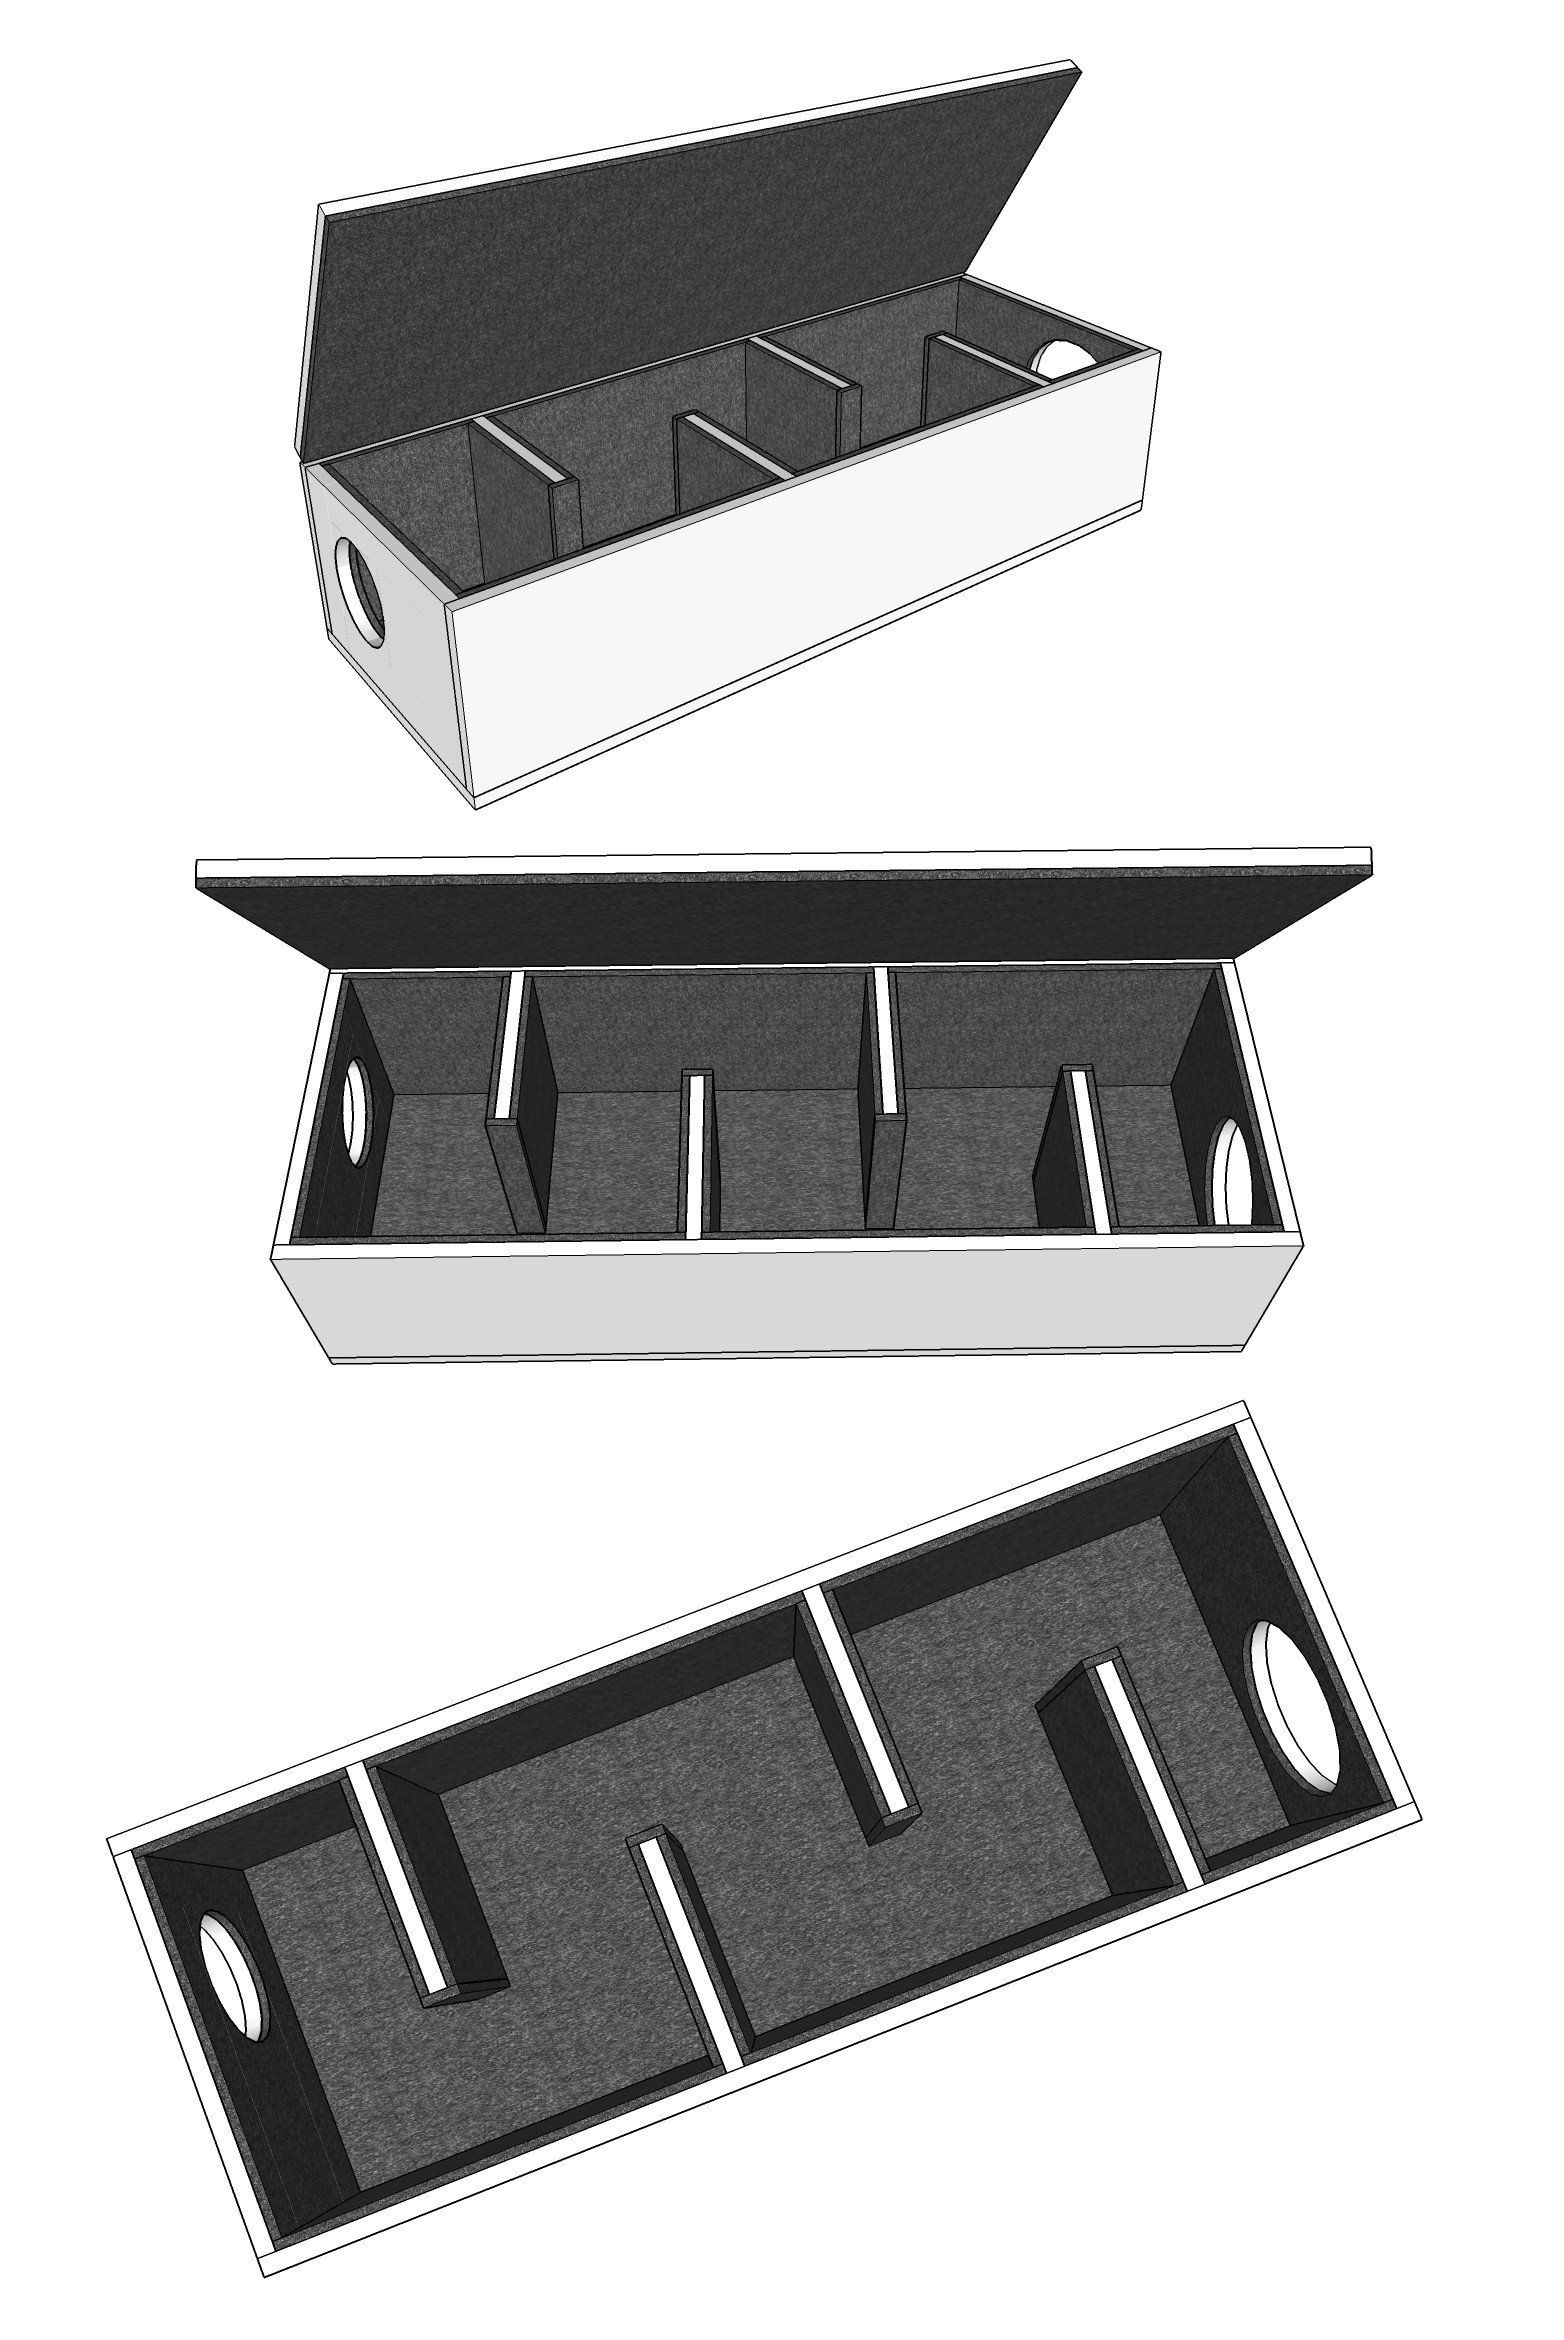
Of course, cutting a hole in your wall for a vent will allow sound to leak out. Our acoustic vent has a layer of absorption material inside to absorb some of the sound passing through. You can go a step further by building an acoustic vent baffle. This forces the air to bounce around a maze type box which is lined with absorbing material. As the air passes through the sound bounces off these surfaces and gets absorbed.
Acoustic Ventilation Comparisons
In this case we didn't need a baffle as the vent opened onto a quiet side of the property and wasn't an issue.
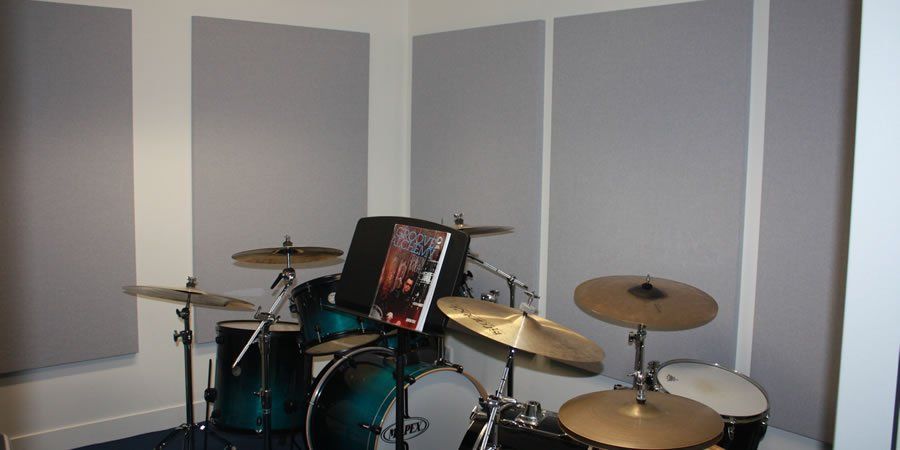
Acoustic Treatment
All the heavy mass loaded materials we have fixed to the ceiling and walls are very reflective for sound waves. This creates a space with a lot of echo which isn't great for a rehearsal or recording space.
We need to acoustically treat the room internally to absorb the echoing, reflecting soundwaves, creating a dryer, cleaner acoustic.
We have a selection of Class A treatment panels which can be fixed to the walls or suspended from ceilings to achieve this. As the ceiling height is already very low, directly fixed wall panels are more practical.
Click here for more info on our
ProSound Absorption Panels .
Summary
The end result here was fantastic. After the installation was complete, our customer set up his kit and proceeded to play. No knock on the door from the neighbour... so he went round to ask if they could hear and they had no idea he had been playing at all.
Top result!
Total cost for soundproofing materials was around £5,000 including VAT and delivery.
The full job took around 2 weeks but with lots of other building works being completed in between. The soundproofing materials alone would have taken up around 5-6 working days with a two man team.
If you have found this blog interesting, why not have a read of some of our other useful blogs.
How To Soundproof A Room -
https://www.soundproofingstore.co.uk/how-to-soundproof-a-room
Soundproofing A Drum Room -
https://www.soundproofingstore.co.uk/soundproofing-a-drum-room
Sound Absorption -
https://www.soundproofingstore.co.uk/sound-absorption1
Share
Need Help?
"We don’t expect you to become an overnight expert in soundproofing, that’s what we’re here for."